5 Minute Photoshop Edit for Underwater Photographers
by Andy Davis, PADI TecRec, ANDI, BSAC and SSI Instructor
Many divers don’t have the luxury of using underwater strobes to provide effective directional lighting for their underwater photography. With a basic point-and-shoot underwater camera, the resulting pictures are often washed-out and contain too little red light. When the in-built flash on a compact camera is used, it has a very limited range (1-4ft) and the light will be reflected from any particles suspended in the water (called ‘backscatter’). This will result in distracting white spots all over the photo. [no_toc]
I utilise Photoshop CS5 to remedy these problems, using a simple 5 minute edit to color correct the photos, providing a more natural lighting, and to remove the backscatter. This edit often makes a drastic improvement to the quality of the photo.
It’s important to ensure that your original photo is properly white balanced at the time of taking the photo. This gives you more to work with at the time of editing. Likewise, if your camera takes RAW photos, then use that format for your editing, as it gives your photo editing software far more information to work with.
Step 1 – Importing and Saving Photos
Your first step is to download and save your photos from your camera’s memory card. Once I’ve downloaded the photos to my hard-drive, my first step is always to back-up the files onto a portable hard-disk. I will then review and assess my photos, to determine the ‘keepers’. Where a photo needs improvement, I will open it with Photoshop CS (I use CS2) and begin a quick edit.
Step 2 – Open and Save a Working Copy
Having opened the photo, my first action is to save a working copy of the photo. I will create a new folder on my hard-drive, where all my working photos are stored. At this stage, I will rename the photo. For this demonstration, it is called ‘Bumphead Processing 1’.
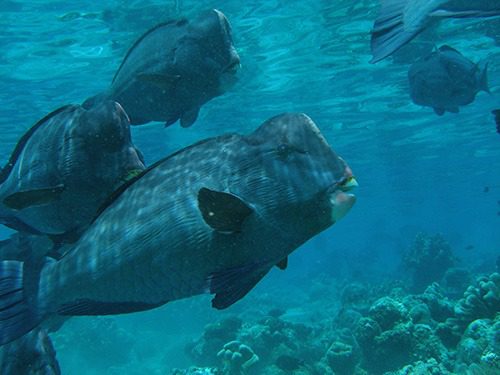
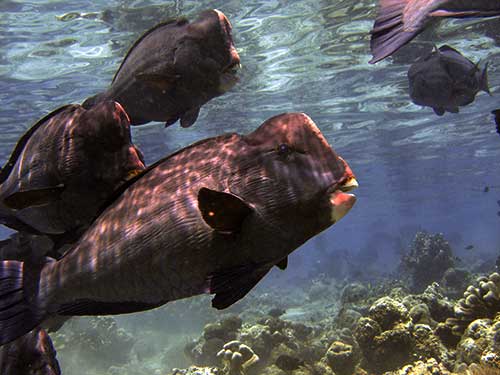
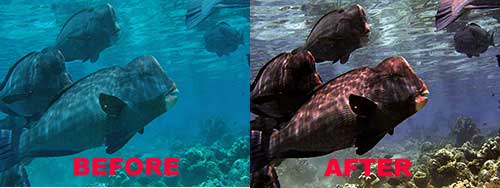
As you can see, this photo has a very blue cast – with little red color. There is also a large amount of floating sand particles that distract from the subject.
The photo was taken in clear water (Sipidan, Malaysia) at a shallow depth (5m) and no strobes/flash was used.
Step 3 – Removing Backscatter
To remove the particles/backscatter, I first create a copy layer. To do this, go to the Layer menu. Select Create Duplicate Layer.
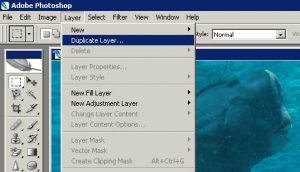
I then enter the ‘Filter‘ menu and select Noise, and then select Dust&Scratches. This opens an adjustment and preview box. Using that box, I will adjust the Radius setting, until the preview shows that all the particles/scatter has been ‘blurred’ away. I do not adjust the Threshold setting (set at 1). Click Ok.
- Selecting the Dust and Scratches filter
This applies the Dust & Scratches filter to the whole photograph, which makes it appear blurred. To recitify this, and use the filter to specifically target/isolate the particles, I now use the History Brush function.
The next step is to go to the History menu. In this menu, check the box next to Dust & Scratches. This creates a ‘history state’. I then select the previous action in the menu – Duplicate Layer. This selection
takes us back to the previous stage in the editing process.
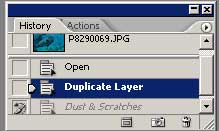
Select the History Brush icon ![]() from the palette menu. A new brush menu appears at the top of the screen. In this menu, I select Mode and choose Darken.
from the palette menu. A new brush menu appears at the top of the screen. In this menu, I select Mode and choose Darken.
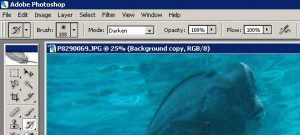
This selection ensures that the History Brush will only apply the Dust and Scratches filter to remove light colored particles (radius set at 5 pixels). It won’t effect darker colored pixels. I then select an appropriately sized Brush (to set this, just right-click and use the slider to set the brush size). Use the History Brush to remove all of the annoying particles in your photo.
Here is the Backscatter Removed photo:
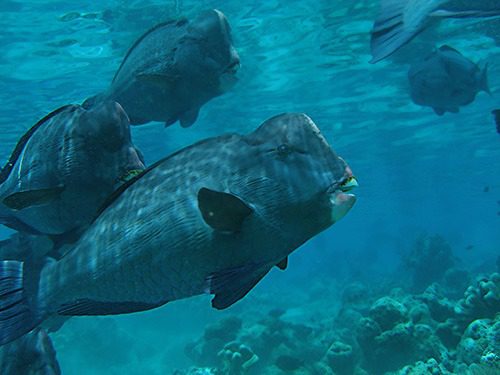
Now save the photo at this stage, to preserve the changes you have made. I have saved the Photo as ‘Bumphead Processing 2’.
Step 4 – Resolve Focus/Blue with Unsharp Mask
If your image is a little blurry or out-of-focus, you can now attempt to improve the clarity.
My first action is to create a new duplicate layer. To do this, go to the Layer menu. Select Create Duplicate Layer. I then enter the ‘Filter‘ menu and select Sharpen, and then select Unsharp Mask. This opens an adjustment and preview box.
To make selective sharpness adjustments select a preview area on the photo that shows lots of detail. In this example, I am previewing the fish’s eye. Set Threshold at 1. Adjust/raise the Radius until you can see improvement in the crisp detail on the fish. Slide the Amount to fine-tune the effect.
The next step is to go to the History menu. In this menu, check the box next to Unsharp Mask. This creates a new ‘history state’. I then select the previous action in the menu – Duplicate Layer. This selection takes us back to the previous stage in the editing process.
Select the History Brush icon ![]() from the palette menu. A new brush menu appears at the top of the screen. In this menu, I leave Mode as Normal. I then select an appropriately sized Brush (to set this, just right-click and use the slider to set the brush size). Use the History Brush to ‘paint in’ any areas of higher sharpness that you want. In this example, I added some sharpness/detail resolution to the eyes and fins of the central parrotfish in the photo. This adds some depth and definition.
from the palette menu. A new brush menu appears at the top of the screen. In this menu, I leave Mode as Normal. I then select an appropriately sized Brush (to set this, just right-click and use the slider to set the brush size). Use the History Brush to ‘paint in’ any areas of higher sharpness that you want. In this example, I added some sharpness/detail resolution to the eyes and fins of the central parrotfish in the photo. This adds some depth and definition.
Step 5 – Improve the Color
Now we can start on the color improvement stage. This will help to remove the blue ‘cast’ typical in most underwater photos, helping to restore a more natural and vivid color tone to the photo.
1. Channel Mixer
My first step is to go into the Layer menu. Select New Adjustment Layer. On the drop-down menu, then select Channel Mixer. Select ‘Ok‘ to save this layer. This opens a new adjustment box.
The Channel Mixer allows Photoshop to ‘transfer’ color/pixel information from one color (red, green or blue) into another color. The photo is missing red color (as most underwater photos do). To improve the red spectrum of lighting, just experiment with raising either the green or blue values. If you raise one value, you must decrease the other (i.e. raise green, decrease blue) to prevent over-saturation.
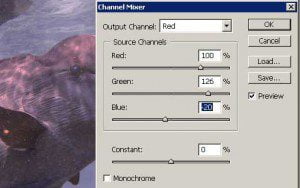
This is a process of experimentation for each photo, but you will get quick with predicting the necessary adjustments as you practice more.
For the Bumphead Parrotfish photo I have raised the Green Channel to 125% and reduced the Blue Channel to -20%.
This adds a lot of warmth and a more natural color spectrum to the photo, although it does look slightly ‘pink’ at this stage.
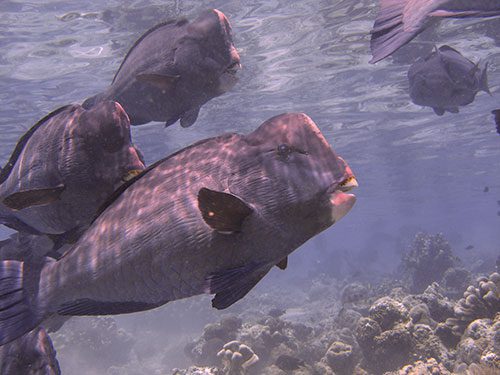
Save the photo again, using a new stage filename (i.e. Bumphead Process 3) to preserve your work.
2. Levels Adjustment
The next stage is to create a Levels Adjustment Layer. Again, go into the Layer menu. Select New Adjustment Layer. On the drop-down menu, then select Levels. Select ‘Ok‘ to save this layer. This opens a new adjustment box.
Using the drop-down menu in the box, adjust the Red, Green and Blue levels to balance the color. You do this by dragging the ‘stops’ in until they touch the outer edge of the histogram at each side. Fine-tune the overall effect using slight adjustments to the mid-point stop.
Sometimes ‘autolevels’ works fine – but on this pic, because of the sharp histogram and the channel mixing, I had to get creative and experiment to get a better output.
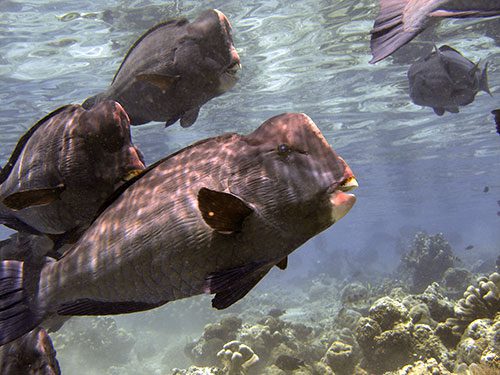
You can see that dramatic difference made to the color spectrum of the photo. I save this as ‘Bumphead Process 4’.
3. Hue and Saturation
Whilst the photo now looks pleasing, you can tweak it further using a Hue and Saturation layer.
Go back to the Layer menu. Select New Adjustment Layer. On the drop-down menu, then select Hue/Saturation. Select ‘Ok‘ to save this layer. This opens a new adjustment box.
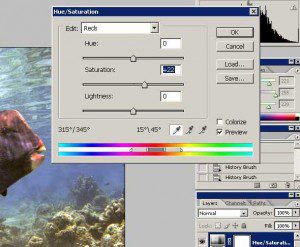
In the adjustment box, go through each color option individually and adjust the saturation setting and the lightness to give a pleasing effect. Then go to the Layer menu ..and adjust the setting from Normal to Multiply. This will make the image very dark (it increases the pixels). To compensate for this, reduce the Opacity setting. Slide it down from 100% until the photo is sufficiently light. It gives a crisper and deeper image.
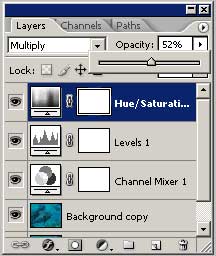
In my example, I have reduced the Opacity to 52%.
Step 6 – Brightness / Contrast
Now, a final tweak on the brightness and contrast of the photo.
Go back to the Layer menu. Select New Adjustment Layer. On the drop-down menu, then select Brightness/Contrast. Select ‘Ok‘ to save this layer. This opens a new adjustment box.
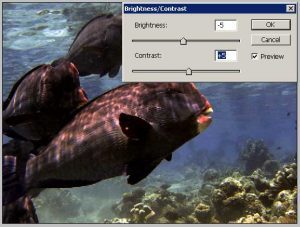
Spend a short while adjusting the sliders for both brightness and contrast, to experiment and see if you can improve the image. In this example, I have decreased the brightness to -5% and increased the contrast to 5%.
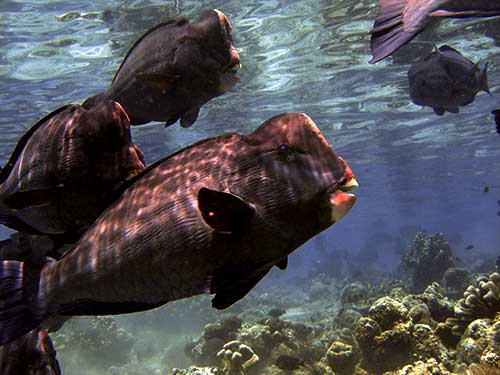
Save the photo again, with a new filename to preserve your changes.
Step 7 – Trim, Size and Save
You may now wish to crop the photo to change the composition and/or removed unwanted or surplus background. Use the Rectangular Marquee Tool to designate the area you want to keep, then go to Image – Crop to cut the image down.
If your cropped image is too small… you can increase the size slightly. Go to Image – Image Resize and adjust it larger. I opt for Resample Image: Bicubic Sharper. I then save the picture at max resolution…
Step 8 – Save for Web
I assume that you will want to publish the photo onto an online album or share it on Facebook. For online photos, you can use Photoshop to compress the picture for fast uploading and viewing. Simply go to the File menu and select Save for web. On the following pop-up menu, ensure that you select JPEG and then choose an appropriate quality of compression size.
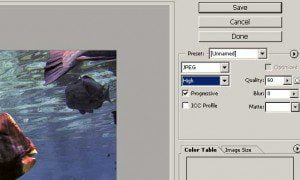
Unless I have strict limitation on my upload/online storage, I will use the highest compression that does not significantly impact on the crispness of the photo. On the Compression Quality drop-down box, select High and notice the quality of the photo in the preview. Then select Medium. Again, inspect the quality. Keep moving down the options until you reach the Compression Quality option that provides a decent picture, with the smallest size. Click Save and then provide a new filename for the photo (i.e. Bumphead Web Complete).
Step 9 – Upload and make your friends jealous!
There you have it! A quick 10-step process that can make a dramatic improvement to the quality of your otherwise washed-out, blue photographs. With a little practice, this process will become very instinctive and should take less than 5 minutes per photo.
Here is the final comparison.
I hope that this mini-workshop helps you create more fabulous photos on your dives!
Check out the Scuba Tech Philippines website, for details of our diving and underwater photography courses.
Originally posted 2011-06-01 16:32:43.


