Equalization Made Easy: Pro Tips & Techniques for Great Diving!
Embarking on a scuba dive is an exhilarating experience, but without proper equalization, it can quickly turn into a frustrating and uncomfortable ordeal. That’s why mastering the art of equalization is crucial for every diver. This comprehensive guide aims to make equalization easy and ensure you don’t suffer more frustration.
As a full-time technical diving instructor for over a third of my life, the ability to reliably equalize is critical to my success in work. With decades of professional experience, and over ten thousand dives, I have had to find the best solutions available. This article share that information.
Before you even dip your fins in the water, there are effective pre-dive techniques that go beyond what’s found in traditional diving manuals or taught by many instructors. These special tips, often overlooked but highly effective, hold the key to reliable equalization. By implementing these strategies, you’ll significantly reduce the chances of ruined dives or potential injuries
Learn how to equalize reliably, some ideas that make it easier, and the six different methods for equalizing you can try. Each diver is unique, and understanding these diverse techniques will enable you to discover the most effective approach that suits your physiology and diving style. No more frustration or uncertainty—find the perfect method that works for you and ensure seamless equalization on every dive.
Here are the key points in the article:
Pre-dive techniques: Unlock a treasure trove of special tips, not commonly taught, that significantly enhance equalization, making your overall diving experience extraordinary.
Effective equalization on the descent: Dive into our arsenal of techniques specifically designed to empower novice divers, enabling them to conquer common challenges and enjoy a comfortable descent.
The six methods for equalizing: Explore and embrace the variety of techniques available, empowering you to discover the one that harmonizes with your unique physiology and personal diving preferences.
With these expert insights and practical advice at your disposal, you’ll embark on each dive with confidence, experiencing effortless equalization, and relishing in the breathtaking underwater realm.
Remember, like any skill, equalization improves with practice, so keep honing your techniques and prepare to dive deeper into the awe-inspiring wonders that await you beneath the surface.
Equalizing is an essential part of scuba diving, as it helps to balance the pressure between your ears and the surrounding water.
If you don’t equalize properly while diving, you can experience a range of uncomfortable and potentially dangerous symptoms. These can include:
Ear pain
Dizziness
Vertigo
Ruptured eardrums
Hearing loss
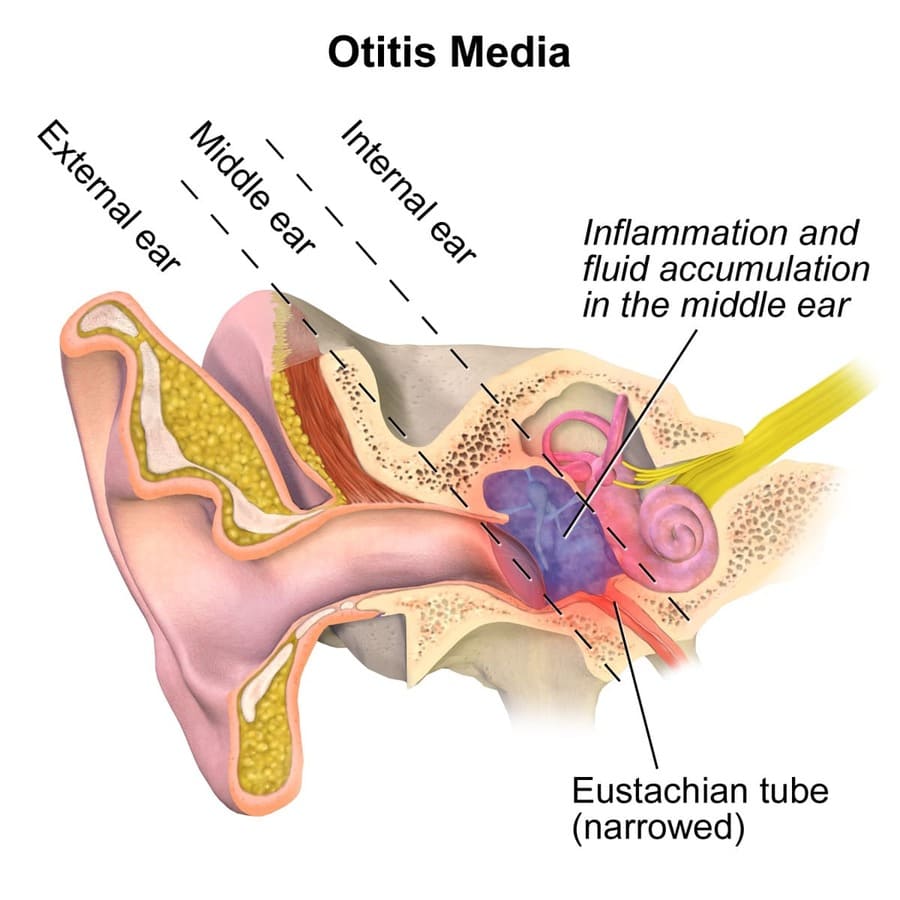
In severe cases, failing to equalize can lead to middle ear or sinus barotrauma. This is a serious injury caused by the difference in pressure between the air inside your body and the surrounding water.
Therefore, it is crucial to learn proper equalization techniques and to always take the time to equalize frequently during a dive.
Sponsored Link
Understand Why You Cannot Equalize
There are three primary reasons why a diver may face difficulty equalizing upon descent.
Eustachian Tube Mucus Blockage
First, blockage of the Eustachian tubes can occur due to mucus forcing its way into the tubes or sinus inflammation, often resulting from a head cold.
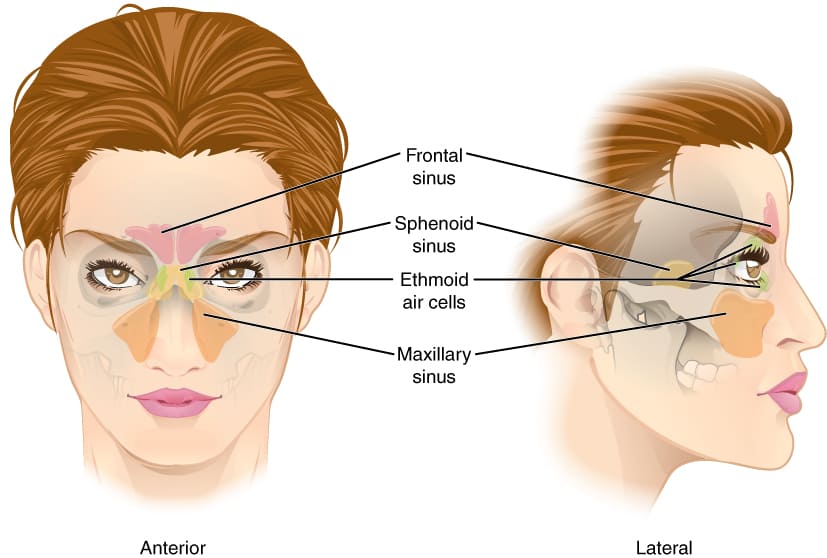
Secondly, the sinus cavities in your forehead and cheeks may be inflamed. This can prevent air from moving into sinus spaces to allow equalization. Inflamed sinuses can occur as a result of a cold or an ear infection, such as Otitis Externa. In these cases, the pain will be felt in the sinuses themselves, not the ears.
Lastly, increasing water pressure on the descent can close off the Eustachian tubes if the diver fails to equalize proactively. In such cases, it is advisable to ascend slightly and attempt equalization again. Repeat the process until successful equalization is achieved.
Key Points:
Blockages and closed Eustachian tubes are common reasons for the inability to equalize.
Ascend slightly and try again if unable to equalize.
Pre-Dive Preparation For Equalization
To reduce the chances of a block during your descent, it’s essential to begin preparing your ears before you dive.
Never Blow Your Nose: The ‘Snort and Spit’ Method
If you are slightly congested before diving, avoid blowing your nose. Blowing your nose can force mucus into your Eustachian tubes, hindering equalization during the dive.
Instead, use the “snort and spit” method to remove mucus from your nose and sinuses. This method creates an under-pressure that helps suck the mucus from the Eustachian tubes.
Always clear out your sinuses with the “snort and spit” technique before attempting any equalization method, even as a pre-dive preparation.
Key Points:
Avoid blowing your nose before diving.
Use the “snort and spit” method to clear sinuses.
Saline Flush
To ensure reliable equalization, use a saline flush on your sinuses before diving. Nasal saline sprays available at most pharmacies can help loosen and remove mucus. Perform repeated saline flushes over the days and hours leading up to your dive.
Key Points:
Use nasal saline sprays to flush sinuses.
Perform repeated flushes before diving.
Saline Flush with a Neti Pot
A Neti Pot is a simple and effective tool for nasal irrigation that can help relieve sinus congestion and promote clearer breathing.
Prepare the solution: Mix a saline solution by dissolving 1/4 to 1/2 teaspoon of non-iodized salt in 8 ounces of warm distilled or previously boiled water. Ensure the water is at a comfortable temperature, neither too hot nor too cold.
Position yourself: Stand over a sink or in the shower and tilt your head slightly forward.
Fill the Neti Pot: Pour the prepared saline solution into the Neti Pot, holding the spout securely with your finger to prevent leakage.
Insert the spout: Gently insert the spout of the Neti Pot into one nostril, creating a seal to prevent the solution from escaping.
Begin irrigation: Tilt the Neti Pot to pour the saline solution into your nostril. Breathe through your mouth to allow the solution to flow out of the other nostril. Maintain a relaxed breathing pattern throughout the process.
Allow the solution to drain: Let the saline solution flow through your nasal passages and out of the opposite nostril. Avoid swallowing the solution; instead, allow it to pass out of your mouth or the other nostril.
Repeat the process: Switch nostrils and repeat the process with the remaining solution, ensuring both nasal passages are adequately flushed.
Cleanse and dry: After using the Neti Pot, rinse it thoroughly with distilled or previously boiled water. Allow it to air dry completely before storing it in a clean, dry place.
Note: It’s important to use sterile water and keep the Neti Pot clean to avoid introducing bacteria or other contaminants into your sinuses. If you experience any discomfort or have specific medical concerns, consult a healthcare professional before using a Neti Pot.
By incorporating Neti Pot nasal irrigation into your routine, you can effectively clear your sinuses, alleviate congestion, and promote better breathing.
Key Points:
Remember to follow proper hygiene practices
Consult a healthcare professional if you have any concerns or persistent symptoms.
Use a Camphor and Menthol Inhaler
Before diving, consider using a Camphor and Menthol inhaler, such as Vicks tube, to open up your sinuses. While this method is not a solution for congestion during the dive, it can facilitate mucus removal as a pre-dive routine when combined with other methods mentioned.
Recap:
Camphor and Menthol inhalers can open up sinuses before diving.
Use in combination with other pre-dive preparation methods for optimal results.
By avoiding these mucus-causing or mucus-thickening foods, you can create a healthier diet that promotes clearer airways and a more comfortable diving experience.
Key Points:
Certain foods increase mucus production.
Avoiding those foods will help avoid equalization problems.
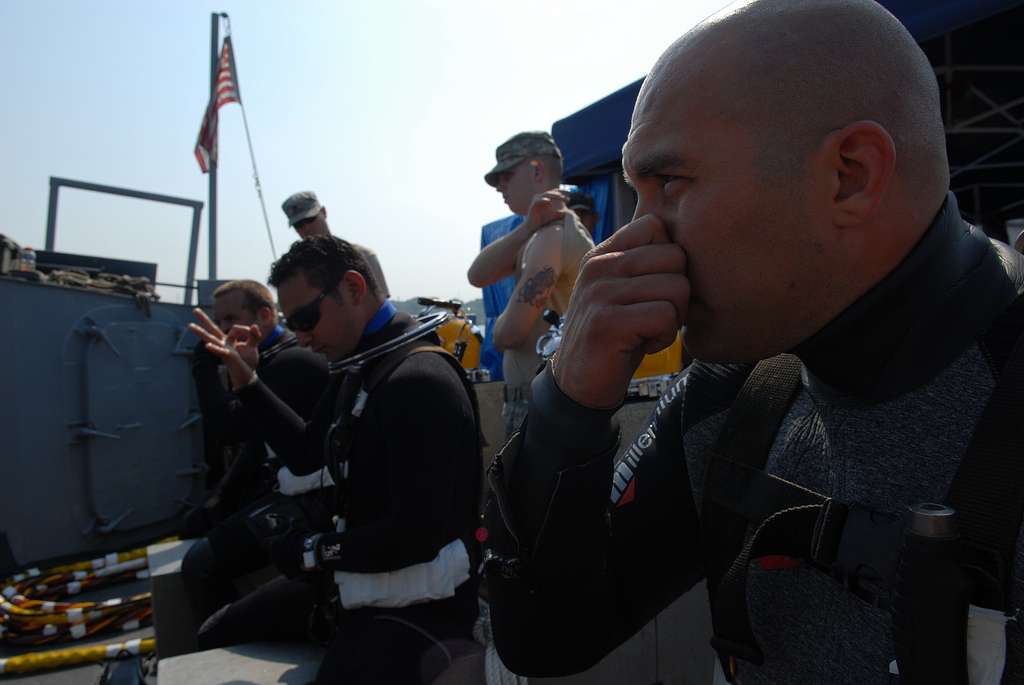
Pre-Pressurize Your Ears
Gently equalizing your ears before entering the water is a practice known as pre-pressurizing. This prepares your ears for the upcoming dive. Chewing gum before and between dives can also be helpful.
Key Points:
Equalize your ears before the dive.
Practice pre-pressurizing by gently equalizing a few times before entering the water.
Chewing gum pre-dive can assist in equalization.
US Navy divers pre-pressure their ears before diving to make equalization easier on descent
Listen for the “Pop”
When performing pre-pressurization, ensure that you can hear a “pop” or “click” in both ears when you swallow. This sound indicates that both Eustachian tubes are open, allowing for proper equalization.
Key Points:
Swallow and listen for a “pop” or “click” in both ears.
Ensure both Eustachian tubes are open.
Equalize at the Surface: Pre-Dive Equalization
Equalizing at the surface before descent, also known as pre-equalization, helps open up the Eustachian tubes and prepares your ears for equalizing during the dive.
Key Points:
Equalize at the surface before descending.
Perform pre-equalization to open up the Eustachian tubes.
Best Techniques for Equalization on Descent
Once you’ve prepared and cleared your ears using the pre-dive methods already described, you will find the job of equalizing on descent much easier. However, there are also some in-water techniques that help you achieve success more reliably.
Equalization: Gently and Frequently
During descent, it’s important to equalize very gently. Forceful equalization can lead to inflammation in the middle ear or fluid filling the Eustachian tubes, resulting in muffled hearing after the dive. Instead, equalize softly every few inches of your descent, before pressure is felt.
Key Points:
Equalize gently to avoid middle ear inflammation.
Equalize little and often during descent.
Conduct a Descent Stop
As you initially descend, conduct a brief stop at a depth of 5m/16ft. Become neutrally buoyant and allow some time for your ears to equalize. You can use this time to briefly check your scuba gear for leaks (bubbles will be evident) and that everything is functioning correctly. Descent stops also help ensure better coordination with your diving buddy, preventing separations on the descent.
Some dive training agencies teach descent stops as a standard protocol, but others don’t bother. Regardless of your certification agency, this technique is worth considering in dive plans.
Key Points:
Stop and get neutrally buoyant at 5m/16ft on descent
Use this time to check your gear and equalize your ears.
Sponsored Link
Six Common and Less Common Equalization Techniques
If one equalization technique does not work for you, don’t get discouraged. There are various alternative equalization methods you can try. Here are a few common and less common techniques:
1. Valsalva Maneuver
The Valsalva maneuver is the most common equalization method. Pinch your nose shut or close your nostrils against your mask skirt and gently blow through your nose. This technique helps open the Eustachian tubes and equalize the pressure in your ears.
2. Toynbee Maneuver
The Toynbee maneuver involves swallowing while pinching your nostrils closed. This technique helps open the Eustachian tubes and equalize the pressure in your middle ear.
3. Lowry Technique
The Lowry technique combines the Toynbee and Valsalva maneuvers. Pinch your nose shut, swallow, and then blow gently against your pinched nose while swallowing. This technique can be effective for equalizing your ears.
4. Voluntary Tubal Opening
Tensing the muscles of the soft palate and throat while pushing the jaw forward, side-to-side, and down is known as voluntary tubal opening. This technique can help open the Eustachian tubes and facilitate equalization.
5. Frenzel Maneuver
The Frenzel maneuver involves clenching the jaw tightly while pressing the tongue against the soft palate. This technique helps control the airflow and pressure during equalization.
6. Edmonds Technique
The Edmonds technique combines the Valsalva maneuver with a “yawn.” It involves a combination of jaw movement, tongue placement, and blowing through the nose. This technique can be effective for equalizing your ears.
Key Points:
Valsalva, Toynbee, Lowry, Voluntary Tubal Opening, Frenzel, and Edmonds are common equalization techniques.
Experiment with different techniques to find what works best for you.
Be Cautious About Using Decongestants
Using off-the-shelf decongestants can be problematic for divers. If the decongestant ceases to be effective at depth and congestion returns, you may be unable to equalize on the ascent, leading to a reverse block. As ascending with a reverse block can be considered an emergency, it’s important to exercise caution.
In the worst-case scenario, a diver may be forced to ascend and suffer a hyperbaric injury to their ear. Therefore, it’s recommended to consult with a medical professional and know the potential risks before using decongestants during diving.
Another issue that can result from certain decongestants is the side effects underwater. The effects of medications can be amplified when under greater pressure. This is especially relevant to ‘anti-drowsy’ decongestants that contain Pseudoephedrine; as this can be a powerful stimulant.
Recap:
Exercise caution when using decongestants for diving.
Consult professionals to understand the potential risks.
Learn Effective Equalization For Diving
Mastering the art of equalization is the key to unlocking the full potential of your scuba diving adventures. In this comprehensive guide, I have shared pro tips and techniques that will make equalization easy and ensure you have a great diving experience every time.
Before you even enter the water,I have revealed pre-dive techniques that go beyond the traditional diving manuals. These insider tips will give you an edge, allowing for more reliable equalization and minimizing the risk of missed dives or injuries.
Once you’re descending into the depths, I have described the most effective techniques for equalizing. Specifically tailored for novice divers, these tips will help you overcome common struggles and ensure a smooth equalization process.
Moreover, I have outlined the six different methods for equalizing. By understanding and practicing these techniques, you’ll be able to identify the most effective method that suits your unique physiology and diving style.
In summary, here are the key points to remember:
Pre-dive techniques: Explore special tips that aren’t commonly taught but can greatly improve equalization, enhancing your overall diving experience.
Effective equalization on the descent: Discover techniques specifically designed for novice divers to overcome common challenges and ensure a comfortable descent.
The six methods for equalizing: Familiarize yourself with these different techniques to find the one that works best for you, allowing for seamless equalization on every dive.
With these expert insights and practical advice, you’ll have the confidence to equalize effortlessly, enjoy clear ears, and fully immerse yourself in the mesmerizing underwater world. Remember, practice makes perfect, so keep honing your equalization skills and dive deeper into the wonders that await you beneath the surface. Happy diving!
Remember to consult with professionals and always prioritize your safety while diving.
About The Author
Andy Davis is a RAID, PADI TecRec, ANDI, BSAC, and SSI-qualified independent technical diving instructor who specializes in teaching sidemount, trimix, and advanced wreck diving courses.
Currently residing in Subic Bay, Philippines; he has amassed more than 10,000 open-circuit and CCR dives over three decades of challenging diving across the globe.
Andy has published numerous diving magazine articles and designed advanced certification courses for several dive training agencies, He regularly tests and reviews new dive gear for scuba equipment manufacturers. Andy is currently writing a series of advanced diving books and creating a range of tech diving clothing and accessories.
Prior to becoming a professional technical diving educator in 2006, Andy was a commissioned officer in the Royal Air Force and has served in Iraq, Afghanistan, Belize, and Cyprus.
Scuba Diving Anxiety & CO2 Narcosis Did you know that scuba diving anxiety can arise from CO2 narcosis? Learn why descent speed, gas density & exertion can affect your dives!
How Deep Can You Dive Using Air? There are three governing factors which determine how deep can you dive using air. Understanding those factors promotes safe gas selection.