The Lost Guideline Search Procedure in Advanced Wreck Diving
Advanced wreck diving is a challenging, yet immensely rewarding activity that requires divers to thrive within the hazardous complexity of shipwrecks. While advanced wreck divers undergo highly-specialized training to master a plethora of life-preserving techniques and protocols, one of the most important skills is the lost guideline search procedure. In this article, I will delve into the significance of this skill and the best practice step-by-step procedure for successfully relocating a lost guideline.
Advanced wreck divers lay a guideline to ensure that they can safely exit the wreck. It is their confirmed route back to open water and the ability to ascend to the surface. The consequences of losing that guideline can be fatal.
If a wreck diver loses the guideline, they risk becoming inexorably disoriented, or blinded by silt out, and may not be able to find their way out of the wreck.
Additionally, searching for a lost guideline can be time-consuming and mentally exhausting due to stress. This, in turn, can result in a diver’s gas supply becoming quickly depleted whilst still lost inside the wreck.
Sponsored Link
How do advanced wreck divers lose the guideline?
There are three essential reasons why an advanced wreck diver may lose the guideline when penetrating a shipwreck:
Impaired situational awareness
The advanced wreck diver may be distracted or task loaded to the extent that their situational awareness becomes critically degraded. With impaired situational awareness, they may distractedly blunder away from the guideline, inadvertently taking a wrong turn that makes the guideline unobservable.
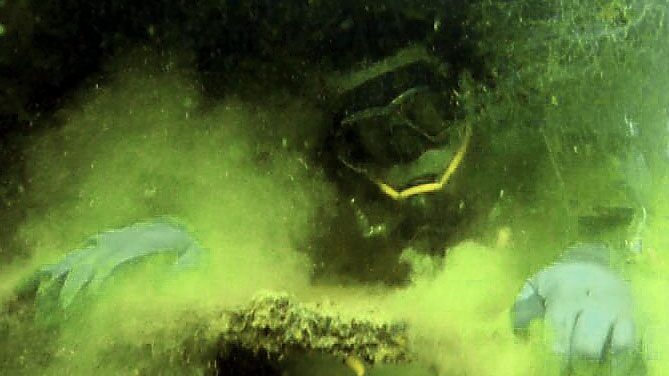
Failure to contact the guideline in a silt out
In the confined spaces of a wreck, total silt out can happen within a few seconds. If the wreck diver is too far away from the guideline, or otherwise tardy in making secure contact with it, they will find themselves unable to see it. That counts as being lost from the guideline. With every passing second, they will drift around; moving further away from the line and losing orientation toward it. In zero visibility it can take many minutes to find a guideline that was just beyond arms reach when the silt out occurred.
Losing contact with the guideline in zero visibility
Another common cause for losing the guideline is when the wreck diver unwittingly releases the line whilst traveling along it towards the exit in zero visibility.
Whilst advanced wreck diving courses stress the necessity of maintaining constant contact with the guideline and the teammate in front during low visibility exits, it is surprisingly common that divers make the split-second mistake of momentarily releasing the line to operate equipment, clear a mask or free themselves from a minor entanglement.
Always release contact with your teammate, never the line, if you need to free up a hand to do something. Your teammate should be trained to stop and hold their position until you reacquire contact with them. Because both divers are on the guideline, that is a swift and assured process.
If you let go of the guideline, it can take an inordinate amount of time to find it again, even if you’re still in contact with your teammate. Your buddy will not know you have lost contact with the line; if they maneuver abruptly you can also easily lose contact with them. In zero visibility that constitutes a life-threatening emergency.
Realistic self-confidence in wreck diving
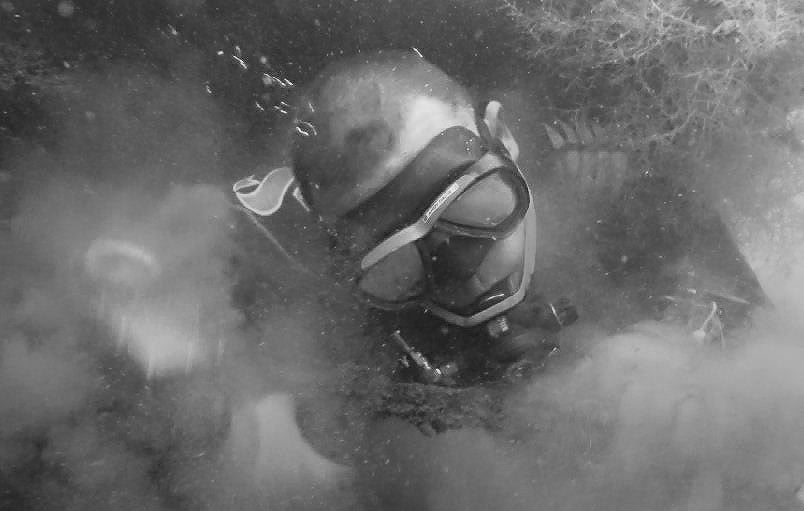
It is very easy to become disorientated inside a wreck; even if you feel an abundance of confidence that you know your exit route. One split-second of doubt is all it takes to shatter that confidence and induce a crushing level of stress. Thereafter, you can be plagued by uncertainty, second-guessing yourself about the path to safety and making flawed judgments that increasingly decrease your odds of survival.
A wreck diver should not consider themselves well-experienced until they have lived through that situation and learned first-hand how quickly and easily a wreck penetration can turn sour. You only realistically understand your cognitive fallibility and the limits of your psychological resilience in a real-life emergency, not just within the inherent safety of training drills.
As an advanced wreck diver, remain conservative in your wreck penetration dives until you have learned the hard lessons necessary to evaluate your ability in real worst-case situations.
Real-life emergencies are not like the carefully controlled drills experiences in wreck training.
Situational awareness: Your best friend in advanced wreck diving
Situational awareness is a critical skill that advanced wreck divers must master to avoid losing the guideline. Lack of situational awareness is one of the primary causes of lost guidelines. As task loading or stress goes up, situational awareness goes down.
Advanced wreck instructors strive to help their students develop muscle memory for the various skills and protocols utilized in wreck diving in order to reduce task loading. As skills and protocols are trained to become unconsciously habitual, task loading decreases and greater detail of situational awareness becomes possible.
Sponsored Link
What Equipment is Needed for the Lost Guideline Procedure?
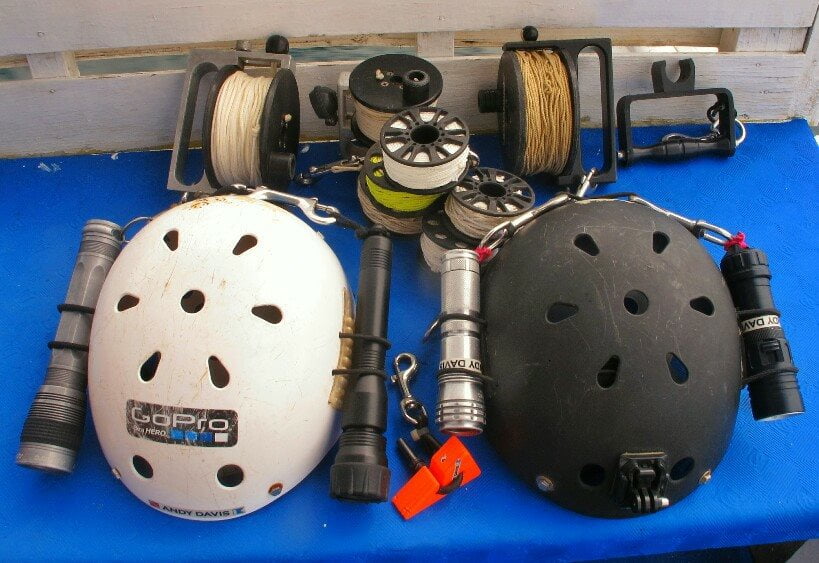
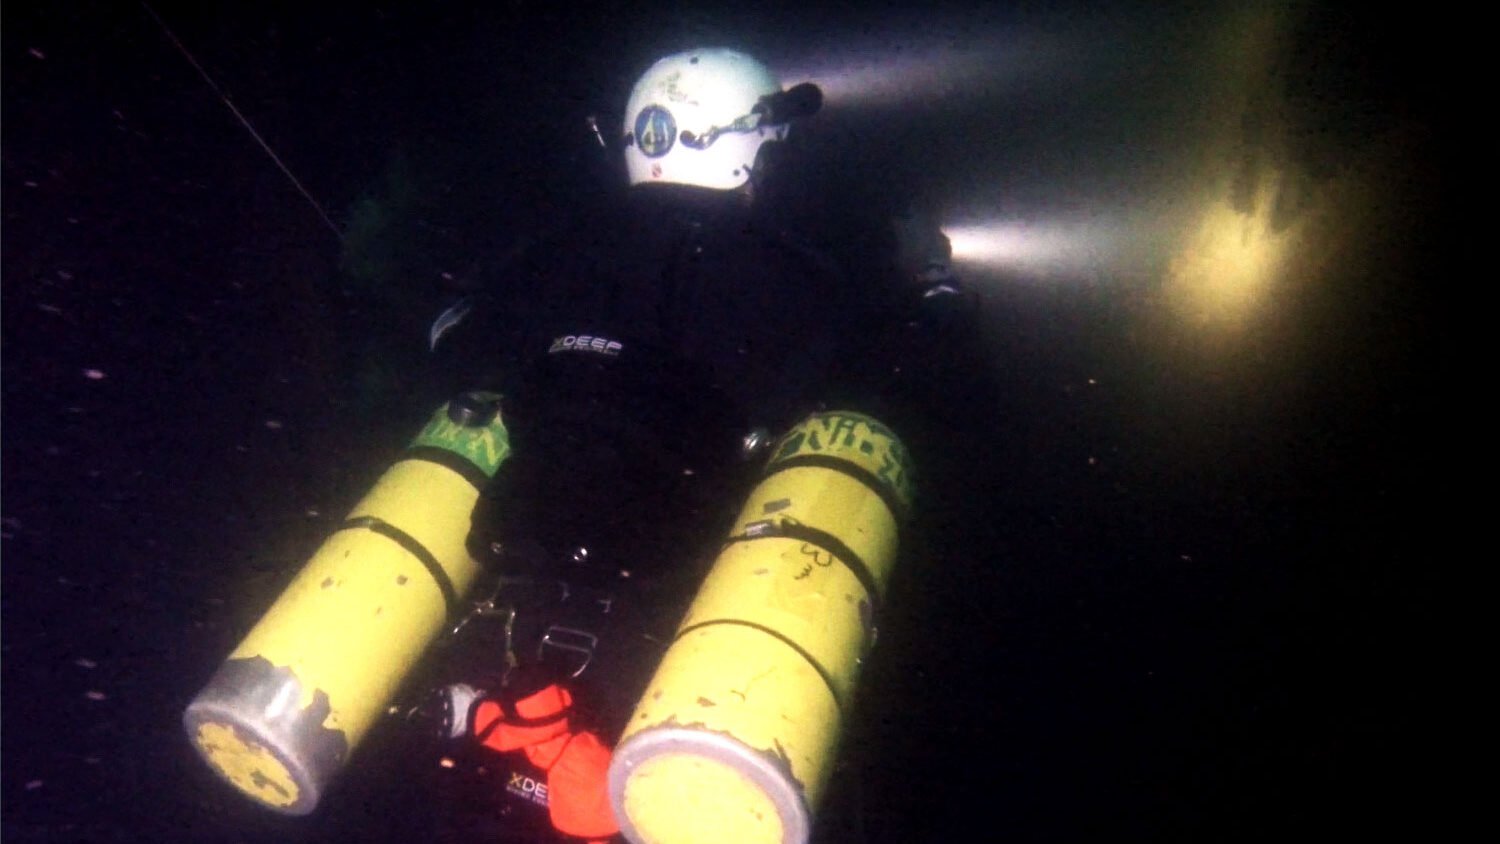
Advanced wreck divers are taught what equipment is needed to mitigate the risks that exist when penetrating wrecks. Amongst all of that extensive and specialized dive gear, the following items are needed to successfully conduct a lost guideline search procedure:
Extensive specialist equipment is required for advanced wreck penetration diving.
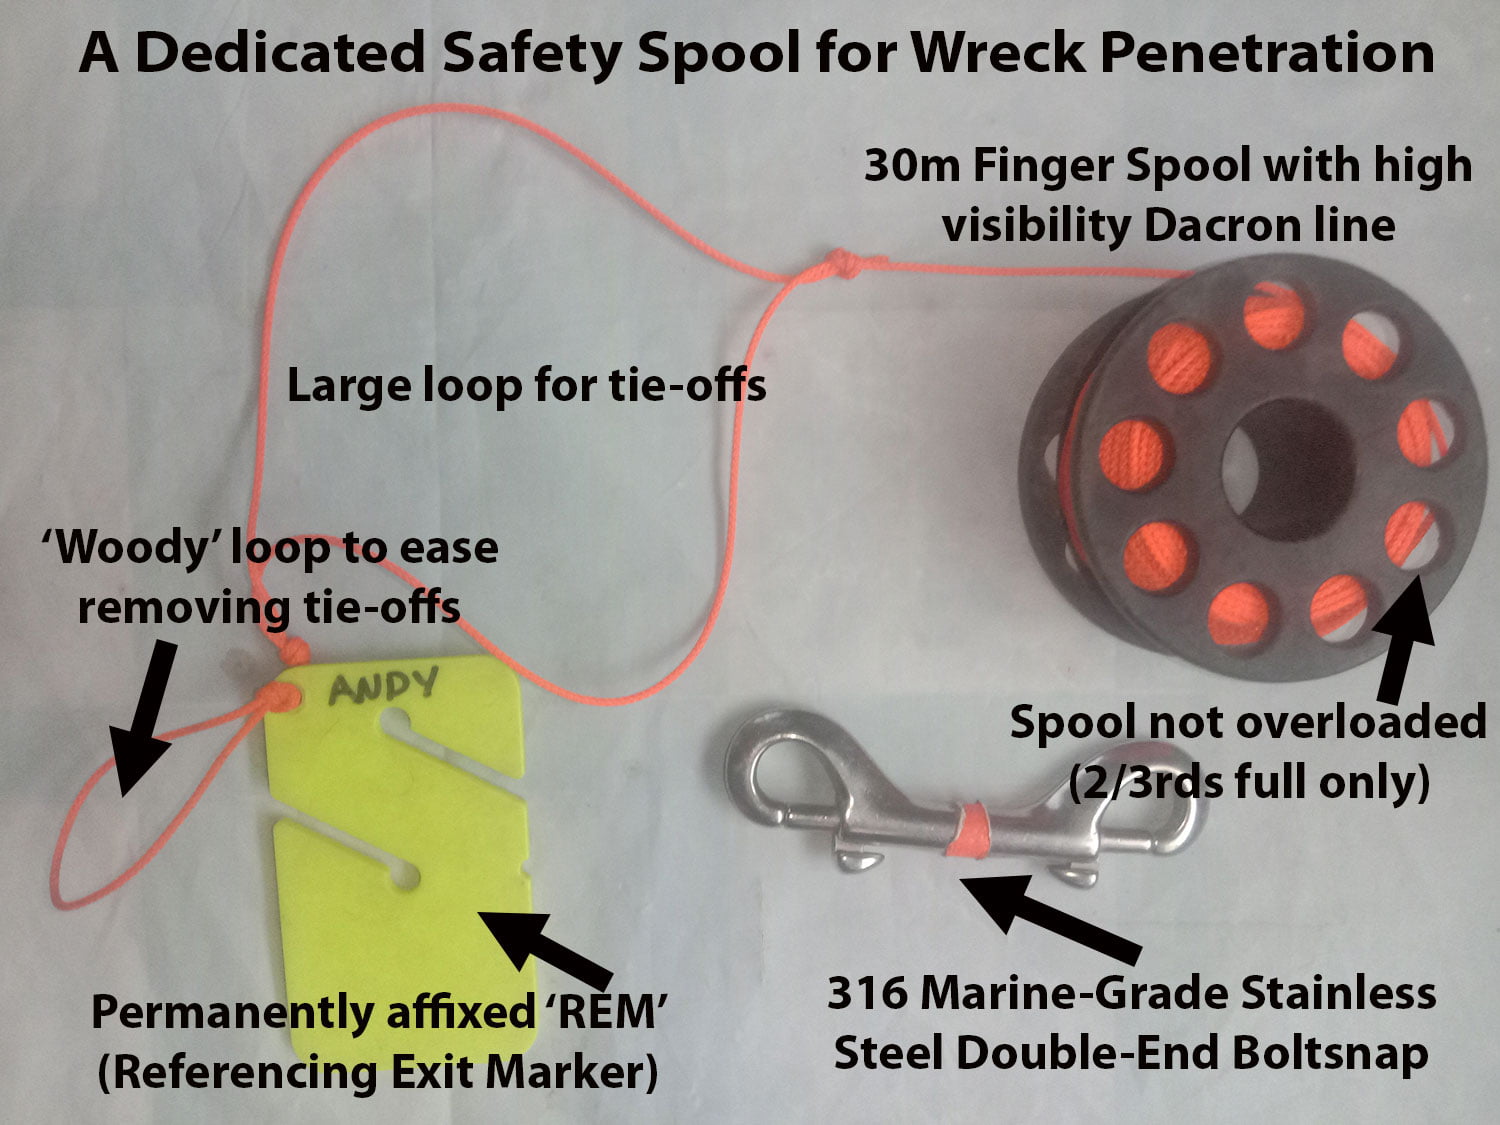
Lost Guideline: Preparing for Survival
Setting up your wreck safety spool for optimal function goes a long way to making the lost guideline procedure quicker and simpler. Speed and ease reduce task loading, stress, and confusion; improving the chances of a successful outcome.
Some advanced wreck instructors recommend carrying two safety spools on each technical-level wreck dive to deploy in case of losing the guideline. Deploying a safety spool when disoriented inside a wreck, and especially in zero visibility, can be immensely stressful. Psychological stress dramatically increases your chances of dropping or tangling your safety spool.
Knot the line for distance measurement
It is also common for advanced wreck instructors to advise knotting the line of the safety spool every 3 meters/10 feet or so. The knots give you a reference to distance, which is very difficult to judge underwater in zero visibility.
Mark the line to add further team safety
Another equipment preparation step is to pre-attach a REM (Referencing Exit Marker) or line arrow to the end of your safety spool line. This simplifies and speeds up the process of attaching your safety spool line to the primary guideline. A REM is particularly useful because, if separated from the team, the diver can write their name and exit time on it when they leave the wreck.
This improves team situational awareness, and thus safety, because your teammates will know to discontinue their own lost diver search for you. It will be apparent that you have already found the line and exited. My own recommended setup for a wreck diving safety spool is illustrated below:
It is ideal to use a safety spool with a different colored line than is used in the primary guideline reel. This helps avoid confusion when you are searching. Even better, each team member can use a different color line on their safety spools. When you have a diver searching for the guideline and teammates simultaneously searching for the lost diver it allows immediate identification of any line that is encountered.
The Lost Guideline Procedure Explained
If you find yourself lost off of the line, it is essential to follow the formal procedure taught in your advanced wreck class.
Become stationary
The first step is to STOP moving to avoid becoming even more lost. If you are in zero visibility, sweep around your immediate area with your hands until you make contact with the wreck. Maintain that contact to prevent yourself from unknowingly drifting further away from the point at which you became lost.
Apply stress management
Once stationary, it is time to apply immediate stress management. You need functional cognition to plan your way out of the wreck, and you must lower your respiratory rate to maximize the time available to save your life. I use a mantra to help achieve this:
“Gas is time, time is life”.
When under stress, I repeat that mantra to remind myself that slow, controlled breathing extends the time I will have available to resolve a diving emergency successfully. The mantra focuses me on my breathing and that, in turn, calms and clears my mind.
I will invest some precious time in stress management because it always pays dividends in preventing further mistakes, extending my gas supply time, and enabling a more effectively reasoned search to be planned.
Sponsored Link
Conduct an initial visual search
Whilst stationary, use your eyes to search for your guideline and your team. The aim is to gather as much useful information as possible.
First, sweep around the area with your primary torch. Inspect your surroundings slowly and methodically. The guideline may actually be visible, but obviously apparent. There may be wreck layout features that you recognize to increase your situational understanding. You may also observe subtle clues that could make your following search more effective; such as disturbed silt or bubbles on the ceiling in one direction, but not others.
In zero visibility a visual search with your primary light may reveal nothing, but your light could be seen by teammates who are simultaneously searching for you. Sweep your light around to maximize the chances that you will be seen.
If lost: stop, look, and listen
If visually searching with your primary light is not fruitful, then you should shield your light and observe the darkness. Allow a few seconds for your eyes to adjust. Look out for your teammates’ lights, or ambient light penetrating into the wreck.
Don’t abandon the drill because you see a light
It is very important to remember that seeing something hopeful during your visual search does NOT mean you abandon the lost guideline procedure.
You can be deceived if you think you see a feature, route, or layout that you recognize.
You could see ambient light entering the wreck, but it may not be a large enough space to exit the wreck.
You may see the lights of your teammates but nonetheless, be utterly obstructed from reaching them on a direct path.
Don’t make knee-jerk judgments
Reflexively blundering toward visual clues can make your situation much worse, taking you further away from your start point and adding much greater complexity to finding a route to safety.
Whether you see your team, a possible exit, or nothing at all, you should always continue the full lost guideline procedure as insurance against survival-reducing errors.
Be forewarned that your mind may powerfully suggest taking the quickest, easiest, and most immediate solution of blundering toward hope. That is a common mental reaction when under stress and scared. It is important to apply self-discipline when your mind tempts you to abandon taught protocols.
Make an audible signal
You may not be able to see the guideline or your teammates, but chances are you will be able to hear them. Sound carries a great distance underwater, even within the confines of a shipwreck.
Use a double-ender boltsnap or your backup torch to tap loudly on your cylinder. Tap slowly three times and pause for twice as long to listen for a reply.
Tap signaling can alert your teammates and ensures that they realize you are lost from the guideline. Whilst you cannot ascertain direction from sounds underwater, you can tell if a sound is getting louder or quieter. That can be a distinct clue as to whether you are searching in the right direction, or not.
In addition to being a search direction indicator, it is also an immense psychological reassurance to know that your teammates are close (and getting closer!).
Create a mental representation of your situation
The next step is to reconstruct in your mind where and when you last saw the line. In good visibility, you may have lost situational awareness and blundered beyond a junction or object inside the wreck that hides the guideline from view. This can entail a larger search area. Whereas in zero visibility, you may have accidentally let go of the line, and it will be much closer to you.
Questions to ask yourself include:
Was the guideline run along the floor?
Was it near the ceiling?
Was it in the middle of the passageway?
What obstructions are around me?
What depth was the guideline at?
What depth am I currently at?
Have I passed through any restrictions since last seeing the line?
Have I taken any turns or changes in direction since last on the line?
What was the wreck layout in general?
Your ability to construct a mental representation of the situation is very much determined by your level of situational awareness as you penetrated the wreck. Develop the mental habit of absorbing and remembering your surroundings whenever you are wreck diving. As you improve this ability, you will observe and recall increasingly more detail whenever problem-solving in emergencies.
Anticipate reduced situational awareness and consciously focus on absorbing the wreck layout.
The layout inside wrecks can vary greatly, and this must direct the search pattern and technique you will use.
Are you in an engine room which is a small space filled with confusing obstructions?
Are you in a passageway that has multiple junctions, stairways, and hatchways into adjacent areas?
Are you within a wide-open space, such as a cargo hold or vehicle deck?
Plan the lost guideline search pattern
Once you have reconstructed in your mind where and when you last saw the line, and what the wreck layout is around you, it’s time to plan a methodical lost guideline search.
Decide upon a search pattern that best fits the area you are lost within. A linear up-and-down search may be optimal for passageways, whereas a large sweeping search may be best for wide-open spaces. In tight, obstructed, spaces, you may have to improvise a less formulaic search pattern that prioritizes not creating a ‘spider’s web’ with your safety spool line.
Common lost guideline search patterns include:
Clock-face search
Use this search pattern in open areas without much depth variation. Assign a direction at 12 o’clock and search extensively in that direction. If unsuccessful, reel in your line and return to your tie-off. Then repeat the process in 3, 6, and 9 o’clock directions.
Linear search
This search pattern is useful if you have taken a wrong turn away from your guideline in a passageway or corridor. Search back along the area and inspect adjoining junctions, holes in bulkheads, and through hatchways.
Sweeping search
This search pattern involves running out a distance of the safety spool line and then sweeping around an area in a circular manner. It is useful for wide-open 3-dimensional spaces with no obstructions to snag your line. Your sweep can be horizontal or vertical, depending on the space you are in. If your guideline is run through the center of an area, there is a chance your sweeping line will trap it as you move around.
Tactile search
In zero visibility you will conduct a fingertip search of your surroundings. In most cases, a zero-visibility touch search will only need to cover a small area, but the process can be very slow.
Plan the limits of your lost guideline search
Search for the lost guideline over a larger area than you consider is necessary because it is common for the distance traveled to feel longer than it actually is; especially when there is no visibility and when stress slows your perception of time.
Also cover as many search directions as possible, as your orientation can easily become confused. It is very easy to become turned around when lost inside a wreck. One of the biggest dangers is that your mind can try and convince you that it knows the way out. That false intuition can cost vital time and, at worst, following it stubbornly can mean you don’t exit safely at all.
Always remember that your mind is fallible and prone to lead you catastrophically astray.
Tie off your safety spool
The safety spool tie-off point needs to be very secure and as prominent as possible. Tug on it to confirm it is reliable. If it detaches whilst you are conducting the search you will be even more lost.
Where possible, add a secondary tie-off near the first. This not only reduces the risk of losing the start point of your search but also gives you some sense of orientation for clock-face search patterns.
Deploying and tying off a safety spool in zero visibility is surprisingly difficult. Practice until it is second nature.
How to search for the lost guideline
Once you have a well-reasoned plan suitable for your situation, it is time to conduct the actual search. Your focus must be on searching diligently and methodically. Be very observant if you have visibility, and be very physically sensitive if you are in a total silt out.
As you conduct the search, remember the maxim:
Slow is smooth, smooth is fast
It is easy to miss a life-saving glimpse of the guideline if you are rushing around and simply fixated on covering distance. Regularly pause to observe and study your surroundings. Consider the surrounding wreck layout and whether there may be obstructions shielding the guideline from view.
Depending upon the search pattern you are using, you may elect to put in tie-offs as you progress. This will prevent the line from getting entangled as you move around.
Lost guidelines searches in zero visibility
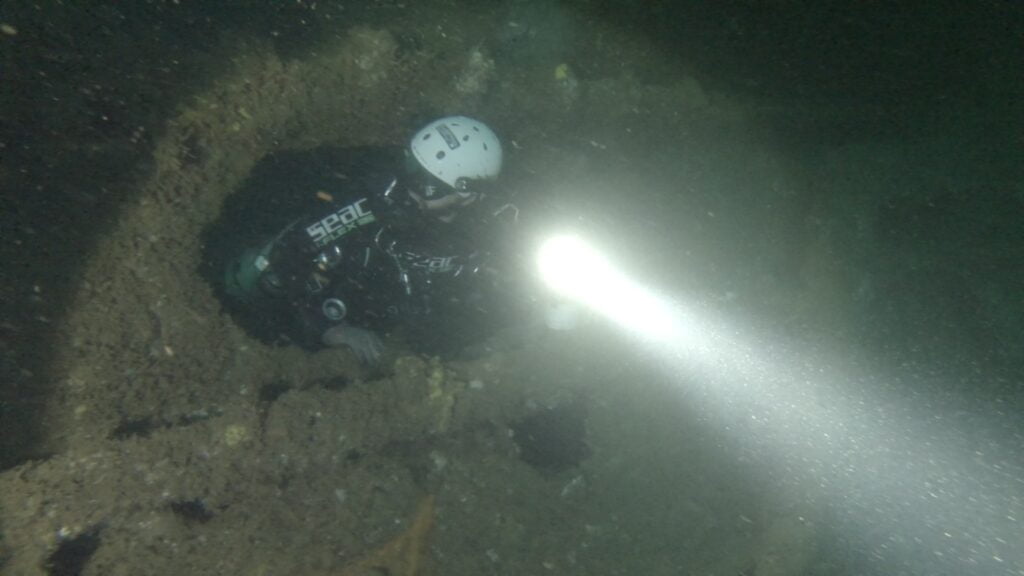
When conducting a lost guideline search in zero visibility it is important to hone your mind to make your whole body as touch-sensitive as possible; you must be attuned to notice the slightest brush or bump against the guideline as you move around. Extend your arms, and legs, as wide as you can to increase the chance of encountering the line.
In zero visibility you will be unaware that you are drifting or changing direction. Keep constant contact with the wreck as you move around. Remember that your perception of time and distance will be warped; search further, and for longer, than your mind tells you is necessary.
As an advanced wreck diver, anticipate that you will encounter zero visibility situations.
The ability to read your gauges
Zero visibility also robs you of the ability to check your instruments. Prepare yourself mentally for the stress of not knowing your gas supply as time progresses.
You also won’t know your depth relative to where the guideline was. Allocate some mental attention to the clues that you will have: your ears and your buoyancy.
If you have unknowingly ascended or descended from the depth of the guideline, the pressure in your ears should give an indication. Do you need to equalize? Have your ears whistled as the pressure decreased? This is high-level situational awareness, so you need to consciously remember that it is a valuable indicator.
Likewise, if you were in neutral buoyancy at the depth of the guideline, has your buoyancy changed? If you have become negatively buoyant, the guideline is probably above you. If positively buoyant, it may be below you.
Your ears can also provide information with respect to hearing sounds. You might hear a teammate tapping their equipment to signal you, hear their exhaled bubbles as they breathe, or fleeting sounds from them bumping and scraping equipment on the wreck.
Being lost inside a shipwreck in zero visibility is one of the most stressful situations that a diver can experience. It will task your stress management ability to the limit.
Practicing wreck skills with a black mask to simulate zero visibility
Even if you have practiced extensively using a blacked-out mask in training, be aware that simulated training cannot represent the severity and intensity of psychological stressors that you’ll face in a real-life, zero visibility, lost guideline emergency.
That stress can be mentally crippling. Focus on one step at a time. Try to block out fatalistic intrusive thoughts and concentrate on performing the lost guideline search procedure as accurately and methodologically as possible. As long as you have gas to breathe, you have the time necessary to save your own life. Trust that the lost guideline procedure will get you to safety.
Upon finding the guideline
When you have relocated the guideline you should attach your safety spool securely to it. This is easiest if you have a line arrow or referencing exit marker (REM) to attach to the line. If you do not have any line markers, you can use the double-ender boltsnap from your safety spool. Make sure that your search line is not slack and that it cannot inadvertently slide up or down the primary guideline.
It is an important principle in the procedure to never recover and remove ANY line from the wreck unless you have physically confirmed that the entire team is together on the exit line.
If you were lost from the guideline, then you should assume that a teammate may also be in the same predicament. Leaving your search line in place maximizes their opportunity to get out alive.
Once your spool is attached to the guideline. You need to take stock of your situation and plan the next step. The first thing to do is check your gas supply. Do you have sufficient gas to search for your team, or do you need to exit the wreck with haste?
Actions to take if you are low on gas
If you are low on gas, clip your backup torch onto the primary line where you attached your safety spool. Turn that light on and leave it in place when you exit. This will aid teammates who may be searching for the line, and also indicates that you have exited the wreck. If you have used a referencing exit marker (REM), quickly write your current bottom time onto it; this indicates when you have left for the exit.
Next, study the guideline route to ensure that you will travel in the correct direction to exit the wreck. You may remember the path, but it is also not uncommon to be disorientated in direction. If you make a mistake and travel the wrong way along the guideline, you will waste your precious remaining gas. Stay mentally aware to catch a directional mistake as you move along the line, and do not thoughtless speed along the line oblivious to your surroundings. If your team has judiciously laid line arrows regularly along the line, you will obtain directional confirmation sooner rather than later.
Actions to take if you have sufficient gas remaining
If you have enough gas remaining to afford extra time inside the wreck before exiting, then you can consider conducting a search for your team. Do not put yourself in danger if making the decision to remain in the wreck.
Firstly, assess your mental disposition and be realistic about your capability to safely undertake further complex actions on the dive. If you feel confident, composed, and cognizant, calculate exactly how much gas you can afford to spare for a further search without jeopardizing your own safe exit.
Having set a firm limit on gas consumption for conducting the search, progress up and down the guideline to see if your team or other situational indicators can be found.
There are four potential situations: the team may have been forced to exit the wreck already, they could be holding position on the line, may have started lost diver searches to find you, or might even be lost away from the guideline themselves.
1. If the team is holding position on the line
Make contact with the team and confirm that everyone is present. Conduct a team gas check, evaluate conditions inside the wreck, and consider everyone’s stress levels. You may decide to continue the wreck penetration or decide it is more prudent to abort the dive. If the decision is made to exit, decide as a team whether you will recover the primary guideline or you will opt for safety and leave the reel in place to be recovered on a subsequent dive.
2. If the team has set markers indicating they have exited the wreck
If the dive team has already been forced to exit the wreck, they should have left individual markers on the line that indicates their exit time. Discontinue your search and immediately exit. As you have not physically confirmed the team has exited, leave all lines in place; you can retrieve them on a subsequent dive.
3. If the team is searching for you
If your teammates have initiated a lost diver search for you, their safety spool lines will be attached to the primary guideline with markers. Go out along their lost diver search line, make contact with them, and signal to turn back to the guideline. Once the team is reunited, exit the wreck immediately. Retrieving the safety spools and primary reel is a low-priority decision that must reflect the team’s psychological state, the conditions inside the wreck, and the amount of gas remaining.
4. If the team has also lost the guideline
You may search along the guideline and find nothing; no teammates, no exit markers, and no safety spools deployed for lost diver searches. In this situation, it is prudent to assume that your teammates may also be lost off the guideline. If you have a backup safety spool, you can initiate a lost diver search for them.
The lost guideline search for advanced wreck divers
In conclusion, specialist expert wreck instructors teach the life-saving lost guideline search procedure during advanced wreck diver training. As situational awareness is crucial in advanced wreck diving, muscle memory for specific skills should be highly developed through repetitive practice to cut down on task loading and reduce stress during emergencies.
When an advanced wreck diver becomes losses the guideline, it is essential to immediately hold position, visually search and reconstruct in their mind where and when they last saw the line. Apply stress management to reduce respiratory rate and enable clear thinking. Take sufficient time to plan a search pattern appropriate to the wreck layout and then conduct that search methodically and calmly. Anticipate zero visibility conditions and ensure that you can carry out a lost guideline search without vision.
The safety spool tie-off point needs to be secure and prominent. If possible create two tie-offs that give directional reference to the search. Once the advanced wreck diver relocates the guideline, they should attach the safety spool to the line, mark the direction of the exit and leave a backup light to mark the guideline. It is crucial to practice this procedure periodically and, ideally, as part of the team you will subsequently wreck dive with.
By following these steps for the lost guideline search procedure, developing stress resilience, and building muscle memory for the specific skills involved, advanced wreck divers can confidently rely upon the lost guideline search procedure to get them safely out of what is arguably the worst imaginable situation that a wreck diver may face.
Currently residing in Subic Bay, Philippines; he has amassed more than 10,000 open-circuit and CCR dives over three decades of challenging diving across the globe.
Andy has published numerous diving magazine articles and designed advanced certification courses for several dive training agencies, He regularly tests and reviews new dive gear for scuba equipment manufacturers. Andy is currently writing a series of advanced diving books and creating a range of tech diving clothing and accessories.
Prior to becoming a professional technical diving educator in 2006, Andy was a commissioned officer in the Royal Air Force and has served in Iraq, Afghanistan, Belize, and Cyprus.
What skills are taught during an advanced wreck course?
Advanced wreck certification courses teach divers how to lay and retrieve a guideline, search procedures for a lost guideline or lost diver, and how to deal with all equipment failures, silt outs, and entanglements. Training also includes advanced buoyancy control, precision maneuvering, and non-silting propulsion techniques.
What are the prerequisites for an advanced wreck course?
The normal prerequisites for advanced wreck training are Advanced Open Water, Wreck Diver, and a minimum of 50 logged dives experience. Some training agencies only offer advanced wreck courses for divers with technical-level qualifications.
How To Choose The Best Wreck Diving Course? Detailed guidance for choosing the best wreck diving course. Wreck diving can be dangerous; so it is important to choose expert instruction
Grading Wreck Diving Restrictions Defining grades of wreck diving restrictions. How to assess the severity of restrictions when planning your dives in backmount and sidemount