Your Ultimate Buoyancy Control Guide: Dive with Effortless Precision
Buoyancy control is the cornerstone of a successful, safe, and enjoyable scuba diving experience. Whether you’re a novice diver or a seasoned pro, mastering buoyancy is crucial for enhancing your underwater adventures.
In this comprehensive masterclass guide, I’ll delve into the fine details of buoyancy control, providing a step-by-step approach to improved skills, along with valuable insights and tips to help you become a more competent, comfortable, and confident diver.
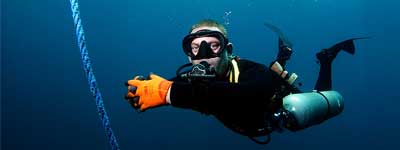
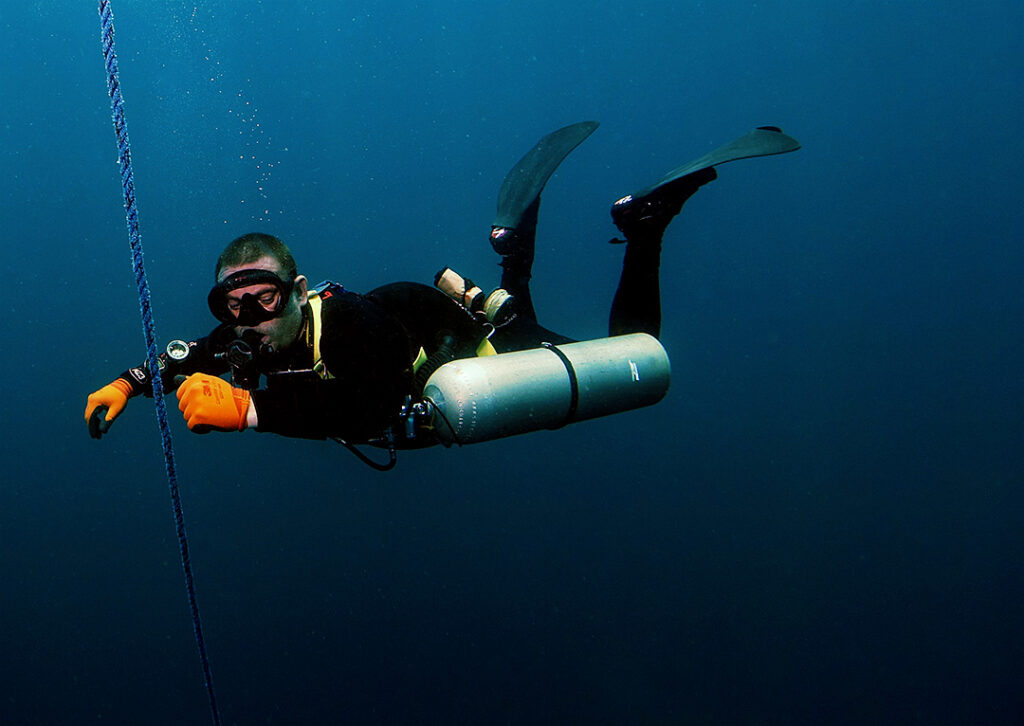
The author, Andy Davis, demonstrating refined buoyancy control and maneuvering skills
Diving buoyancy control proficiency offers a myriad of benefits, making it an essential skill for any scuba diver. Let’s delve into these eight significant advantages:
1. Environmental Protection
Maintaining neutral buoyancy helps avoid touching and damaging marine flora and fauna.
Prevent stirring up silt and sediment, protecting coral reefs.
Move through the underwater environment without disturbing the ecosystem.
2. Equipment Damage and Injury Prevention
Prevent accidental collisions with delicate marine life and underwater features.
Reduce the risk of sustaining injuries, including abrasions, contusions, lacerations, and stings.
Safeguard expensive dive gear and equipment such as cameras and GoPros.
3. Efficiency, Relaxation, and Enjoyment
Reduce physical strain during dives for a more comfortable experience.
Improve finning efficiency, requiring less energy expenditure.
Enhance relaxation and overall enjoyment of the underwater environment.
Enable divers to fully immerse themselves in appreciating marine life and surroundings.
Precise control prevents silt disturbance and collisions with wreck structures.
Good buoyancy enables safe navigation around wrecks without silt issues, causing damage or sustaining injuries.
8. Better Buddy Skills
Buoyancy control is crucial for safe and effective buddy or team diving.
Good control keeps divers close, facilitating rapid support.
It reduces the risk of buddy separations, common during descents and ascents.
Proficiency eases emergency skills like air-sharing ascents.
Sponsored Link
Achieving Great Scuba Buoyancy Control
Effective scuba buoyancy control is, without a doubt, the most important attribute that a diver needs to develop. Control of your buoyancy has a direct impact on air consumption, comfort, relaxation, and the control of descents and ascents – which have direct safety implications.
Understanding the Basics: Archimedes’ Principle
Scuba buoyancy control is rooted in Archimedes’ Principle, which states that the buoyant force acting on an object submerged in a fluid is equal to the weight of the fluid displaced by that object. This principle underpins the fundamental concept of buoyancy in scuba diving.
Here’s a simplified explanation:
If you displace more water (weight) than your body’s weight, you’ll float.
If you displace less water (weight) than your body’s weight, you’ll sink.
If the weight of the water you displace equals your body’s weight, you’ll be neutrally buoyant.
Why Do Divers Struggle To Master Buoyancy Control?
Typical entry-level scuba courses teach divers to perform skills from a kneeling position in negative buoyancy on the bottom.
As a result, divers do not become familiar with multi-tasking buoyancy control and other skills simultaneously.
Buoyancy control fails whenever the diver is distracted from focusing on it.
Kneeling skill practice ingrains bad habits that become an impediment to learning horizontal trim.
Training time spent negatively buoyant on the bottom wastes opportunities to improve neutral buoyancy control.
True proficiency in a skill, such as mask-clearing, can never be attained whilst kneeling; as the demands of real diving require the ability to utilize skills in neutral buoyancy whilst mid-water.
Buoyancy Control and Diver Safety
Buoyancy control is a critical factor in diving safety, and diving accident statistics highlight its significance.
Poor buoyancy control can lead to various diving accidents and incidents:
Half of Diving Accidents are Buoyancy-Related. In a DAN study, buoyancy control problems were either the cause, or a contributing factor to, 50% of diving fatalities.
Rapid Ascents and Descents: Accidental rapid ascents or descents are often the result of buoyancy control issues. These can lead to decompression sickness, lung barotrauma, and other injuries, as indicated in diving fatality analysis.
Factors Influencing Scuba Buoyancy Control
Scuba buoyancy control depends on several key elements. Each of these contributes to your ability to achieve and maintain neutral buoyancy. These factors include:
1. Weighting
Balanced weighting is the foundation of buoyancy control. Being over or under-weighted makes buoyancy control challenging. Proper weighting ensures you can achieve neutral buoyancy at the end of your dive without excessive adjustments.
2. Trim
Trim refers to your body’s orientation in the water. Maintaining a horizontal position, with your feet at the same level as your head, reduces drag and aids buoyancy control.
3. Breathing Control
Your breath plays a crucial role in buoyancy. When you inhale, you become more buoyant, and when you exhale, you become less buoyant. Mastering controlled breathing allows you to make fine adjustments to your buoyancy.
4. BCD/Drysuit Inflation/Deflation
Your buoyancy control device (BCD) or drysuit provides adjustable airspaces. Inflating these airspaces increases buoyancy, while deflating decreases it. Properly managing your BCD or drysuit inflation and deflation is vital for buoyancy control.
5. Propulsion
Efficient finning techniques minimize the use of your hands for propulsion. Proper finning conserves energy and helps maintain buoyancy control.
Now, let’s explore how to improve your scuba buoyancy control systematically.
The First Step: Assessing Your Current Buoyancy Skills
Depending on your experience level, use these skill assessments to evaluate your scuba buoyancy control:
A. Novice Diver
Perform a controlled descent, stopping and hovering within 3 meters (10 feet) of the bottom.
Hover for one minute horizontally within 1.5 meters (5 feet) of your starting depth.
Maintain a constant depth in a static position without adding or releasing BCD air. Do not scull your hands or fin forwards.
B. Intermediate Diver
Execute a controlled descent, stopping within 1.5 meters (5 feet) of the bottom.
Demonstrate buoyancy control and propulsion without using your hands.
Hover for two minutes slightly head-down, remaining within 60 centimeters (2 feet) of your starting depth.
Perform an air-sharing drill while floating horizontally without changing depth by more than 1.5 meters (5 feet).
C. Advanced / Technical / Cave Diver
Perform a controlled descent, stopping within 30 centimeters (1 foot) of the bottom.
Execute buoyancy control and propulsion without using your hands.
Hover for two minutes slightly head-down, remaining within 15 centimeters (6 inches) of the starting depth.
Hover in mid-water for two minutes slightly head-down, remaining within 30 centimeters (1 foot) of the start depth.
Perform a full air-sharing drill while hovering horizontally without changing depth by more than 60 centimeters (2 feet).
Only once you know your current level of proficiency, you can begin setting specific goals for improvement.
Sponsored Link
The Second Step: Achieve Optimal Weighting
Divers seeking perfected scuba buoyancy can achieve precise and correct weighting through the application of several assessment methods.
As the diver progresses in experience, whenever they change equipment or whenever they change diving environments (salt/freshwater) they should re-assess their weighting.
During the initial stages of diver development, changes in breathing patterns and increased relaxation underwater often also allow a slow progressive reduction in weights.
Our aim is to carry sufficient weight to allow us to maintain neutral buoyancy at any stage in the dive, without carrying an excess weight that has to be offset by adding extra air to our BCDs.
Get your weighting perfect
At the very most, we need sufficient weight to allow us to maintain neutral buoyancy at the end of the dive when our exposure suits re-gain buoyancy on the ascent and we have depleted a significant weight of gas from our scuba cylinders.
This is essential if we are to maintain safety stops and conduct a slow, controlled ascent from that stop to the surface.
How to confirm optimal scuba diving weighting
Achieving optimal scuba diving weighting is a three-step process. Unfortunately, most scuba divers are not taught all of these steps:
Estimation
Assessment
Confirmation
1. Estimation: Basic weighting guidelines
We can follow a series of basic calculations, which incorporate the buoyancy of our exposure suit and body size to provide a rough estimate of our weighting needs (see below). This allows us to set up a weight belt in advance of our dive.
Relying only on these vague estimations, often written in Open Water course manuals, leads to grossly overweighted divers.
They can be a useful starting point if change exposure protection, but they need to be greatly refined through more precise in-water checks.
7mm wetsuits w/hood: +10% bodyweight + 1.5-3 kg (3–5 lb)
Neoprene drysuits: +10% bodyweight + 3–5 kg (7–10 lb)
Trilaminate drysuits: +10% bodyweight +1.5–3 kg (3–5 lb)
Adjust weighting for human factors:
Women should add 4-5 lb of weight (~2 kg) if diving in saltwater or subtract the same amount for freshwater.
Men should add 6-7 pounds (~3 kg) if diving in saltwater or subtract the same amount for freshwater.
2. Assessment: Quick Pre-Dive Weight Check:
Once we actually enter the water, we can confirm that our estimation was roughly correct. This check ensures that we have sufficient weight to descend, but are not carrying a surplus, unnecessary weight.
A pre-dive weight check is not accurate in confirming the exact weight you need for the end of the dive; when you are most positively buoyant.
It is a simple, quick check that can be conducted before any dive. To carry out this check, conduct the following steps:
At the surface, take a deep breath and hold it.
Cross your ankles to prevent any instinctive fin movement (upward propulsion).
Keep your arms against your body to prevent any instinctive sculling.
Hold your LPI vertically upwards and release all the air from your BCD.
You should now float at approximately eye-level in the water.
Exhale the breath that you were holding.
You should now begin to slowly sink.
If not, then add/remove weight until you do float at eye level whilst holding a normal breath and can sink when you release that breath.
Once this is achieved, add 1-2kg of weight to account for air use during the dive.
3. Confirmation: Post-Dive Weight Check
Whilst the pre-dive weight check gives us a fair idea of our weighting requirement, it does not account for air use during the dive. It is well worth conducting an accurate check that absolutely confirms your weighting requirement under these circumstances.
You are the most positively buoyant at the end of your dive in shallow water:
Your wetsuit material is not compressed
The cylinder has the least weight of gas
This maximum level of positive buoyancy is what your diving weights must compensate for.
To conduct a weight confirmation, follow these steps;
Attempt to hover neutrally buoyant at safety stop depth
Breathe normally.
Deplete the air in your cylinder to 500psi/35 bar.
Empty your BCD completely.
Slowly reduce the weight that you are carrying until you are neutrally buoyant.
small weights are best, for fine-tuning
When you reach a stage that requires breathing adjustment (shallow breathing) to maintain your stop depth, then you have reached your absolute minimum weighting.
Once you confirm your minimum scuba weighting requirements, you can be confident that you will have enough weight for your initial descent and enough weight to hold a safety stop with minimum air remaining in your cylinder.
As a result, your progress toward effective buoyancy control skills now has a strong foundation and will be considerably easier.
Step 3: Master Horizontal Trim
One key aspect of buoyancy control is horizontal diver trim, often overlooked but critically important for efficient propulsion and overall buoyancy management.
Sponsored Link
Why is Horizontal Diver Trim Important for Buoyancy Control?
Horizontal diver trim refers to the orientation of your body in the water. It is determined by your posture, distribution of weight and volume along your body and equipment, and external forces acting on you.
Achieving a flat, horizontal trim in the water offers several benefits:
1. Efficient Propulsion
Horizontal trim optimizes your ability to move through the water effectively. When your body is flat, all the thrust generated by your fins is directed horizontally, allowing you to cover distances with minimal effort. This means that you can move smoothly without wasting energy on unnecessary vertical movements.
More efficient propulsion will reduce your muscular exertion and lower respiratory demand. This means that your gas consumption will improve during dives.
2. Buoyancy Stability
Maintaining a horizontal position prevents any water movement, such as currents or your body’s motion, from pushing you vertically in the water column. This stability is crucial for achieving neutral buoyancy and staying at your desired depth without constant adjustments.
For a clear demonstration of this principle, consider sticking your hand out of a car window while driving.
If your hand is held flat, it remains steady.
However, angling your hand upwards causes the airflow to force it upwards.
Similarly, divers in a poor head-up/feet-down trim position may experience subtle upward forces when moving through the water, contributing to buoyancy issues.
Many divers can maintain a constant depth while finning but find themselves sinking when they stop finning. This highlights the problem of using trim and downward propulsion to maintain depth.
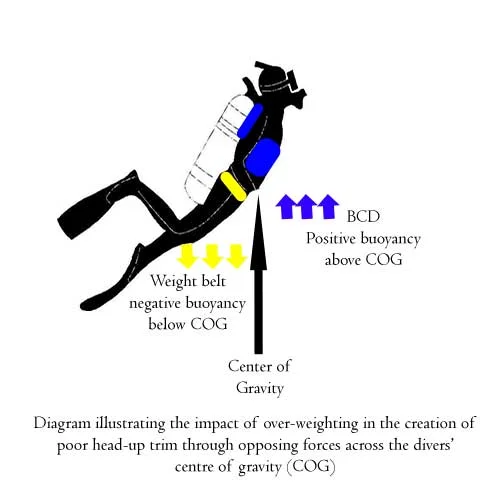
How Does Weight Distribution Affect Trim?
The first step in achieving horizontal diver trim is to ensure you are not over-weighted.
Over-weighting creates a push-pull effect across your horizontal center of gravity (COG).
The weights are located on your torso below the COG, while the compensating air is above it.
This causes the torso to rise and the legs to lower, exaggerating the effect with more weight.
To achieve optimal trim, the shoulders, hips, and knees should be flat horizontally.
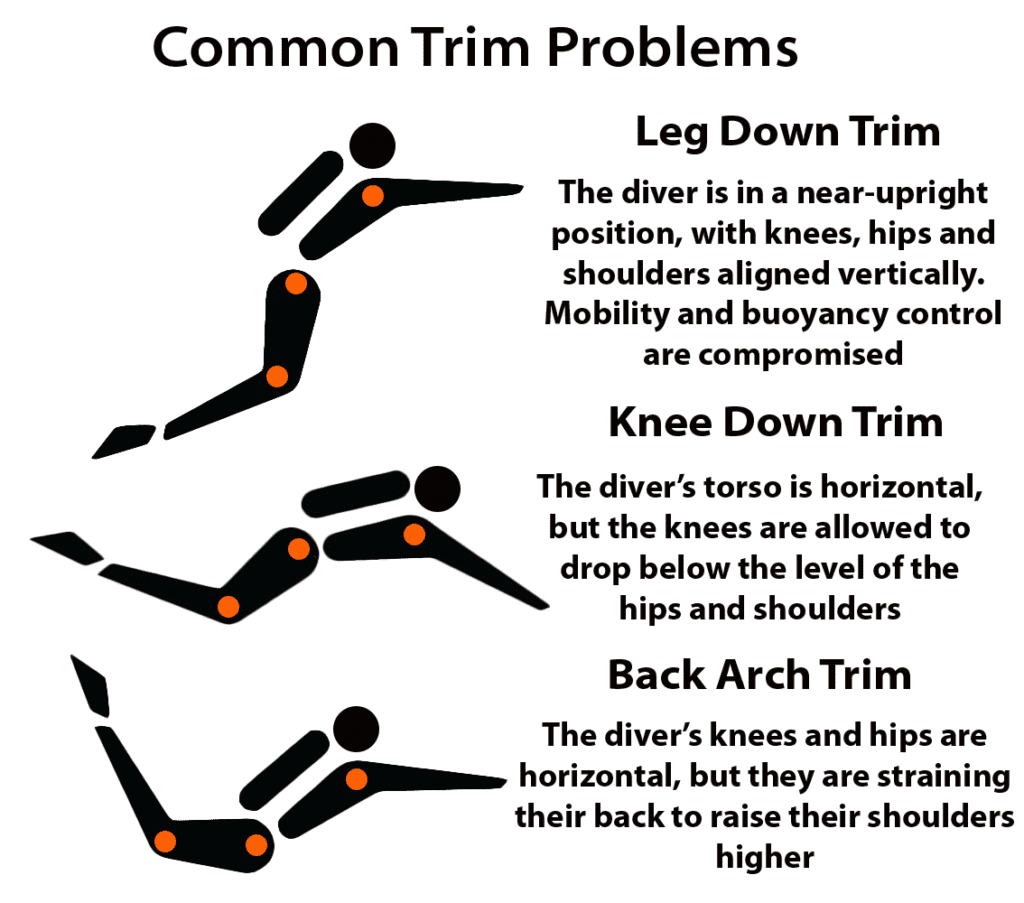
One common mistake is dropping the knees, often due to instructors teaching students to kneel during skills or adopt a vertical position during descents, ascents, or safety stops. Such practices can reinforce bad habits and hinder natural trim.
There are three common trim problems divers experience:
Head-Up/Feet-Down Trim: This occurs when divers have their heads up and feet down, which can lead to buoyancy issues when they stop moving.
Head-Down/Feet-Up Trim: The opposite of head-up/feet-down trim, this position can also disrupt buoyancy control.
Knees-Down Trim: Dropping the knees while diving is a prevalent issue that affects trim and stability.
Top Tip: To achieve the right body posture for stable trim, focus on keeping your buttocks slightly clenched. This action locks your hips forward, aligning your shoulders, hips, and knees horizontally.
Practicing to Improve Horizontal Diver Trim
The second step in achieving horizontal trim is deliberate practice. Start by working on maintaining a static hover similar to the position used by freefall parachutists.
As you practice, you may identify equipment-related issues that affect your trim.
Addressing these issues is essential for achieving and maintaining horizontal trim.
Working with a partner or observer who can provide feedback is valuable
Using a video camera to record and assess your technique can be immensely beneficial.
Horizontal trim and buoyancy control have an inexorable connection
Adjusting Horizontal Diver Trim
If you still encounter problems with trim, you can make specific adjustments to resolve them:
Trim Weights: These are small weights that can be attached to the cylinder cam bands, the BCD, or the ankles to address major trim issues.
Cylinder Position: Experiment with the location of your diving cylinder on the BCD. Raising or lowering the cylinder can shift your center of gravity upwards or downwards along your torso.
Equipment Selection: Choose fins that are either positively or negatively buoyant to fine-tune your trim.
Arm Positioning: The placement of your arms during the dive can impact your trim. Extending your arms forward can help raise your legs, while holding your arms closer to your body negates this effect.
Achieving and maintaining horizontal diver trim is a skill that requires practice and attention to detail. It may take time to perfect, but the benefits in terms of efficient propulsion, buoyancy stability, and overall diving comfort are well worth the effort.
Remember, buoyancy control is a continuous learning process, and mastering trim is a significant step toward becoming a more skilled and confident diver.
Step 4: Develop Breath Control as a Buoyancy Tool
Breathing and scuba buoyancy control are inexorably connected. As we breathe, the inflation and deflation of our lungs continually affect our buoyancy, but providing the breathing remains steady, slow, and controlled it is barely noticeable on a scuba dive.
How are breathing and buoyancy connected?
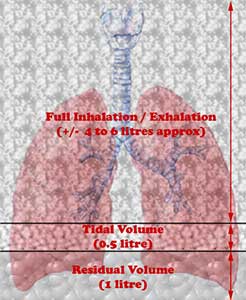
The lungs are air-spaces
The human lungs have a relatively large capacity
4-6 liters on average.
Of that total capacity, there is a ‘tidal volume’ that varies as we inhale and exhale normally
0.5 liters on average.
A minimum volume of about 1 liter (called residual volume) always remains, as our lungs cannot completely collapse on exhalation.
A full, forced exhalation and inhalation can vary the volume by as much as 5 liters. As we already know, air volume equates to buoyancy, due to the fact that it displaces the weight of water (Archimedes Principle).
For each liter of water displaced, we increase our buoyancy.
1 liter =1kg freshwater or 1.03kg saltwater
Consequently, a potential 3-4kg (7-9lbs) buoyancy shift can occur from full exhalation to full inhalation.
Thus, as a buoyancy control tool, divers can add, or subtract, about 4lbs/2kg of buoyancy to enable minor depth changes during their dive.
Scuba Buoyancy Change When Breathing
Time Delay: Buoyancy changes in response to breathing are not immediately felt. There’s a slight delay, preventing rapid up-and-down motion in the water with each breath.
Regular Breathing: Divers who maintain a consistent breathing pattern experience stable buoyancy control.
Partial Lung Use: Divers typically don’t fully inhale or exhale during normal breathing, resulting in only a small (0.5kg) volume shift with each breath.
Variable lung volume on normal and forced inhalation and exhalation
Why is lung volume control essential for good buoyancy control?
This can be effectively used to allow the diver to temporarily gain/lose buoyancy without having to re-adjust the air volume inside their BCD. The primary uses for this would be:
Using Breathing Patterns for Tactical Buoyancy Control:
Navigating Obstacles: Adjusting breathing can help briefly ascend or descend to navigate around small obstacles. For example, breathing deeper and slower to rise above a coral head, then breathing shallower and slower to descend.
Compensating for Deviations: Breathing pattern changes can compensate for sudden deviations from neutral buoyancy. If ascending for a mask clearance but still rising due to slight positive buoyancy, breathing slower/shallower can temporarily reduce buoyancy until the mask is cleared.
Handling Objects: Immediate buoyancy compensation is possible when handling objects with varying buoyancy. For instance, breathing adjustments can help manage negative buoyancy objects like metal torches or positively buoyant objects like deploying a DSMB.
Top Tips for Breathing and Buoyancy Control
Weighting Impact: Lung control’s effectiveness for precise buoyancy relies on correct weighting. Incorrect weighting leads to exaggerated shifts in BCD air volume, requiring BCD gas adjustments to correct ascent/descent.
Natural Breathing: Divers should prioritize natural breathing and reserve shallower or deeper breaths for brief buoyancy corrections. Holding one’s breath is strongly discouraged to maintain a specific depth.
Step 5: Apply Buoyancy Control Throughout Your Dive
Buoyancy Control on Descent
The journey towards impeccable buoyancy control begins as you descend into the mesmerizing underwater world. To ensure a smooth descent, follow these essential steps:
Empty Your BCD: As you start your descent, fully empty your BCD (Buoyancy Control Device). Make sure you’re not inadvertently finning or sculling, as these actions often lead to divers unintentionally over-weighting themselves.
Exhale to Descend: Avoid taking a deep inhalation early in the descent, as it could propel you back to the surface. Instead, exhale slowly to help you descend gradually.
Combat Anxiety: Anxiety can trigger rapid breathing, which hampers your ability to descend. Practice deep exhalations and maintain slow, shallow breathing during the initial meters to prevent re-ascent.
Conduct Descent Checks: Around 5 meters, pause your descent for a brief visual check with your buddy. This “bubble check” ensures you both begin the dive safely. You can also use this time to confirm equipment functionality.
Compression on Descent
As you continue your descent, keep in mind that the compression of your exposure suit and buoyant materials in your equipment will increase negative buoyancy.
Add air to your BCD regularly to maintain neutral buoyancy throughout the descent.
Controlled Descent
Avoid free-falling during the descent and plan to maintain near-neutral buoyancy.
This enables you to respond swiftly to any issues, such as ear squeeze, by adjusting your buoyancy through breathing and lung control.
Early Transition into Horizontal Trim
Start your descent in a vertical position but aim to transition into a horizontal trim position after a few meters.
This horizontal position reduces descent speed and encourages proper buoyancy control, preventing you from disturbing the underwater environment.
Dives are more enjoyable when buoyancy control becomes a precise and unconscious skill
Scuba Buoyancy While on the Bottom
Upon reaching your desired depth, ensure you achieve neutral buoyancy.
Aim to stop your descent approximately 1-2m/3-6ft above the bottom in horizontal trim.
Spend a few moments hovering motionless while breathing naturally to confirm that you’ve achieved optimal buoyancy.
BCD Operation and Scuba Buoyancy
Your BCD plays a crucial role in buoyancy control.
Assess the volume of air in your BCD; it should only compensate for the reduction in buoyancy caused by material compression during descent.
Different exposure suits require varying amounts of air in the BCD:
Shorts and Rash Guard: Virtually no air required.
3mm Shorty Neoprene Suit: A slight amount of air.
14mm Full Suit with Hood and Gloves: Considerably more air.
Breath Control and Scuba Buoyancy
Once you’ve achieved your desired depth, maintain a constant depth without frequently adjusting your BCD.
Use breath techniques and lung volume control to make minor depth changes.
Constantly adjusting your BCD for minor fluctuations indicates over-weighting.
Buoyancy Control During Ascent
The ascent phase of a dive is crucial and requires meticulous buoyancy control. Follow these guidelines for a safe and controlled ascent:
Buoyancy Control and Correct Ascent Rate
While novice divers are often advised to “slowly ascend,” there’s an optimal ascent rate to minimize the risk of decompression illness:
Ideal Ascent Rate: Aim for a rate of 9m/30ft per minute until your safety stop.
Final Ascent from Safety Stop: Consider an ascent rate of 1 meter per minute.
As you ascend, the air in your BCD will expand. If properly weighted, that expansion will be minimal. Release a small amount of air whenever your ascent rate exceeds 9m/30ft per minute.
Buddy System Procedures
Maintain depth and ascent rate alignment with your buddy for quick responses to potential issues during the ascent.
Being even a small distance above, or below, your buddy will drastically slow your reaction time should a problem occur.
Buoyancy control means a better buddy system
Diving Ascents are High-Risk
Be aware that the ascent phase carries increased risks due to:
High nitrogen loading
Decreased cylinder air volume
Expanding BCD and equipment air
Stay vigilant and focused during your ascent.
Make Regular “Micro-Stops” on Ascent
Make small stops during your ascent to gauge speed and confirm buoyancy control.
Be prepared to arrest an uncontrolled ascent with deep exhalation and controlled air dump from your BCD.
Venting Your BCD During Ascent
Vent your BCD from the highest point to ensure trapped air exits efficiently.
If ascending horizontally, adjust your body to facilitate venting from the BCD’s lower pull-dump.
Buoyancy control makes holding safety stops effortless
Safety Stops on Ascent
While not always mandatory, a 3-minute minimum safety stop is a prudent measure to mitigate against the risk of decompression sickness (DCS).
Only abort a safety stop if circumstances demand an immediate ascent.
Establish a safety-focused mindset. Perform a longer safety stop whenever you can, or when DCS predisposing factors are applicable:
Dehydration
Lack of sleep
Physical fatigue
Exertion during dive
Cold water
Repetitive and multi-day diving
Make Use of Safety Stops For Buoyancy Practice
Safety stops don’t need to be boring.
Use this time to practice precision buoyancy.
Challenge yourself by trying to stay within 25cm/10 inches of an exact depth.
Start Your Journey To Buoyancy Control Mastery
Scuba diving buoyancy control is a fundamental skill that every diver should aim to master. It offers numerous benefits, including;
Environmental protection
Equipment preservation Enhanced dive experiences
Improved safety
Achieving great buoyancy control requires a combination of;
Quality dive training
Deliberate practice
Attention to various factors like;
weighting
breathing
equipment operation
trim
propulsion
Invest the time and effort to become proficient in buoyancy control, and you’ll not only become a safer and more responsible diver but also gain a deeper appreciation for the beauty of the underwater world.
Remember, buoyancy control is not a skill you learn once and forget; it’s an ongoing process of refinement that can make your diving adventures more enjoyable and environmentally responsible.
Currently residing in Subic Bay, Philippines; he has amassed more than 10,000 open-circuit and CCR dives over three decades of challenging diving across the globe.
Andy has published numerous diving magazine articles and designed advanced certification courses for several dive training agencies, He regularly tests and reviews new dive gear for scuba equipment manufacturers. Andy is currently writing a series of advanced diving books and creating a range of tech diving clothing and accessories.
Prior to becoming a professional technical diving educator in 2006, Andy was a commissioned officer in the Royal Air Force and has served in Iraq, Afghanistan, Belize, and Cyprus.
How To Use Less Air When Scuba Diving? The best way to use less air while scuba diving is to address the root cause of higher air consumption, not to focus on the…
The Best Ascent Speed for Scuba Diving Learn the best ascent speed for scuba diving. Contrary to assumptions, slower is not always safer when it comes to diving ascent rate!
How To Best Ascend When Scuba Diving? Three important tips on how to ascend when scuba diving. Read this to increase your safety and enjoy less fatigue after your dives!
Hello Andy,
I am a CMAS P3 (Dive Master) in Portugal, and I help a diving institute in Portugal, CPAS, the oldest european dive school in operation. (www.cpas.pt)
I have come across your superb article about buoyancy control and would like to translate it to Portuguese and used it, giving you the due credits of course.
CPAS is also a ONGA, and a underwater equipment museum.
There are also other very nice articles in your blog, but all in due time.
For now, I would like to be able to translate it a compose a PDF or send the translation back to you and you would send us the PDF.