Shearwater Dive Computer Settings: Become A Power User!
Shearwater dive computers have gained immense popularity among scuba divers. Unfortunately, many Shearwater users don’t leverage the full potential of these awesome dive instruments. If you’ve been hesitant to explore the advanced Shearwater dive computer settings because they seem too complex, you’re missing out on an incredible tool for enhancing your diving safety.
This article aims to help you become a Shearwater power user!
Why use advanced features in your Shearwater dive computer settings?
Leaving your Shearwater computer default display settings is akin to owning a Ferrari and never driving beyond second gear.
I want to encourage you to go beyond the defaults by making this article as simple and ‘non-technical’ as possible.
In this article, I will illustrate everything you need to know about Shearwater gradient factors and how to use them effectively. That starts by defining what Shearwater gradient factors are and how they keep you safe.
Then, I will guide you on how to set advanced display options unique to Shearwater computers. In doing so, I will explain why the GF99 and SurGF displays empower you to conduct much safer diving ascents.
Additionally, I will explain how you can interpret the gradient factor information provided by Shearwater during a dive. You will learn how customizing your display options can improve your multi-level diving efficiency and the effectiveness of safety stops.
Sponsored Link
Become A Shearwater Power User! (eBook)
An Illustrated Guide to Gradient Factors and Advanced Shearwater Computer Settings for safe scuba diving.
42 Pages. Printable PDF format. Fully Illustrated.$9
Many recreational divers believe that consideration of decompression models is only for technical divers. However, every dive is a decompression dive; even if you stay within no-stop diving limits.
Understanding what is happening with nitrogen inside your body helps you make decisions that preserve your health and vitality. Issues like post-dive fatigue are easily avoided if you understand the theory behind optimizing your ascents to the surface.
De-mystifying decompression models
Diving exposes you to increased pressure
You absorb nitrogen into your body tissues
During ascent, the surrounding pressure decreases
Nitrogen in your body remains at a higher pressure
That difference in pressure causes bubbles to form
Greater pressure difference creates more and larger bubbles
Only large bubbles cause decompression sickness (DCS). You diving computer is programmed to avoid large bubbles from forming.
However, tiny bubbles (micro-bubbles) will still form inside your body on every diving ascent. These are too small to cause injury. However, in large numbers they have a physiological effect. That effect is to cause post-dive fatigue. This is known as decompression stress.
Because your diving computer isn’t programmed to avoid tiny bubbles, you have to do this for yourself. Read on to learn how.
The primary aim of a diving ascent
The primary aim of a diving ascent is to minimize the speed and severity of pressure change on your body. In turn, this reduces the formation of bubbles inside your body.
Reducing the speed of pressure change is as straightforward as reducing your ascent speed.
A very slow ascent means you stay deeper for longer
Nitrogen continues to be absorbed into your body
Getting shallower with more nitrogen in your body causes more bubbles
The secondary aim of a diving ascent
The secondary aim of a diving ascent is to remove as much nitrogen from your body before you surface. This reduces the formation of bubbles after your dive.
Pressure difference forces nitrogen to leave your body
In short, you want more pressure difference to increase the efficiency of nitrogen removal from your body.
Balancing nitrogen removal against bubble formation
As you can see, ascending from a scuba dive has to balance two conflicting aims:
You need to avoid rapid decrease in pressure
You need pressure difference to remove nitrogen
Too much emphasis on one aim can cause problems from neglecting the other. Getting the balance wrong can cause decompression stress, or even DCS.
An optimal diving ascent
For the greatest safety from DCS, an ideal diving ascent has to hit a sweet spot. You need to get shallower to maximize nitrogen removal, whilst avoiding spikes in pressure difference that cause too many, or too large, bubbles.
To find that sweet spot, you need real-time information during your dives. Thankfully, you can opt to display that information through your Shearwater dive computer settings.
Shearwater dive computer settings and Bühlmann ZHL-16C
Shearwater computers use the Bühlmann ZHL-16C decompression model. That is simply a mathematical algorithm which calculates your bottom time and ascent to avoid DCS.
It works by estimating how quickly nitrogen is absorbed into your body, and how quickly it is removed on ascent. It keep you safe by limiting the difference between the pressure of nitrogen inside your body and the outside pressure pushing onto your body.
However, a decompression model needs flexibility to enable different levels of conservatism. Gradient Factors provide that flexibility on Shearwater computers.
Gradient factors refer to the pressure gradient between the surrounding pressure on your body and the pressure of nitrogen inside your body. This is just a scientific way of saying “pressure difference“.
Any time you hear Gradient Factors mentioned, simply understand that it is talking about controlling pressure difference to prevent bubble formation and allow nitrogen to enter or exit your body.
Gradient Factors in the Bühlmann ZHL-16C model
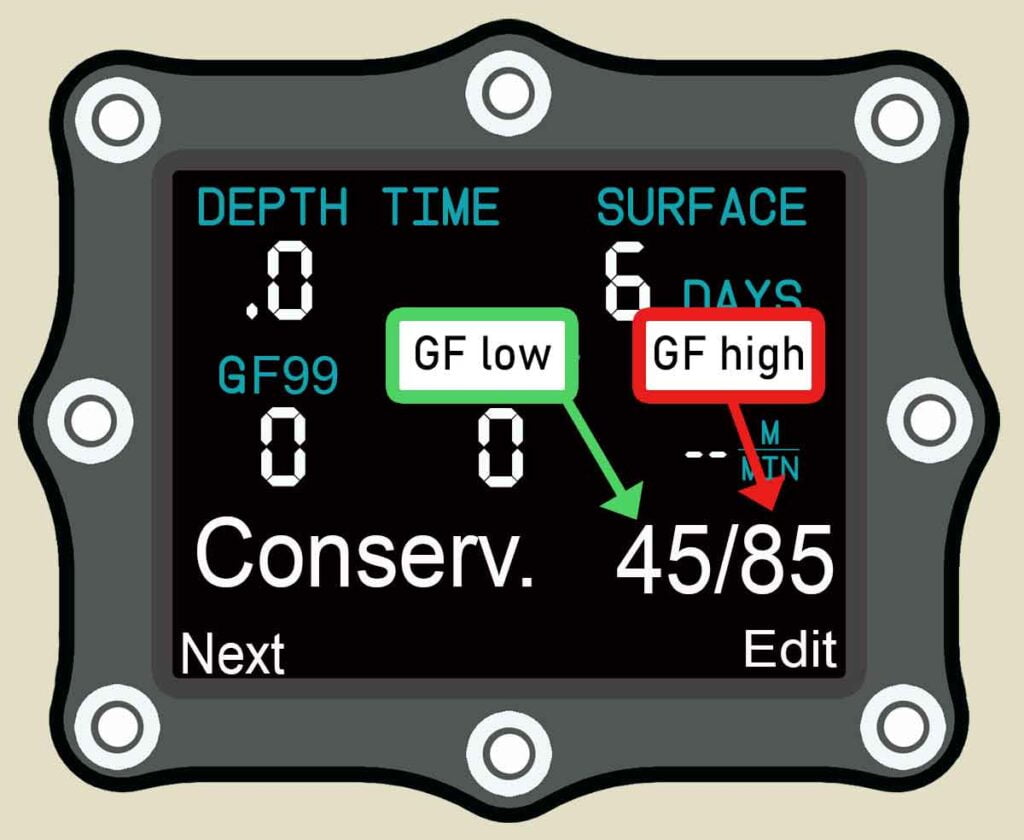
Gradient Factors (GF) are easy to understand. Two numbers modify the computer calculations: GF High and GF Low.
GF High: Sets the overall conservatism.
GF Low: Sets the depth of the first deco stop.
The good news is that you can ignore the GF Low unless you’re a technical diver planning decompression dives.
Gradient Factor High
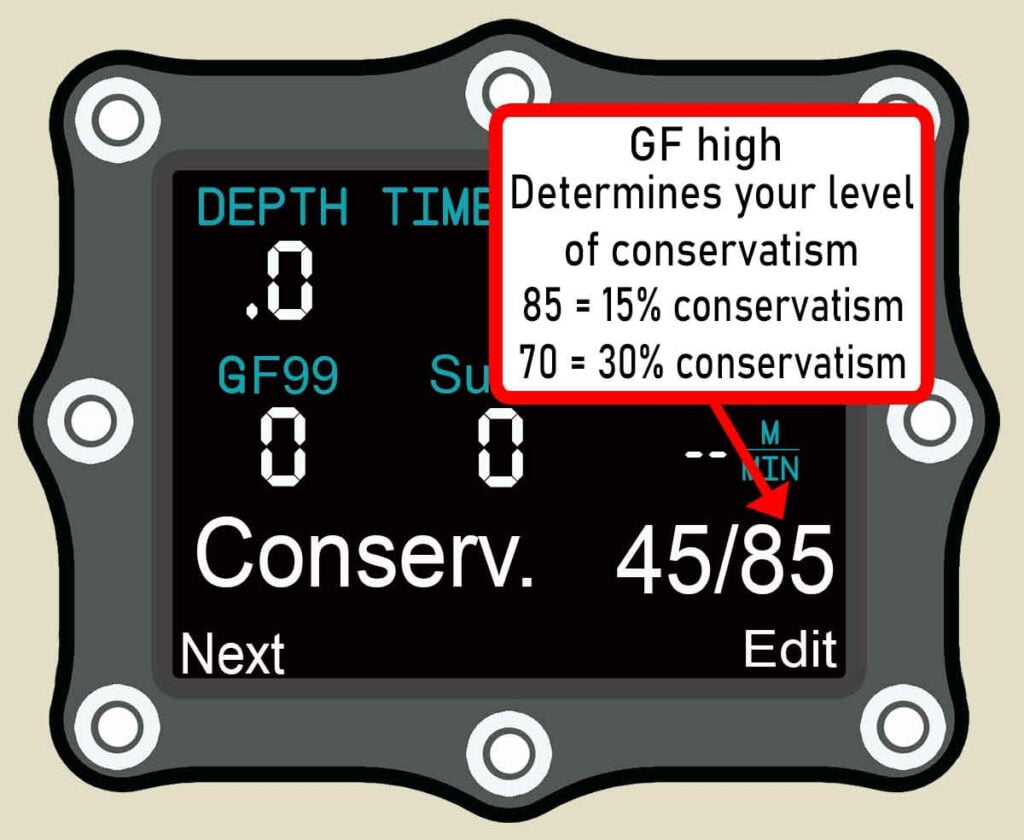
Gradient Factor high (GFhi) allows you to set overall conservatism on your Shearwater computer.
Bühlmann ZHL-16C model has zero conservatism
It calculates to avoid pressure difference that causes large, harmful bubbles
The maximum safe pressure difference is called the m-value.
Obviously, that m-value (GFhi 100%) does not account for individual predisposing factors to DCS. Divers need to reduce their limit below 100% to add further risk insulation from getting bent.
The GFhi setting allows you to reduce the maximum tolerance below 100%. For instance, setting the GFhi at 85%, provides you with 15% conservatism.
As such, setting GFHi 85% will shorten your dive time and increase your insulation from the risk of DCS.
Alternatively, if you set GFHi 70% you’d have an even shorter bottom time, but far higher safety. In this instance, the conservatism would be 30% below the m-value.
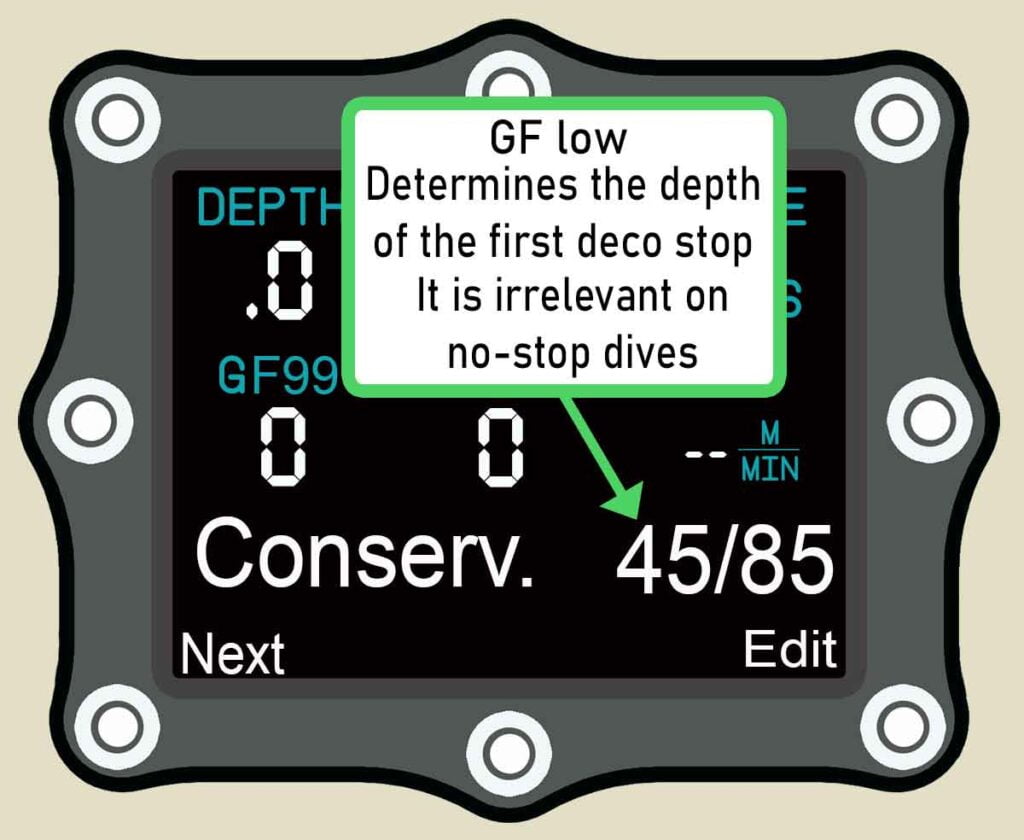
The GFlo setting determines the depth where your first decompression stop occurs during ascent. A lower number determines a deeper stop depth.
For instance, GFLo 30% starts the series of decompression stops deeper than a GFLo of 50%.
However, GFLo has little relevance to recreational divers. If there are no decompression stops, the depth of the first stop is irrelevant. GFLo only becomes a factor if a recreational diver accidentally goes into decompression.
As a general rule-of-thumb, recreational divers should use a higher GFlo setting for emergency decompression. You will want your emergency deco stop to be shallow.
GFLo and emergency decompression stops
Shallower emergency decompression stops are preferable because they:
Maximize the speed your body releases nitrogen. This creates a shorter decompression stop.
If you are manually setting Gradient Factors on your Shearwater computer, set a higher GFLo to ensure that your mandatory stops will be shallower and shorter. This can make a difference if you ever accidentally exceed your no-stop limit on a dive.
Shearwater Gradient Factors in recreational mode
Recreational diving mode on a Shearwater computer keeps the issue of Gradient Factors very simple.
Gradient Factors are always displayed as GFlo/GFhi. For instance, 30/90 would indicate a GFlo of 30% and a GFhi of 90%.
You can choose from three pre-defined conservatism settings:
Low: GFlo 45 and GFhi 95 (45/95). This provides just 5% conservatism.
Medium: GFlo 40 and GFhi 85 (40/85). This is the default setting and provides 15% conservatism.
High: GFlo 35 and GFhi 75 (35/75). This provides a generous 25% conservatism.
Those three Gradient Factors options will be suffice for the vast majority of divers.
You can add further conservatism in real-time on your dives by using the SurGF display. I will describe how to do that later in the article.
Shearwater dive computer settings: Using custom Gradient Factors
If you want to set precise amounts of conservatism, or have more than 25% conservatism, set the GF to custom mode and input a lower GFHi value.
Accessing custom gradient factors can differ depending on the model of Shearwater computer you use.
Shearwater Perdix and Petrel: Enable OC Tec mode. You can then quickly adjust Gradient Factors in the Dive Setup menu.
Shearwater Peregrine: In the System Setup menu, go to Mode Setup and select “Custom” conservatism.
Once enabled, you can change custom Gradient Factors in the Dive Settings screen:
Sponsored Link
Using Sheawater Gradient Factors information during your dives
There are two display settings on your Shearwater computer that are game-changers for improving your safety from DCS:
GF99
SurGF
These display options give you real-time information about what is happening with the nitrogen dissolved inside your body.
Additionally, they empower you to make informed decisions about your ascents and safety stops that reduce your risk of DCS and help you avoid fatigue from decompression stress after dives.
What is GF99?
The GF99 display tells you the real-time relationship between the pressure of nitrogen dissolved within your body and the ambient pressure surrounding you.
Greater pressure difference increases the risk of bubble formation. However, you need a difference in pressure for nitrogen to release from your body on ascent.
The aim of a scuba diving ascent to achieve an optimal balance between those two factors. You want to release as much nitrogen as possible before surfacing, but you don’t want to cause many, or very large, bubbles.
A higher GF99 value indicates faster nitrogen release from your body. Your goal should be to remove as much nitrogen as possible before surfacing from your dive.
The GF99 display indicates when your body is absorbing nitrogen.
Saturation
When GF99 indicates 0% you are at the point of saturation. The pressure of nitrogen inside your body matches the ambient water pressure surrounding you.
Super-saturation
The GF99 display indicates when your body is releasing nitrogen. Higher % means better off-gassing. efficiently. Going beyond 100% seriously risks getting bent.
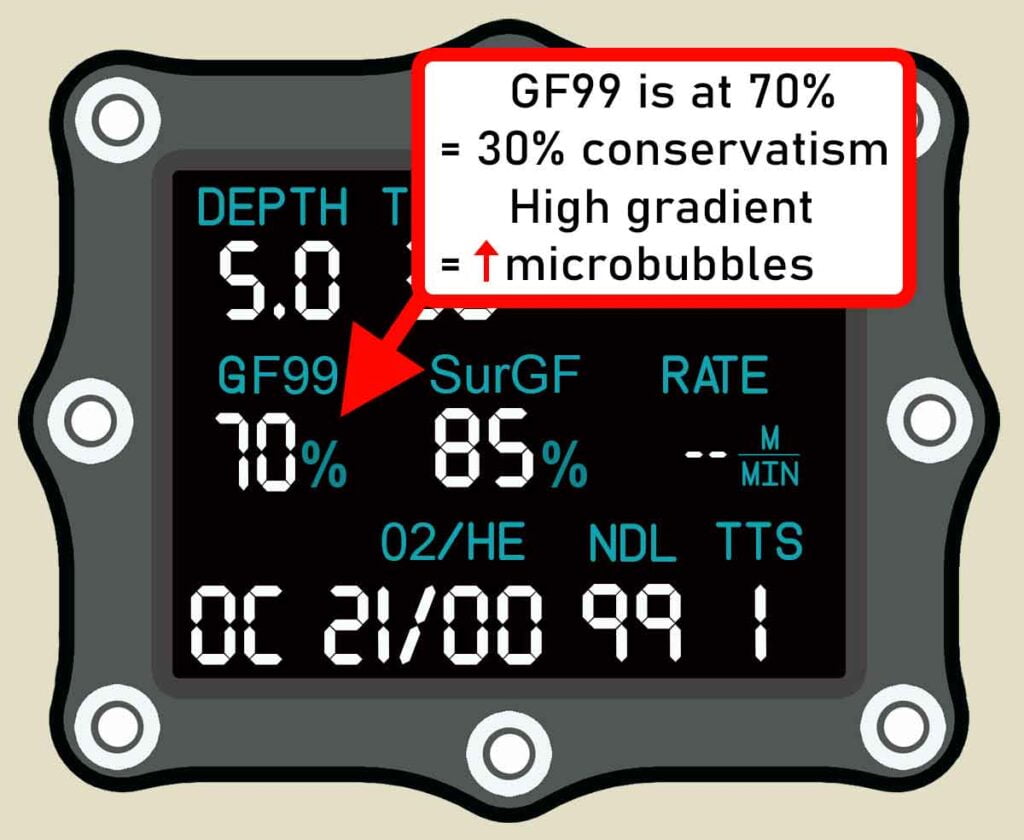
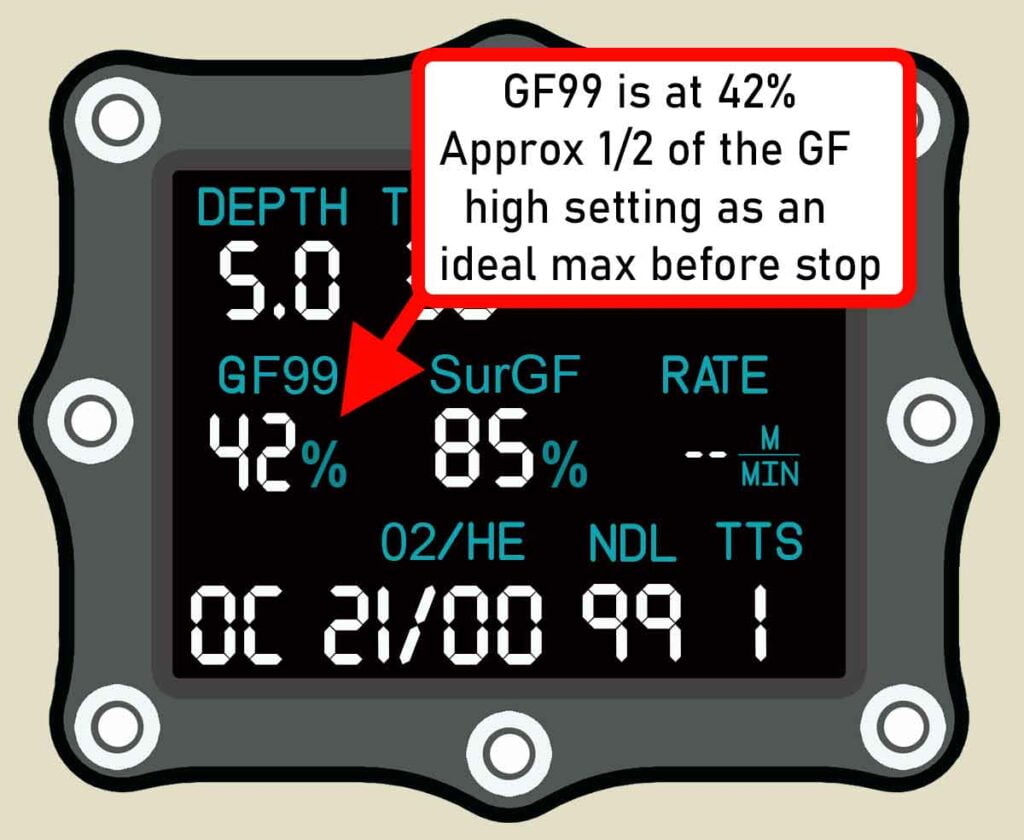
GF99 and decompression stress
In this example, GF99 is 70%. You are 30% below the m-value and off-gassing nitrogen quickly. However, this amount of pressure differential will provoke micro-bubbles and you may experience post-dive fatigue.
A lower GF99 of 42% would approximately half of your preset GFHi. This limits the creation of micro-bubbles. It is nonetheless an efficient speed of nitrogen removal.
What is SurGF?
The Surfacing Gradient Factor (SurGF) display lets you know what the pressure difference would be if you immediately surfaced. As you become more accustomed to using it, it allows ever more refined decision making during your dives.
SurGF information allows you to:
Have real-time control over your conservatism
Decide the optimum length of a safety stop
Monitor how quickly your nitrogen levels drop
Understand the DCS risk level if you ascended immediately in an emergency
SurGF indicates your real-time surfacing gradient factor. This differs from the maximum GFhi setting that determines your overall conservatism.
Sponsored Link
The relationship between GF99 and SurGF
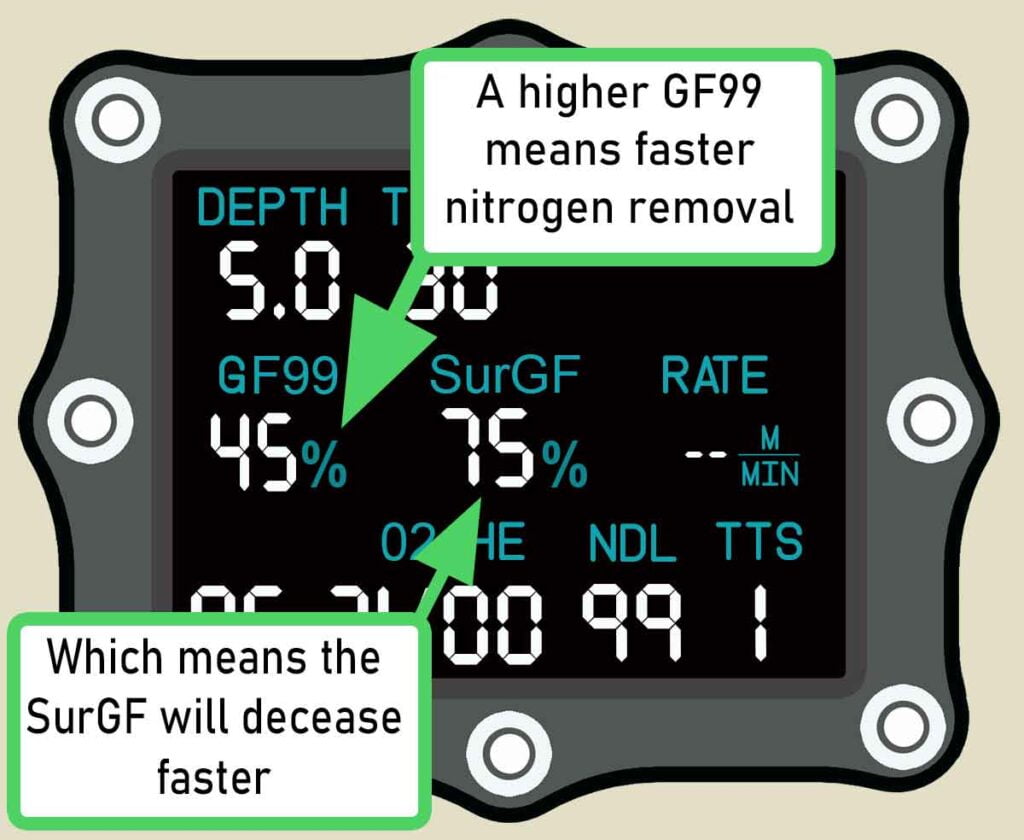
GF99 tells you how much pressure differential exists between the excess nitrogen dissolved in your body and the water pressure surrounding you. A bigger difference in pressure means faster removal of nitrogen from your body.
If you increase the speed of nitrogen removal, you will notice that your surfacing gradient factor (SurGF) reduces faster. In turn, a lower SurGF means you are getting out of the water with less nitrogen remaining inside your body. Ultimately, that means less risk of DCS.
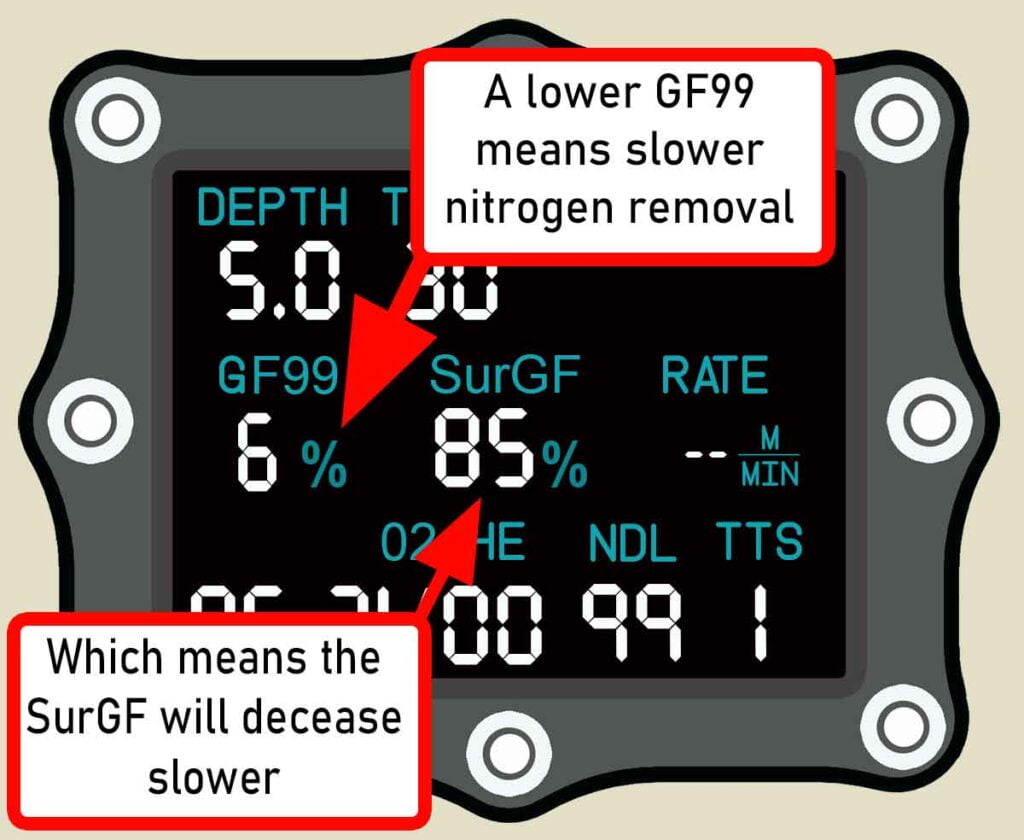
In contrast, a lower GF99 means less nitrogen off-gassing efficiency. You will remove less nitrogen during a given amount of time. This means that your SurGF will decrease slower.
The key to optimized ascents from scuba dives it to keep your GF99 high enough to allow a meaningful speed of nitrogen removal. At the same time, you should be cautious about allowing it to quickly spike. That would provoke micro-bubble formation and cause decompression stress.
GF99 and SurGF displays in your Shearwater dive computer settings
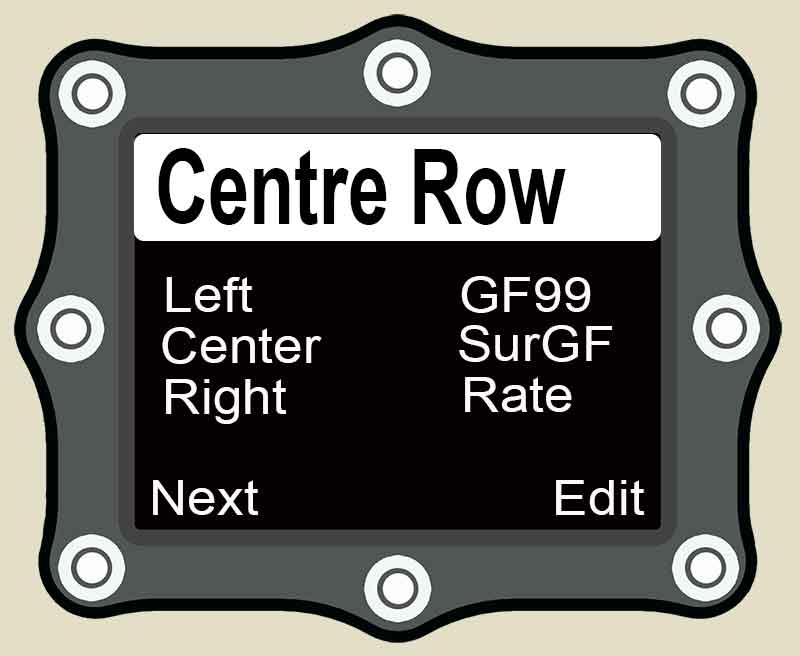
Shearwater Peregrine: Select GF99 and SurGF for the bottom row display within the System Setup menu.
Shearwater Perdix and Petrel: Configure GF99 and SurGF in the center row, also within the System Setup menu.
Configuration menu for GF99 and SurGF on a Shearwater Perdix or Petrel computer.
Ascent Rate indicator
I also like to display the accurate ascent rate on my Shearwater computer. The standard bar display doesn’t enable accurate ascent rates to be achieved.
Knowing your exact ascent speed, in meters or feet per minute, is especially useful as you get shallower. It helps you develop more consistent accuracy as you gain experience.
Shearwater GF99 and SurGF displays on a normal dive
In this section, I will describe the information provided by the GF99 and SurGF displays as you progress through the phases of a scuba dive.
For better understanding, I advise you to first read my detailed explantions of GF99 and SurGF.
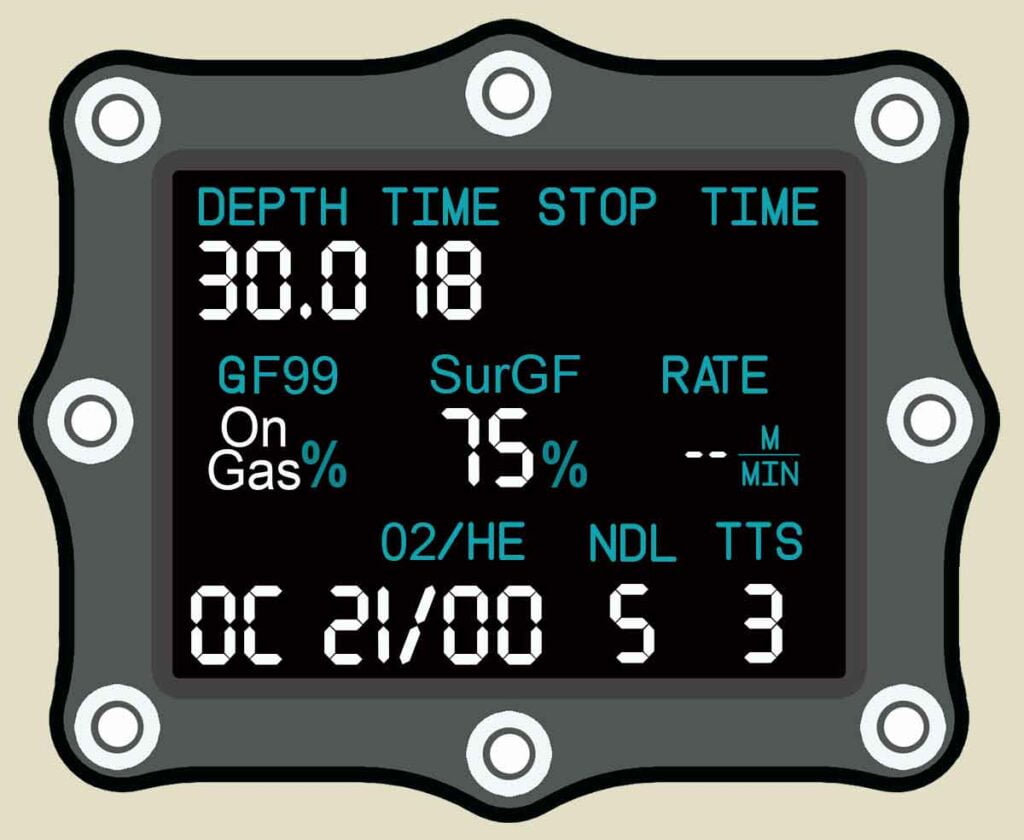
The following example is for a no-stop dive to 30m (100ft) with 18 minutes of planned bottom time. This example assumes a preset default conservatism of GF 40/85. All figures are given purely for illustrative purposes only.
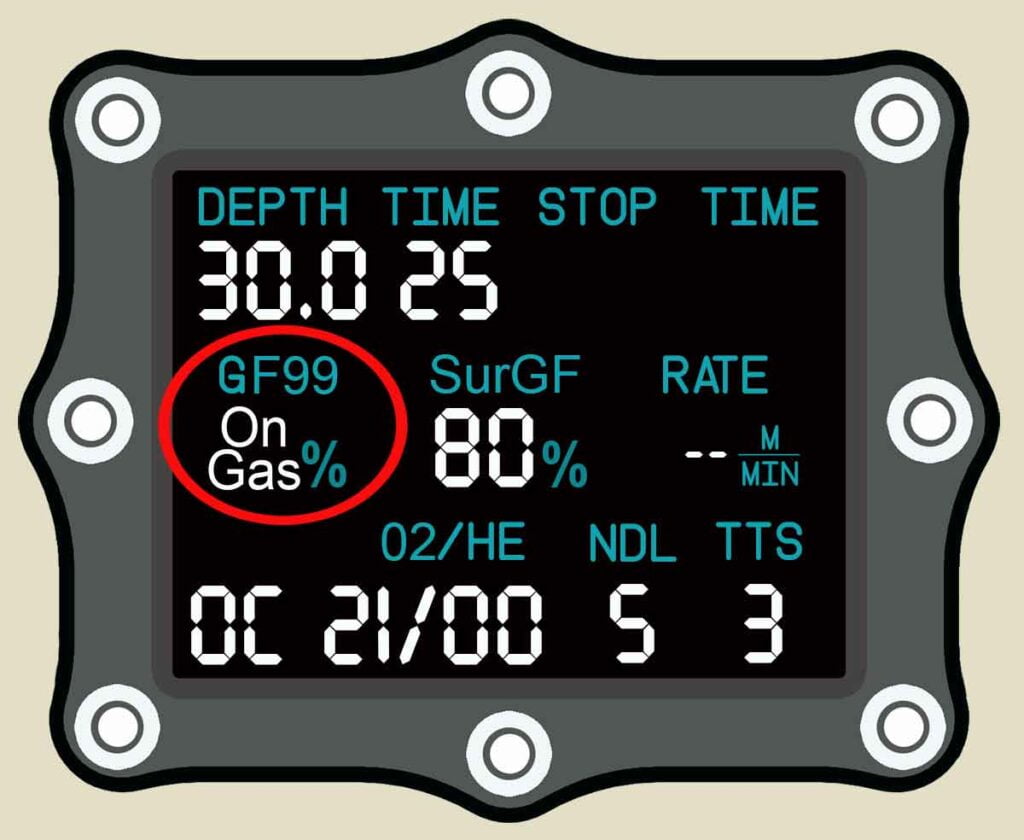
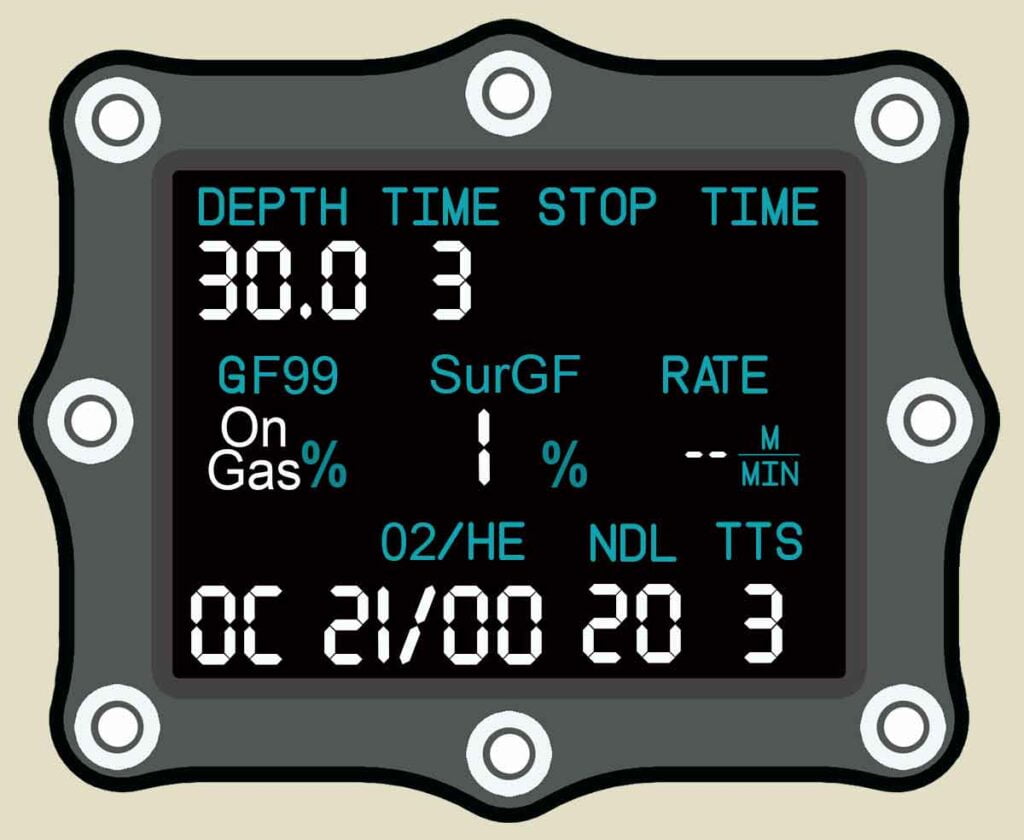
During descent
GF99 indicates that you are absorbing nitrogen. As no nitrogen is yet absorbed, your surfacing gradient (SurGF) remains zero.
During bottom time
As time passes at your bottom depth, you continue to absorb nitrogen. The surfacing gradient factor (SurGF) increases to reflect the nitrogen in your body. The deeper you are, that faster SurGF will rise. The NDL is 20 minutes.
At the end of bottom time
After 18 minutes on the bottom, you are still absorbing more nitrogen. Over that time, your surfacing gradient factor has risen to 75%. Because you are closer to your preset GFHi of 85%, there is less NDL time remaining.
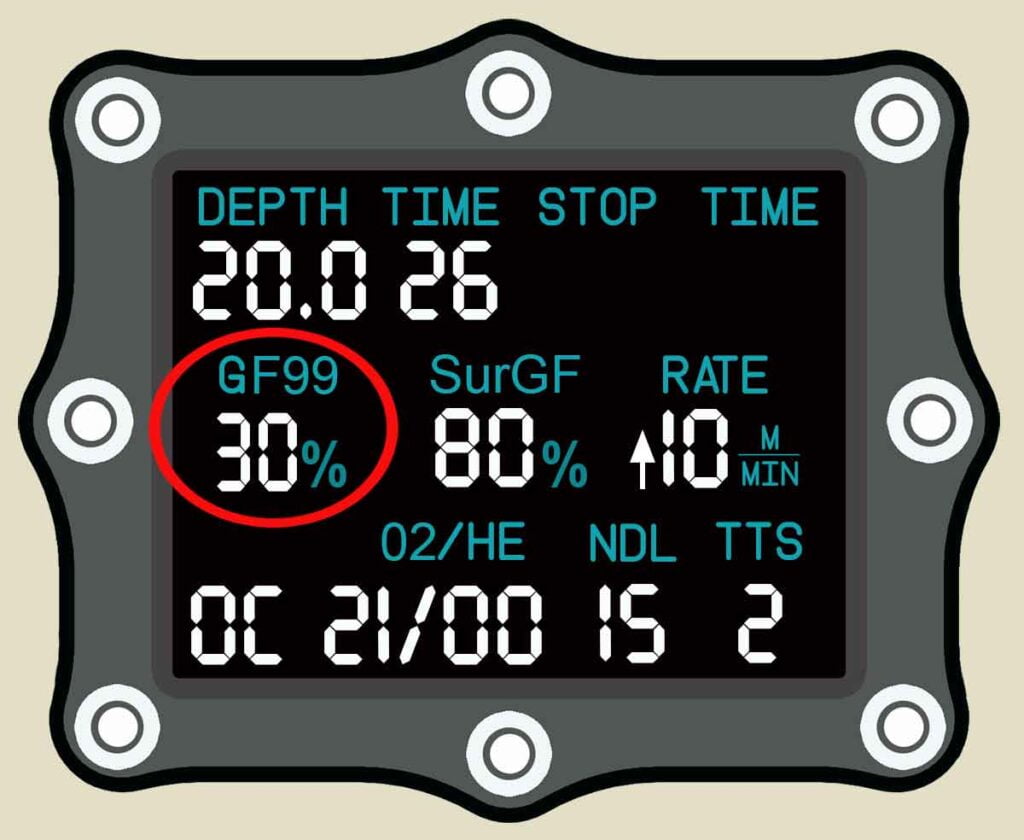
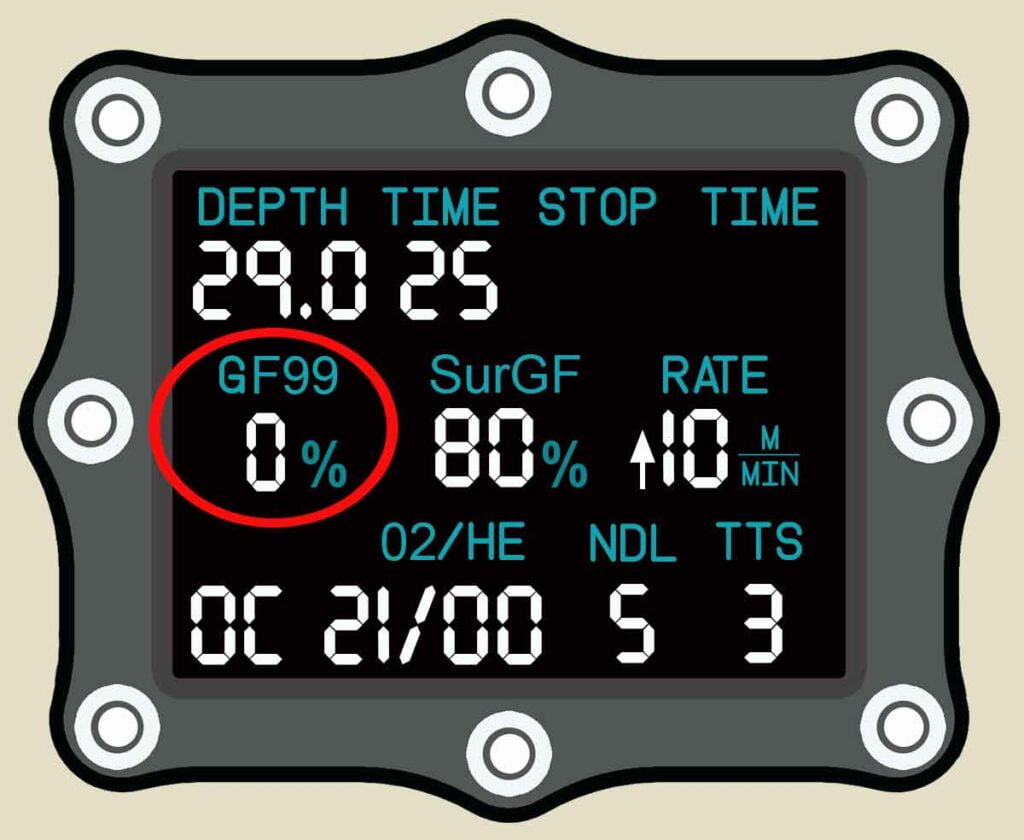
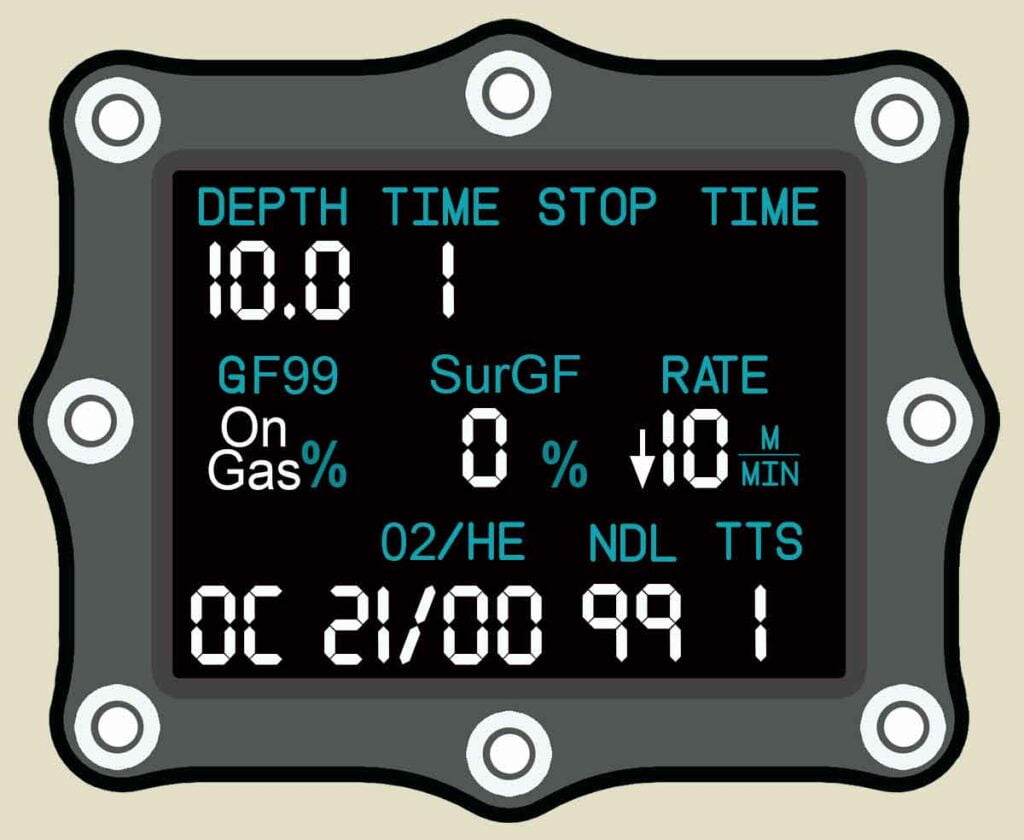
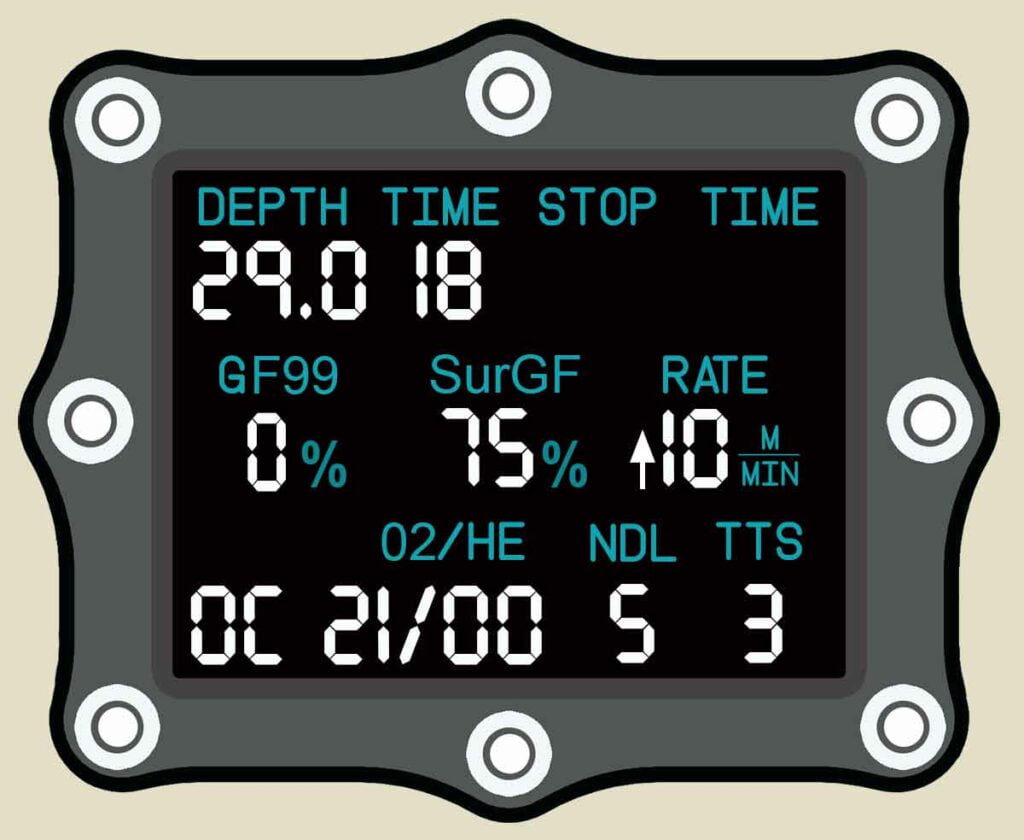
At the start of ascent
As you first leave the bottom, there is not yet any difference between the pressure of nitrogen in your body and the ambient water pressure. Consequently, GF99 reads 0%. You are in equilibrum.
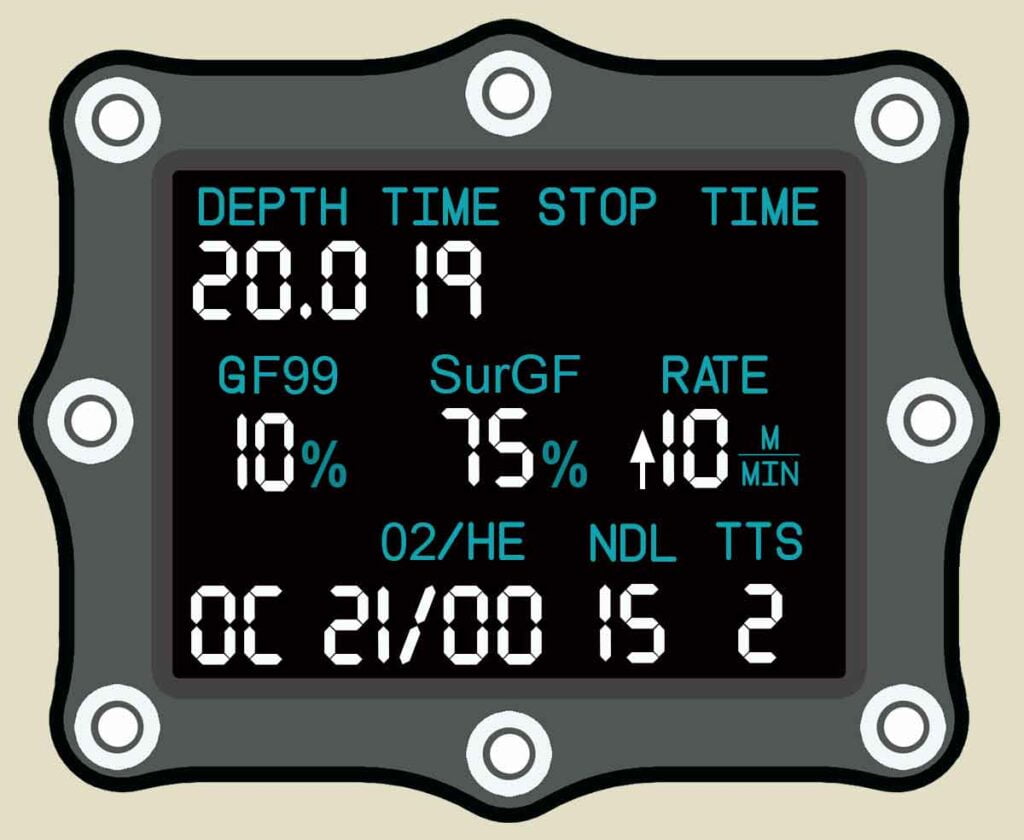
During ascent
As you ascend and the water pressure around you decreases, the GF99% rises. You are super-saturated. A higher GF99 indicates faster removal of nitrogen from your body.
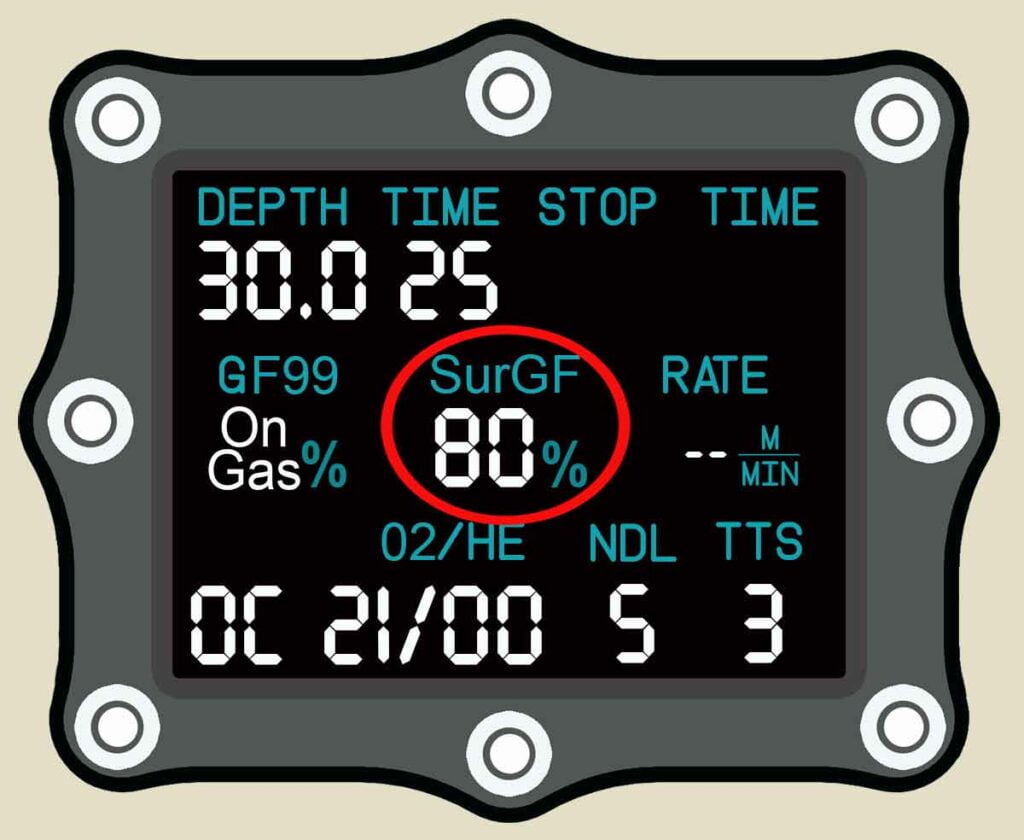
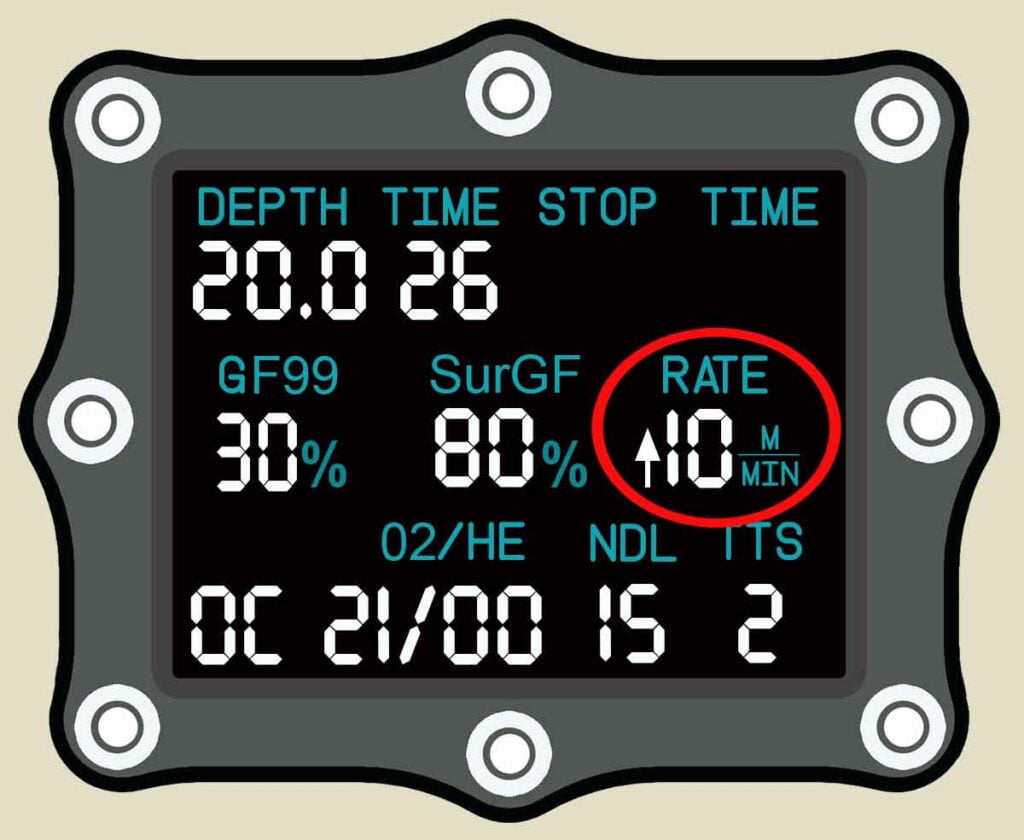
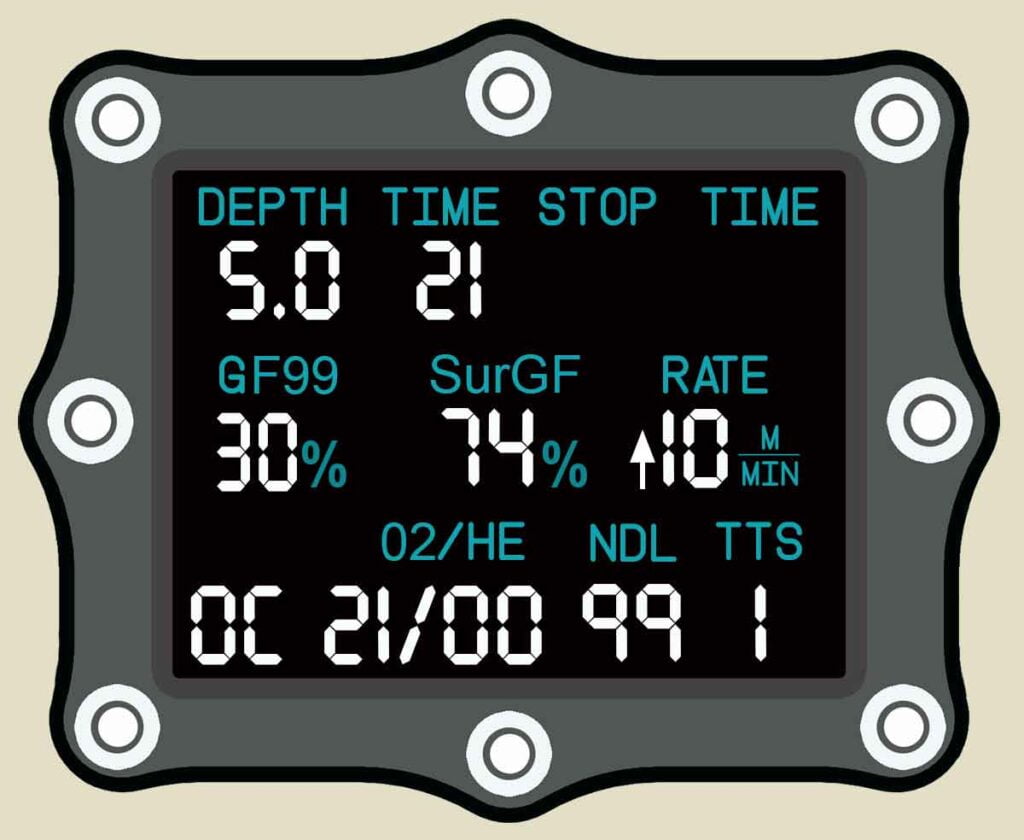
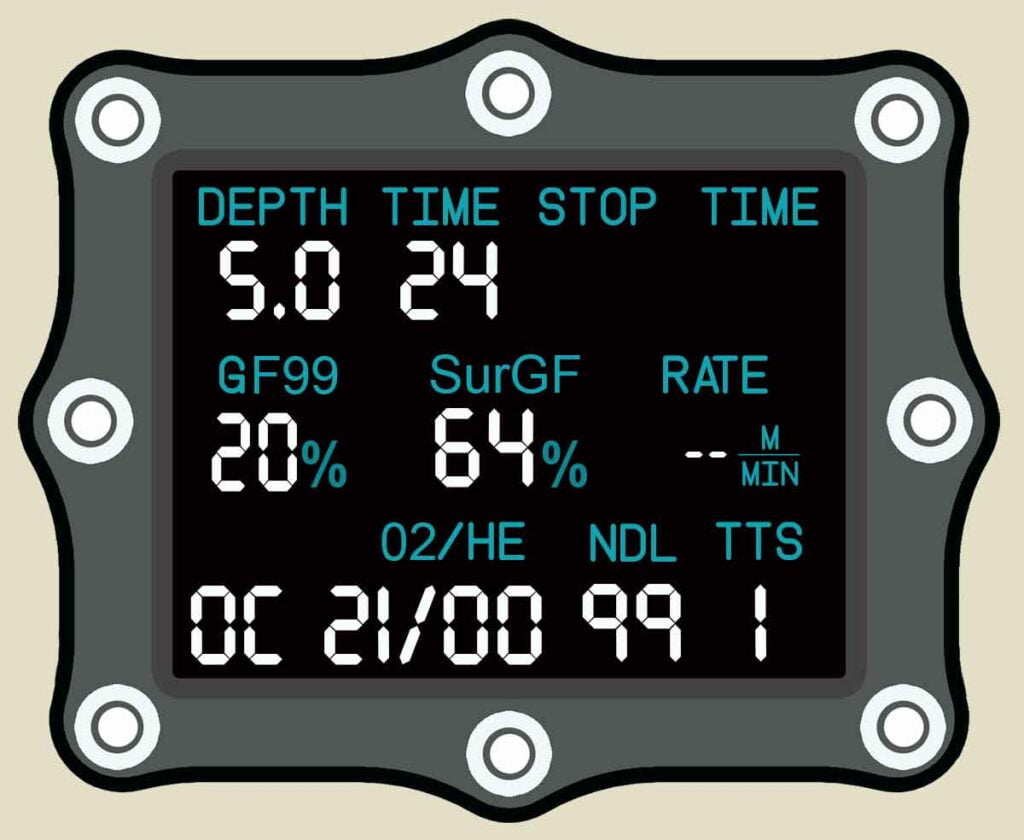
At the start of the safety stop
As you reach your safety stop at 5m (16ft), your GF99 has risen to 30%. This is an effective amount of super-saturation to quickly remove nitrogen from your body. The SurGF has only dropped 1% over less than 3 minutes of ascent.
At the end of the safety stop
After 3 minutes has elapsed your GF99 has reduced. This is because your body has released nitrogen during the safety stop. Simultaneously, that release of nitrogen has lowered your surfacing gradient factor (SurGF) by 10%. In essense, the safety stop added 10% more conservatism to your dive.
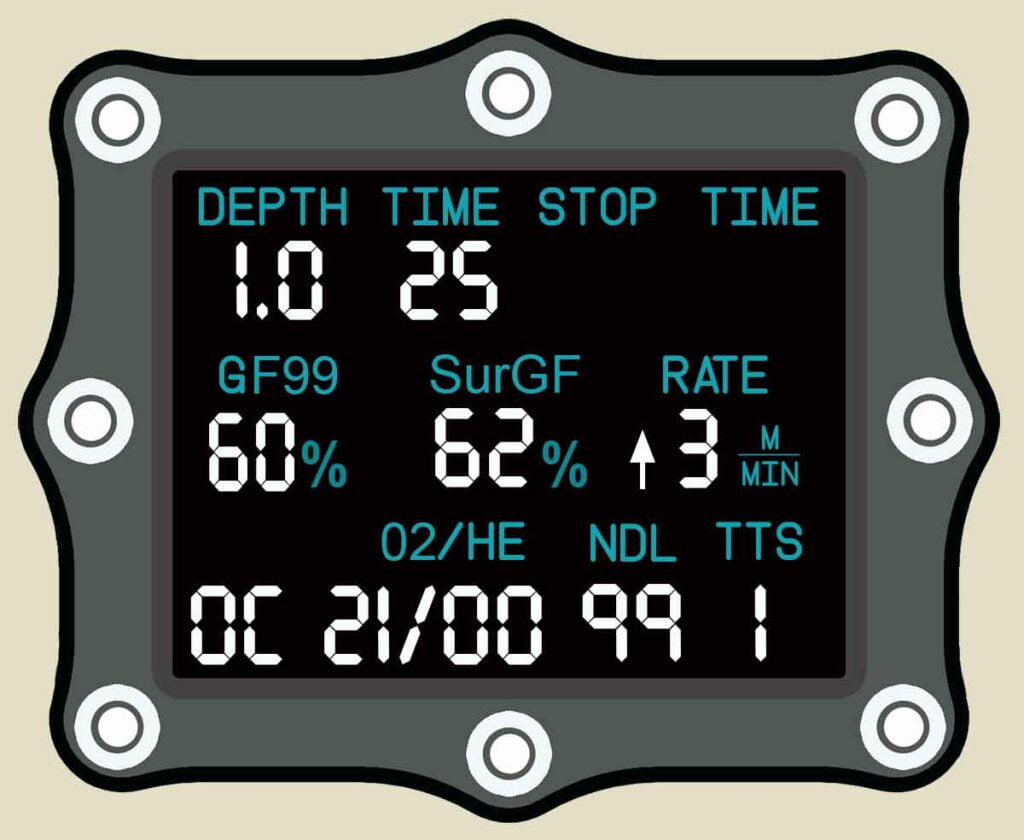
Surfacing from the dive
Ascending slowly from the safety stop at an ascent rate of 3m (10ft) per minute allows further nitrogen release. Pressure reduces quickly as you near the surface. As a result, the GF99 will spike increasingly closer to the SurGF. Those figures will match when you reach the surface.
How you can use Shearwater dive computer settings to better manage your dive profiles
As you can see from the previous example, the GF99 and SurGF displays keep you informed about what is happening with the nitrogen inside your body.
Simply being aware of that information helps you develop better diving intuition. In turn, with experience you will become more adept at managing your dive profile and ascent for optimal safety.
However, this gradient factors information also enables you to make real-time judgments on your dives. There are three specific circumstances where GF99 and SurGF are invaluble aids to decision making:
1. Multi-level diving
The GF99 display shows how effectively you are releasing nitrogen in real-time. Instead of simply ascending to a new level to extend your NDL, you can use the GF99 display to ensure that your new diving level maximizes nitrogen removal.
Put simply, GF99 empowers you to choose multi-level dive depths that will get you out of the water with far less nitrogen remaining in your body. Obviously, less nitrogen means less DCS risk and a smaller chance of experience decompression stress.
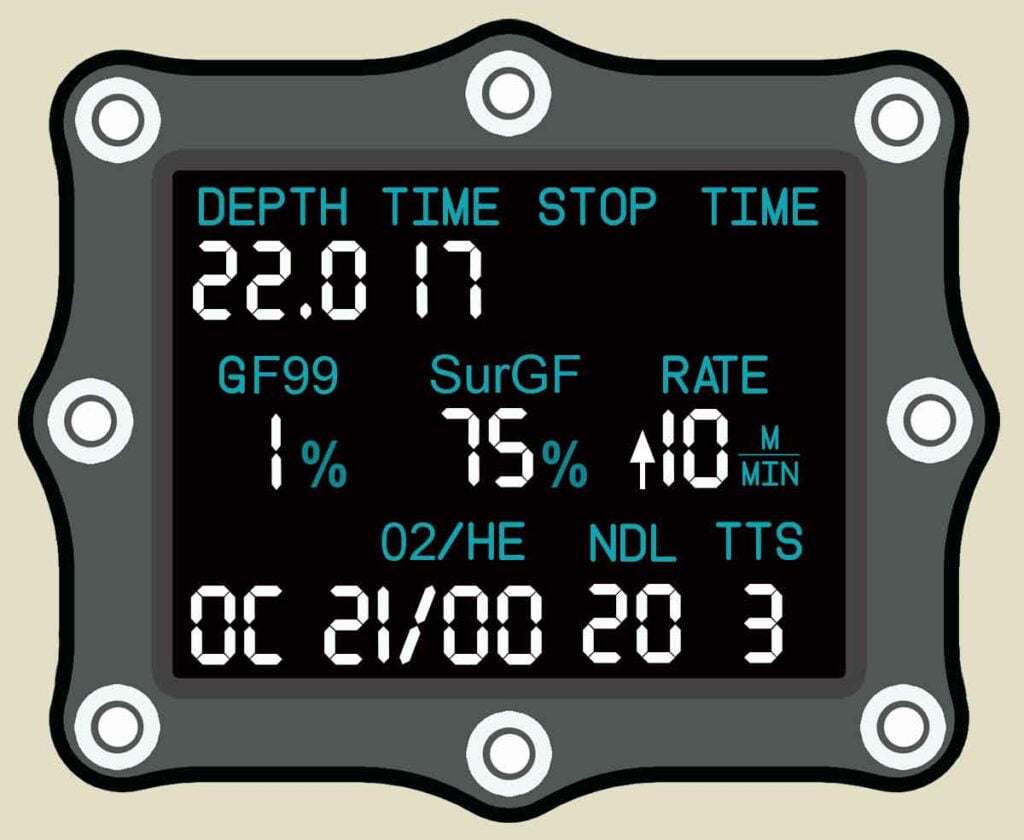
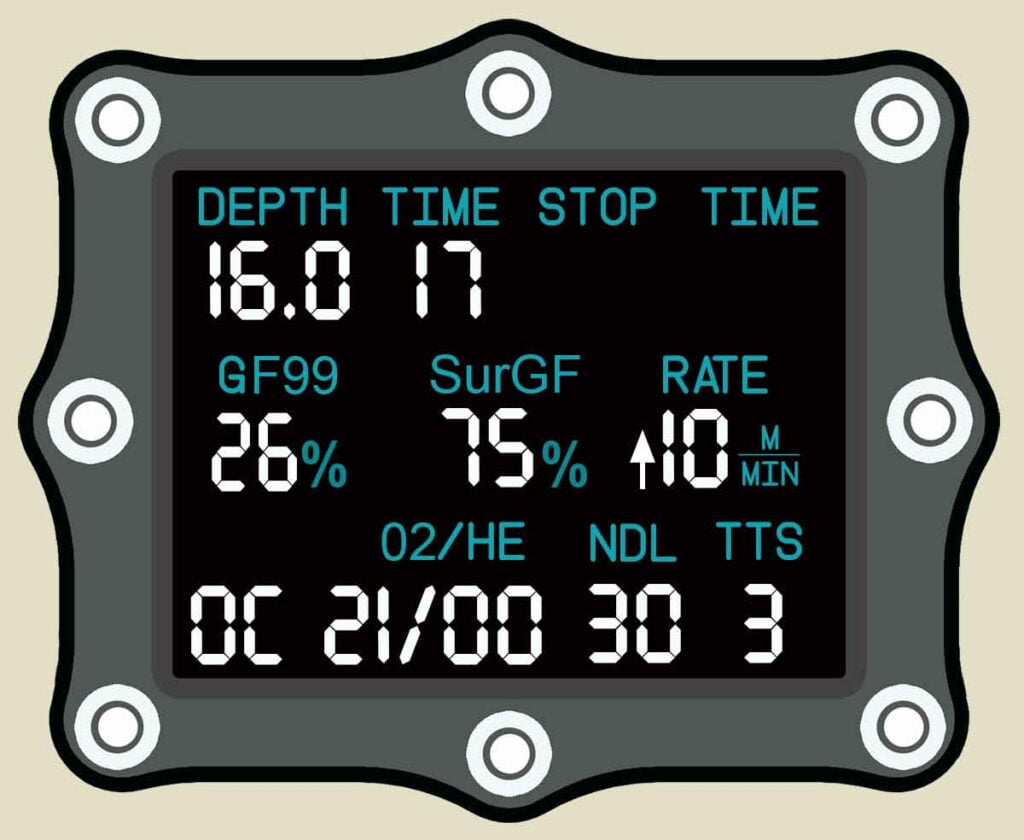
Example of off-gassing efficiency at different depths
GF99 1% indicates neglible nitrogen release, even if you dive time is extended
GF99 26% shows you are getting rid of nitrogen, not just extended dive time
2. Optimizing safety stop depth
The GF99 display also informs you about off-gassing efficiency at your current depth.
A standard 5m (16ft) safety stop
In this example, you conduct a standard safety stop at 5m (16ft). After a shallower dive, you have only reached GF99 8% at that depth. It is a low number and indicates poor nitrogen release speed.
After 3 minutes on the safety stop, your SurGF has only dropped by a paltry 2%. Weak off-gassing efficiency means that a safety stop offers little value in adding conservatism.
On shallower dives, it isn’t uncommon to have a single-digit GF99. For that reason an arbitrary safety stop depth of 5m (16ft) can be a complete waste of your time. You won’t remove any significant amount of nitrogen from your body with a small GF99.
In contrast, you can use the GF99 display to ascend to a depth that guarantees more efficient nitrogen removal.
As a rule-of-thumb, you should aim for anywhere between 1/3 and 1/2 of your preset GFhi. For instance, if your GFhi is set at 85%, aim to conduct your safety stop at a depth that creates a GF99 between 28% and 42%.
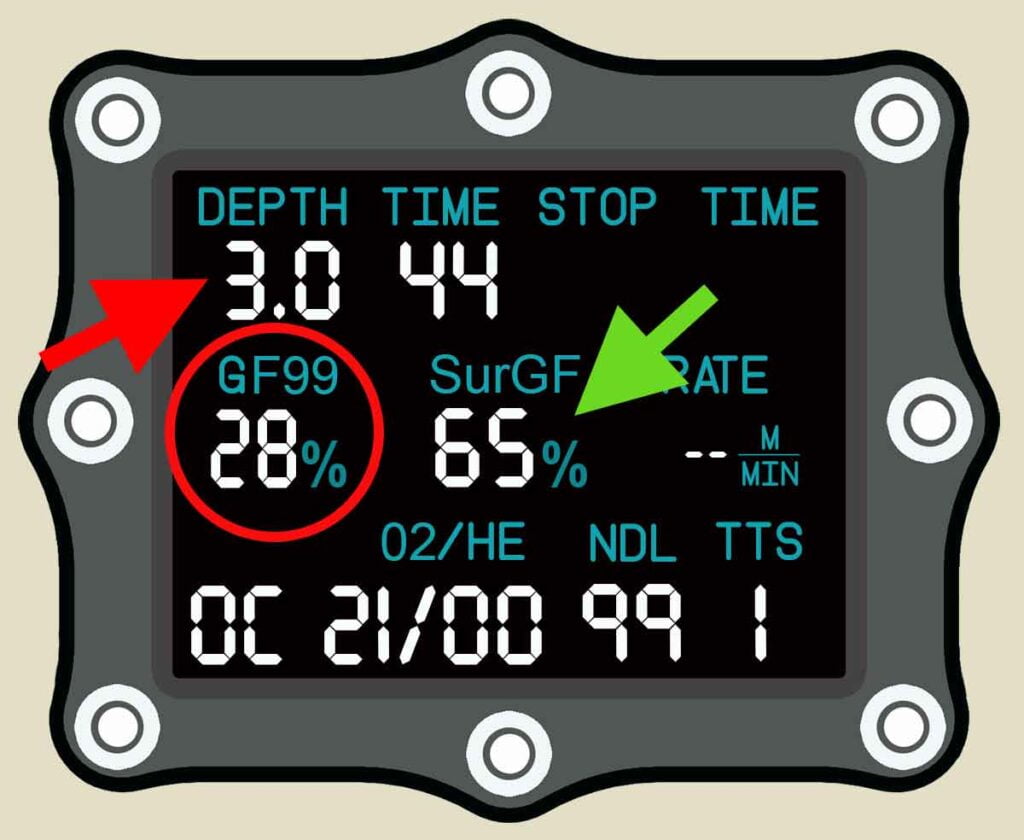
Using GF99 to set an optimal safety stop depth
In this example, you have ascended to a depth of 3m (10ft) to conduct your safety stop. Shallower depth allows a higher GF99 of 35%. This indicated faster nitrogen removal.
Because nitrogen is leaving your body at a faster speed, the same 3 minute safety stop reduces your SurGF to 65%. The extra efficiency in off-gassing means you now create 10% conservatism from your safety stop.
As you can see, varying the depth of your safety stop can pay huge dividends to your safety. There is no ideal safety stop depth, because it depends on specific dive parameters. Using GF99 in your Shearwater dive computer settings gives you the information you need to set that depth.
3. Adding greater conservatism to your dive
Whilst you set your predefined conservatism prior to diving, there may be situations that arise on dives where you feel it is prudent to add a little more safety.
For instance:
You get unexpectedly cold on the dive
The dive demands more physical effort than expected
The SurGF display lets you do that in an informed way. It is far better than merely hanging around for an unspecified amount of time and hoping it might help.
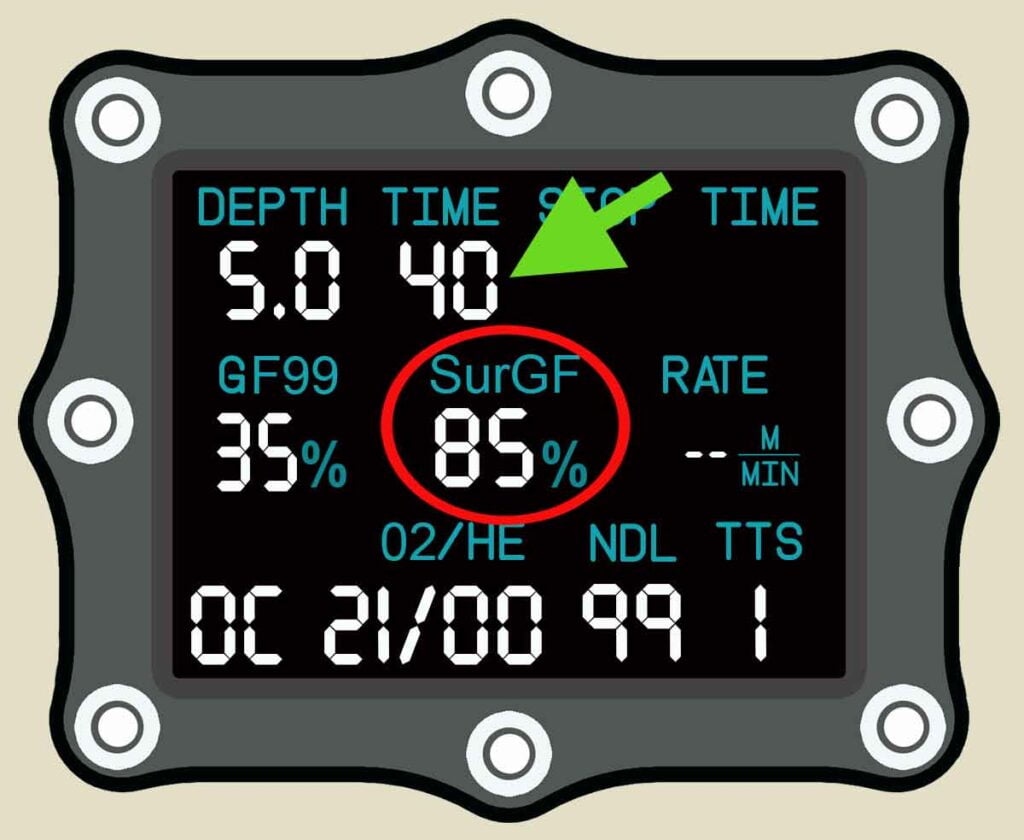
Example of using SurGF to extend a safety stop
Let’s say you reach your safety stop after 40 minutes of diving. The SurGF indicates 85%. You are at the limit of the default conservatism.
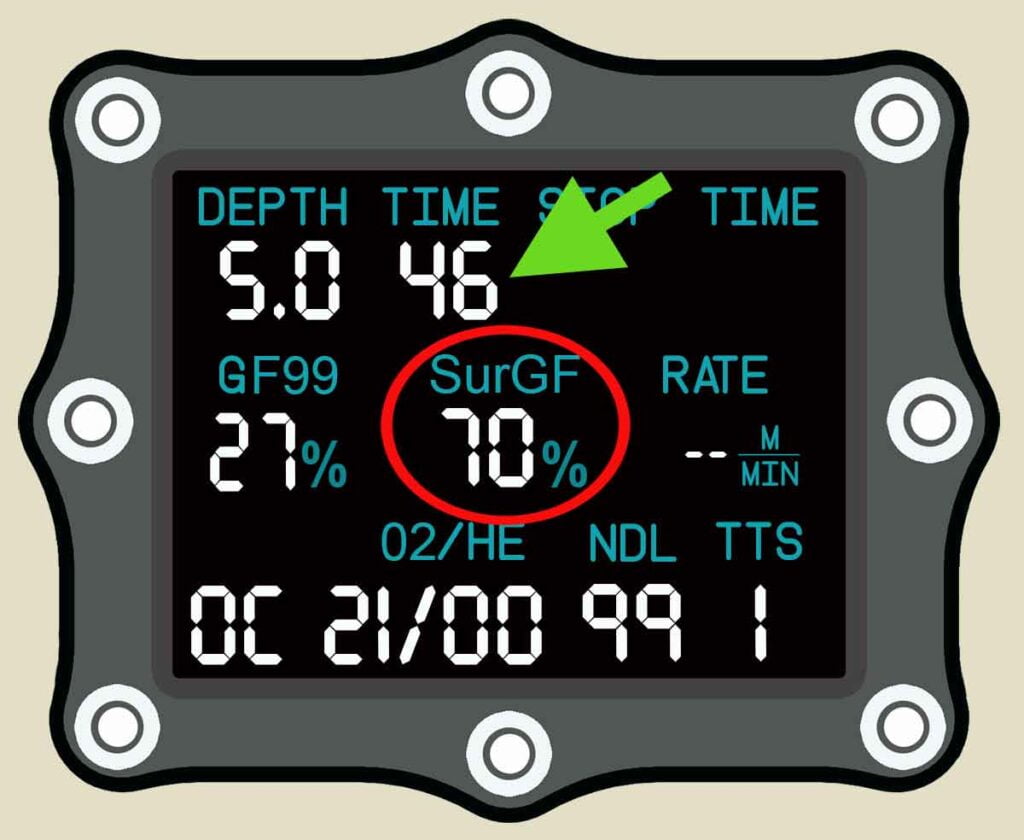
After 3 minutes on the safety stop, your SurGF has reduced to 79%. You have effectively added 6% insulation against DCS risk.
If you wish to add further conservatism, you can remain on your safety stop until the SurGF reaches a desired level. In this case, a further 3 minutes brings the SurGF down to 70%. This is a very safe 30% insulation against DCS risk.
Get the most out of your Shearwater dive computer settings
In conclusion, if you’re a Shearwater dive computer owner it’s time to start exploring the advanced settings and become a Shearwater power user.
By opting for advanced Shearwater dive computer settings you can:
Improve your safety from DCS
Avoid post-dive fatigue
Gain an intuitive understanding of how pressure affects the behavior of nitrogen in your body.
This article has provided a comprehensive guide to understanding Gradient Factors and how they work in the Bühlmann ZHL-16C decompression model used in Shearwater computers.
Shearwater dive computer settings: GF99 and SurGF
My article has also explained how and why to use the unique Shearwater GF99 and SurGF displays:
This is another excellent read on diving theory, and also includes a clear and thorough explanation of how Gradient Factors work with the Bühlmann ZHL-16 model.
Online articles on Gradient Factors and Bühlmann ZHL-16
Currently residing in Subic Bay, Philippines; he has amassed more than 10,000 open-circuit and CCR dives over three decades of challenging diving across the globe.
Andy has published numerous diving magazine articles and designed advanced certification courses for several dive training agencies, He regularly tests and reviews new dive gear for scuba equipment manufacturers. Andy is currently writing a series of advanced diving books and creating a range of tech diving clothing and accessories.
Prior to becoming a professional technical diving educator in 2006, Andy was a commissioned officer in the Royal Air Force and has served in Iraq, Afghanistan, Belize, and Cyprus.
What decompression model is used in Shearwater computers?
Shearwater diving computers use Bühlmann ZHL-16C with Gradient Factors. There are 3 default gradient factor settings, or they can be customized. Some models also permit aftermarket upgrade with the VPM-B decompression model.
What does 40/85 gradient factor mean?
The high gradient factor is set at 85% of the m-value. This equates to 15% conservatism. The low gradient factor is 40% of the m-value. This dictates the pressure differential where mandatory decompression stops will begin.
What is the default gradient factor on a Shearwater computer?
The default gradient factor is 40/85. This represents medium conservatism. Shearwater computers also have low (45/95) and high (35/75) preset conservatism options.
What is GF99 on a Shearwater dive computer?
GF99 is a display option that gives information on the diver’s real-time pressure differential status. A higher figure indicates more effective nitrogen off-gassing, but a higher risk of bubble formation.
What is SurGF on a Shearwater dive computer?
SurGF indicates the diver’s gradient factor if they were to surface instantly. A higher % indicates more risk of DCS. 100% is the controlling maximum value (m-value) for safety.
What are tissue compartments?
Tissue compartments are used to model inert gas (i.e. nitrogen) absorption and release in decompression algorithms. They hypothetically represent different speeds, calculated as half-times.
What is tissue compartment half-time?
The half-time of a tissue compartment is the number of minutes that it takes for a compartment to absorb or release half of the inert gas (i.e. nitrogen) pressure from the body.
What tissue compartment half-times are used in the Buhlman ZHL-16 algorithm?
How To Use Less Air When Scuba Diving? The best way to use less air while scuba diving is to address the root cause of higher air consumption, not to focus on the…
Scuba Gas Planning: Gas Management For Divers Learn scuba gas planning for your dives! A step-by-step guide to gas management for divers. Enhance your dive knowledge & safety underwater!
How To Best Ascend When Scuba Diving? Three important tips on how to ascend when scuba diving. Read this to increase your safety and enjoy less fatigue after your dives!
This article will soon be available as a pdf ebook
Hi Andy
Are your all your articles, specifically the ones on shearwater “power User’ articles, available for down load as ebooks or PDFs?
Thanks Claire
Amazing article! Simple and to the point. Lots of very useful information in layman’s language.
Andy, I really appreciate you taking the time to explain these things in depth. It is exciting to be able to learn about how to beter utilize the potions and settings on my Perdix AI
Very good article , easy to understand « for divers » and also good computer !
Appreciate the article – however two things I can’t seem to get (Perdix AI). 1. I can’t set SurfGp as the middle item on the center row – ppo2 or nothing. 2. I can’t show ascent rate as it is not an option.
Thanks
Thank you very much for your article Mr. Davis.
I start diving a year ago, and your article really help me understand how to program my Peregrine and the importance of some of his features.
I’m very grateful that your share your knowledge and your experience with us throught this article.
I will read yours others publication, that’s for sure.
Thanks for putting this together. Along with Deco for Diver which really helped me visualize the physics of decompression, Shearwater manuals, and now your blog post it makes way more sense. You helped clarify what I’ll see on screen in the water which married up to what Mark teaches about what’s going on in the body perfectly.
Great article! I was doing 3 dives a day in Indonesia on my last trip, I found myself spending lots of time focusing on the NDL and always changing levels in order to increase NDL a bit. I wish I could find this article earlier!
Great in depth explanation Andy! Will incorporate this in my dive planning.
Great article Andy! Really indepth details on using of Shearwater and relations of GF.