Some Options for Homemade / DIY Sidemount Rigs
When I was a new sidemount diver there weren’t many commercially sold rigs available. As a result, I created several homemade DIY sidemount configurations using what was available; typically converting backmount dive wings.
These sidemount configurations were exceptionally economical – costing significantly less than ‘off-the-shelf’ purchased rigs. The majority of components can be bought ‘over-the-counter’ at a reasonably well-stocked dive shop, and/or make use of equipment you may already own.
Both DIY sidemount project configurations detailed here make use of a ‘Hogarthian’ approach to the harness. This allows me to retain a high degree of equipment familiarity when switching between rigs. The value of equipment consistency in promoting fluent and in-grained muscle memory is critical.
Primarily wreck diving in Subic Bay, my dives tend to be extended duration (including decompression) wreck penetrations within recreational ranges (20-40m).
For most of these, I utilize an exceptionally lightweight and low-profile minimalist rig. For deeper dives, requiring 4+ cylinders of greater volume I use a heavyweight rig that converts a dual-bladder wing.
Travel / Lightweight Recreational DIY Sidemount Configuration
This was a DIY sidemount project during 2011 intended for recreational diving. I used this rig for sidemount dives with 2xAL80 cylinders and up to one small (>40cuft) deco/stage cylinder.
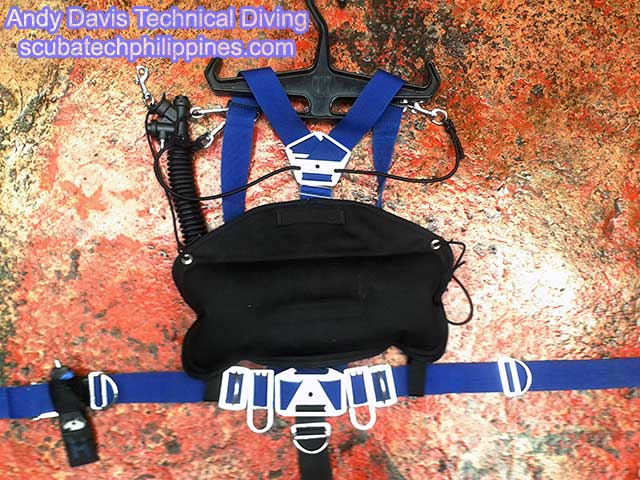
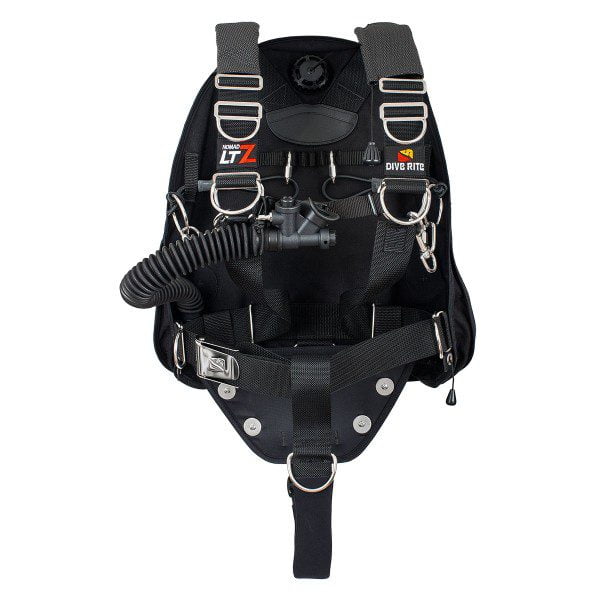
The harness is homemade; with locally water-cut shoulder/lumbar plates and low-profile D-rings. The plates were manufactured using a basic AUTOCAD template that I supplied and cost less than $25 per set.
Read my ultimate guide to setting up a sidemount harness
I use DiveRite off-set D-rings at the rear for equipment (reels/DSMB/kit pocket) stowage, along with a rear crotch strap D-ring. The primary cylinder attachment is via a fixed D-ring on the waist belt, then I move the cylinders lower around the waist belt to low-profile D-rings as they become more buoyant.
The DiveRite Trim Pillow
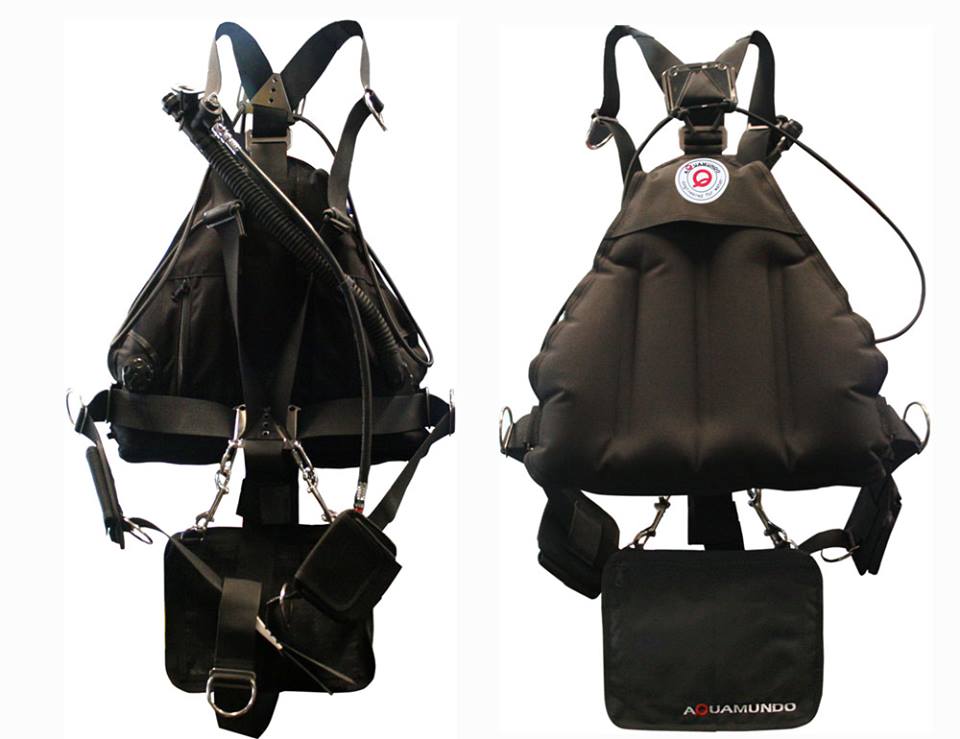
Buoyancy is provided by a DiveRite Trim Pillow. It offers just 6 lbs of lift when fully inflated (sufficient for the cylinder option mentioned) but is very low profile and incredibly lightweight. The Trim pillow is threaded onto the spine webbing and connects to the waist strap using nylon loops. I use bungee/bolt-snap from grommets in the top corners of the wing which route around the torso (as per a Stealth wing) to keep the Pillow wrapped cleanly against my back/torso.
Sadly, the Trim Pillow was recently discontinued by DiveRite – so if you’re interested in replicating my rig, get one ASAP! (or lobby DiveRite to bring it back…it’s an original concept as a “trim aid” kinda sucks… but it is great for a cheap, superlight-role sidemount bladder).
An alternative to the DiveRite Trim Pillow is the slightly larger (10L) Deco Sidemount wing.
Video: My experimentation with a no-harness system using the Trim Pillow
Trim weight pouches on the spine strap
I have added a couple of trim weight pouches that also thread onto the spine webbing and sit directly underneath the wing. These can each accommodate 3 lbs of weight. It is perfect for dives with 2 aluminium tanks and a tropical wetsuit.
This makes it easy to travel with the rig – as opposed to threading weights onto the spine webbing each time (requiring some fiddling with the weightbelt retainers that hold the rig together).
I opted for a separate dedicated crotch strap, as opposed to the continuous routing of the stiffer spine webbing from shoulders to the front waist that, for example, the Razor sidemount uses. This was purely for increased comfort, but also simplifies the initial set-up and adjustment of the rig.
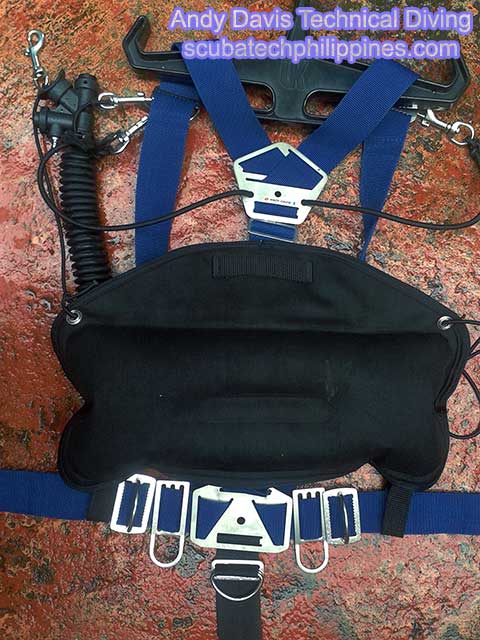
Configuring the sidemount bungees
The continuous bungee runs through the shoulder plate (knotted to prevent ‘pull-through’). I opt for a 6mm bungee, which has sufficient strength to hold the cylinders in good trim, whilst is also flexible enough to allow easy connection of the cylinders.
The LPI/corrugated runs from the lower left bladder across the chest, bungee to the right-side D-ring, as is common in many sidemount configurations and consistent with all the sidemount rigs that I use.
Total Cost:
- DiveRite Trim Pillow: $85
- Lumbar/Shoulder Plates: $25
- Webbing: $20
- D-Rings and Clips: $55
- Crotch Strap: $15
- 6mm Bungee: $8
Rig made for: $208.00
Technical / Redundant Bladder DIY Sidemount Configuration
For deeper diving that requires more cylinders, I used a conversion of a dual-bladder technical back-mount BCD.
This works exceptionally well, providing ample lift and stability, at the expense of bulk/weight. However, it remains considerably more streamlined than many ‘off-the-shelf’ redundant bladder sidemount options. For instance, the Hollis SMS100.
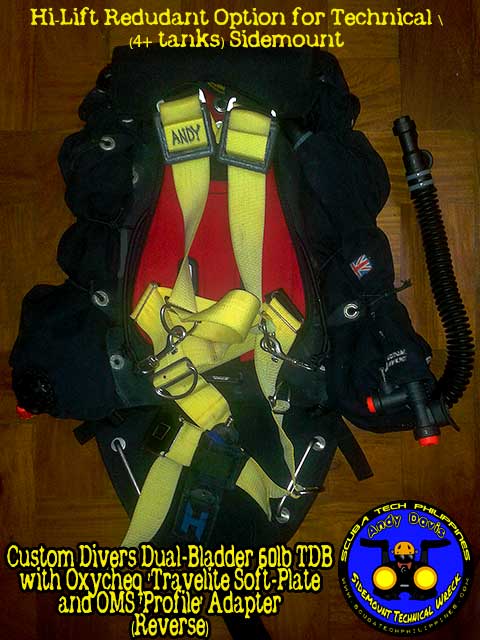
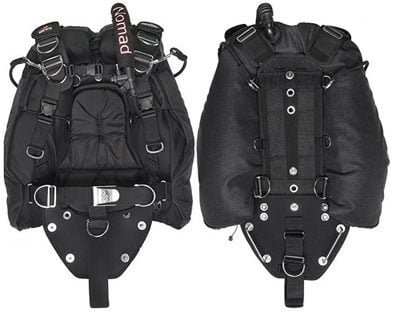
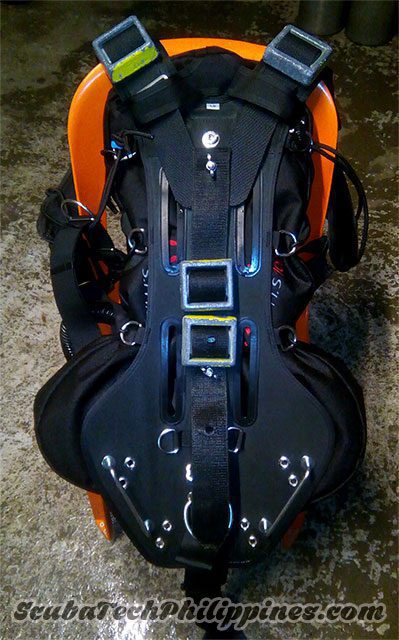
The configuration utilizes a Custom Divers 66lb Dual-Bladder TDB wing, mounted on an Oxycheq ‘Ultralite’ soft travel backplate with a single-piece hogarthian harness.
The DIY sidemount rig is completed with an OMS ‘Profile’ sidemount adapter – this is a convenient option for preventing wing taco and providing a butt plate for mounting ancillaries/stowing kit.
The Custom Divers TDB wing for Sidemount Conversion
The Custom Divers TDB wing is well suited to this conversion. It has a redundant bladder for those that need it.
The low-pressure inflators offset on the shoulders so that they aren’t occluded by the OMS Profile adapter. This is important because the adapter can cover and obstruct LPI/OPV if they are mounted centrally at the top of the wing.
From what I’ve seen, only the Custom Divers TDB and OMS Tesseract wings have sufficiently spaced LPI/OPV to achieve a snug fit with the Profile adapter. It provides 66lbs/300nm of buoyancy, which is more than adequate for most multi-stage, mixed gas deco diving requirements.
LPI and Pull Dump positioning
I exchanged the backup low-pressure inflator (LPI) from the top-left shoulder down to the bottom-left OPV on the wing. I now use this as my primary inflation. The pull-dump/over-pressure valve (OPV) now mounted on the top right shoulder is convenient for dumping, even in horizontal trim.
This modification keeps my primary inflator routed consistently with my other sidemount rigs – and remains ideally located to connect with a short LP inflation hose routed from the end port of my left-side/primary sidemount regulator.
The former ‘primary’ bladder inflator is now the backup. This remains routed from the top left shoulder but is bungeed down the side of the wing (behind my shoulder).
The LPI hose is sufficiently long and flexible to bend out beneath my arm and mate with the LPI hose when it is needed. It also reaches my mouth for oral inflation, without needing to be removed from the bungee that stows it.
I don’t dive with the backup inflator connected. The backup wing OPV is on the lower right of the wing and easily accessible.
Shaping the wing for use with aluminum tanks
In conjunction with lateral D-rings provided on the OMS Profile adapter, I have used a 3mm bungee to ‘shape’ the wing for effective sidemount trim. I restrict the top of the wing but leave the lower half more unrestrained.
This not only keeps the wing snug (it doesn’t extend out beyond the width of my torso) but also shifts the buoyancy lower towards my hips – which is the ideal location for the lift when sidemount diving in horizontal trim.
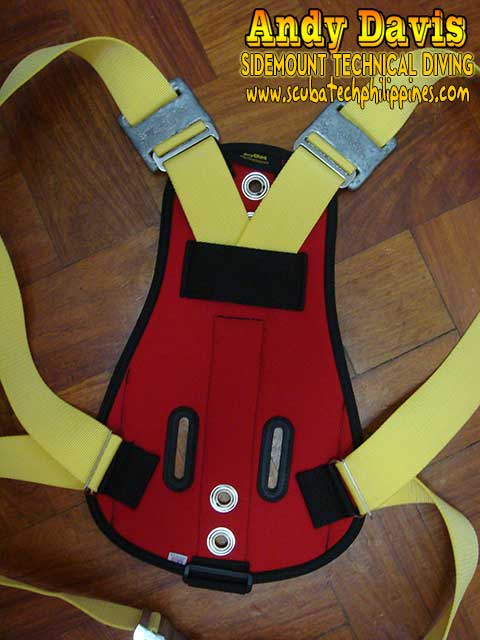
The Oxycheq Ultralite Travel Backplate for DIY Sidemount Conversion
I opted for the Oxycheq ‘Ultralite’ backplate because I reserve concerns about the suitability of metal backplates for use in confined space wreck penetrations.
It would be too easy to ‘wedge’ a metal backplate into a tight space. The Ultralite backplate solves that problem, whilst still permitting the clean and consistent use of a hogarthian style single-piece harness approach. As mentioned, I feel it is important to retain consistency between all of the rigs that I use.
Lightest option on the market
The Oxycheq Travelite is the lightest option currently on the market, weighing just 257 grams. Another option would have been a Zeagle ‘Express Tech’ soft backplate. That is longer, so possibly better for those with longer torsos. However, I couldn’t find those available to buy in my area.
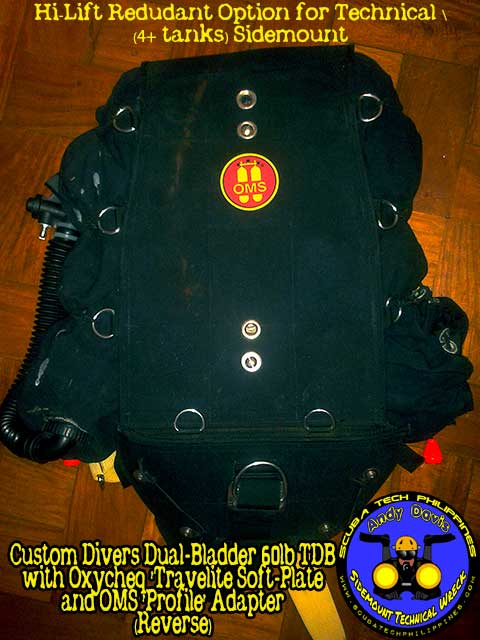
The OMS Profile Adapter for Sidemount Configuration
The OMS Profile Sidemount Adapter was designed to mate with the OMS Tesseract Wing to create a simple conversion between sidemount and backmount.
I’ll be honest, the connections/mounting is very specific to the Tesseract, so some ingenuity and perseverance need to be applied to make it work with other brands/models of the wing.
I needed to use extra lengths of 1″ nylon strap to make it work with the Custom Divers TDB. A few hours of finickety struggle, a few tired fingers and some choice expletives… and it all assembled rock-solidly.
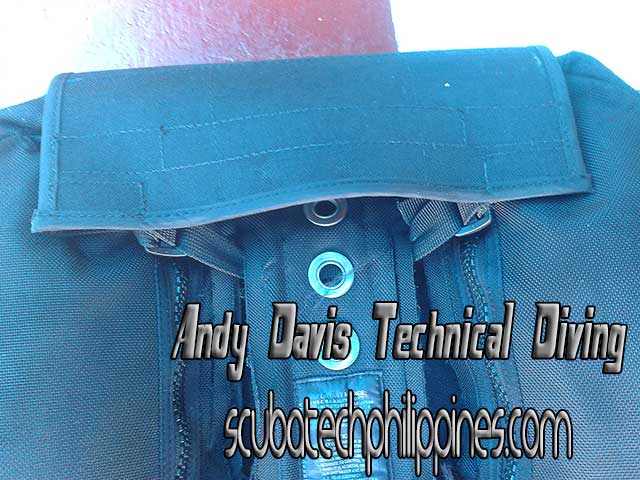
You could, of course, just buy a Tesseract BCD to go with the profile, but my aim was to convert the equipment I already owned. I’ve had the Custom Divers TDB for over a decade and it had been relegated to a plastic crate under the stairs for several years, so why not make good use of it?
OMS… if you’re listening… it’d be great if you could refine a version of the Profile for use as a generic adapter for any model/brand of the wing. Just a few changes… I’d be happy to help you with that. ;)
Compatibility with the adaptor
The Profile also features a ‘wrap-over’ protector for the top of the wing. That’s a great idea for providing some serious abrasion resistance when conducting ‘squeeze-through’ penetrations.
However, the ‘wrap over’ will obscure the LPI on many wings. The Tesseract wing is designed with this in mind. It off-sets the LPI further out on the shoulders. Luckily, the Custom Divers TDB also had sufficiently spaced LPI to enable a clean mating.
One useful feature of the Profile Sidemount Adapter is the 3 small D-rings located down each rear side of the adapter. This enabled me to route some 3mm bungee around the wing to help shape the buoyancy profile.
Bungee wings help with shaping
I think the original concept behind those D-rings was for bungee attachment, but I like the function they provided me. Normally I wouldn’t be a fan of bungee wings. However, for this type of DIY sidemount conversion, it is very beneficial to restrict the wing shape and maximize buoyancy retention at the tail.
The Profile Adapter includes an integral butt-plate. My first modification was to reverse the ‘rails’ onto the underside of the plate. This makes the rails easier to locate (sounds more difficult, but isn’t) and prevents them from becoming an entrapment hazard in tight spaces.
No need for a sidemount buttplate
Butt-plate mounting is more synonymous with cold-water/steel cylinder sidemount diving. That’s odd, because, with other wings (such as the Hollis SMS50), I find the butt plate to be a very inefficient mounting location for aluminium cylinders.
My only other modification was to add a D-ring where the crotch strap originates and also tie some loops of bungee across the butt plate to enable convenient stowage of a large DSMB/Lift-bag.
Total Cost:
- Oxycheq Ultralite Backplate: $80
- OMS Profile Sidemount Adapter: $100
- Custom Divers TDB Wing: used existing/already owned
- D-Rings and Clips: $55
- Crotch Strap: $15
- 6mm Bungee: $8
Rig made for: $258.00
About The Author

Andy Davis is a RAID, PADI TecRec, ANDI, BSAC, and SSI-qualified independent technical diving instructor who specializes in teaching sidemount, trimix, and advanced wreck diving courses.
Currently residing in Subic Bay, Philippines; he has amassed more than 10,000 open-circuit and CCR dives over three decades of challenging diving across the globe.
Andy has published numerous diving magazine articles and designed advanced certification courses for several dive training agencies, He regularly tests and reviews new dive gear for scuba equipment manufacturers. Andy is currently writing a series of advanced diving books and creating a range of tech diving clothing and accessories.
Prior to becoming a professional technical diving educator in 2006, Andy was a commissioned officer in the Royal Air Force and has served in Iraq, Afghanistan, Belize, and Cyprus.
In 2023, Andy was named in the “Who’s Who of Sidemount” list by GUE InDepth Magazine.
Purchase my exclusive diving ebooks!
About The Author

Andy Davis is a RAID, PADI TecRec, ANDI, BSAC, and SSI-qualified independent technical diving instructor who specializes in teaching sidemount, trimix, and advanced wreck diving courses.
Currently residing in Subic Bay, Philippines; he has amassed more than 10,000 open-circuit and CCR dives over three decades of challenging diving across the globe.
Andy has published numerous diving magazine articles and designed advanced certification courses for several dive training agencies, He regularly tests and reviews new dive gear for scuba equipment manufacturers. Andy is currently writing a series of advanced diving books and creating a range of tech diving clothing and accessories.
Prior to becoming a professional technical diving educator in 2006, Andy was a commissioned officer in the Royal Air Force and has served in Iraq, Afghanistan, Belize, and Cyprus.
In 2023, Andy was named in the “Who’s Who of Sidemount” list by GUE InDepth Magazine.
Purchase my exclusive diving ebooks!
Originally posted 2013-07-27 12:23:31.


