I regularly have sidemount students bring the Hollis SMS100 for their courses. The SMS100 is a ‘convertible’ backmount / sidemount system. That causes compromises in design. As a result, modifications are needed to get the best performance from it.
Also, the SMS100 primarily caters for cold-water divers. As such, it tends to be larger and more bulky than warm-water/tropical sidemount divers desire. A few changes and a bit of streamlining make it much nicer for tropical divers.
Over the years, I have developed a few ‘standard’ modifications to the SMS100. These tweaks improve functionality and efficiency for dedicated sidemount diving. They also optimize it for warm-water/aluminum cylinder conditions.
These modifications are done as part of the equipment workshop that I start all of my sidemount courses with. A critical part of sidemount training that demonstrates the benefits of proper sizing, configuration, tweaking and adjustment.
Sidemount training is, after all, a process that simply converts existing divers from backmount to sidemount equipment.
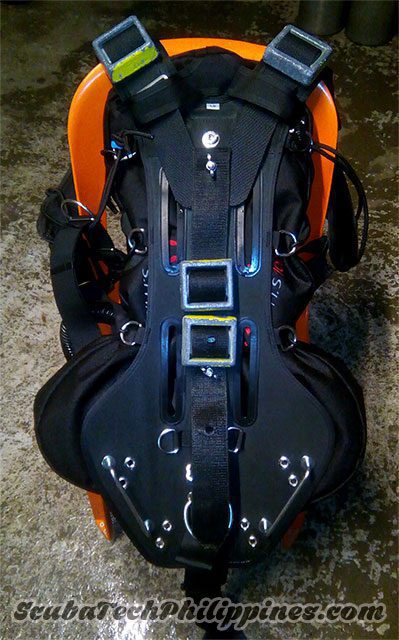
A look at the rear of a modified Hollis SMS100
There are a number of ‘semi-commercial’ modification options for the SMS100; such as the exceptional Edd Sorenson mods. But these require you to ship your rig away for sewing, tailoring and additional components to be added.
Sponsored Link
No tools or sewing are required
My simple modifications require no sewing or expensive additions. Most of the tweaks are done using only what comes out of the SMS100 box. No special tools are required.
The only additional requirements are:
1 meter of 6mm bungee
20cm of 3mm bungee
You can pick these up in any decent diving or marine chandlery shop. The complete modifications can be done in a single morning.
A converted Hollis SMS100 sidemount from the front. The streamlining and other tweaks can be seen.
1. Streamlining and shaping the wing.
The Hollis SMS100 is designed to function as both a sidemount and backmount BCD. This necessitates certain compromises that degrade it’s efficiency compared to pure sidemount rigs.
The donut-shaped wing is the foremost of those inefficiencies. To rectify this, and optimize the wing for sidemount, I use the existing wing bungees to shape and streamline the wing.
Keep the majority of wing buoyancy over the lower torso
Sidemount wings typically benefit from retaining most of their buoyancy on the lower torso. This is why you see so many triangle or pear-shaped sidemount BCDs.
To replicate this on the SMS100, I re-thread the existing wing bungees, using the built-in small D-rings, to tighten and ‘roll-in’ the upper wing; narrowing the profile and pushing most of the lift to the lower section.
Use the existing wing bungee to shape and streamline the wing
The existing wing bungee is simply threaded through all of the small D-rings to constrict the wing tightly. Once you reach the bottom D-ring, bring the end of the bungee back upwards to connect to a higher D-ring (the higher the ring, the tighter the constriction). This leaves the bottom section of the wing unrestricted and full capacity; which is how most sidemount wings are designed to work.
How much Hollis SMS100 buoyancy do you need?
The SMS100 has massive buoyancy; and most sidemount divers, even tech divers, will never require this capacity. Especially so with aluminum cylinders and wetsuits. So, it’s fine to restrict the wing. However, the bungee will still allow the wing to inflate larger in the unlikely event that this capacity is needed.
This step of the modification helps sidemount divers to retain proper trim in the water, as the majority of their buoyancy is now directly counter-opposed to the weight of the cylinders on their hips.
The shaping also reduces air migration around the wing, which promotes more stability and control in the water.
2. Low Pressure Inflator Positioning
Sidemount configuration moves the location of the regulator 1st stages from behind the neck to under the armpits. Logic dictates that the positioning of the Low Pressure Inflator (LPI) also needs to move in order to accommodate this, whilst retaining clean and efficient hose routing.
Top-mounted LPI aren’t good for most divers
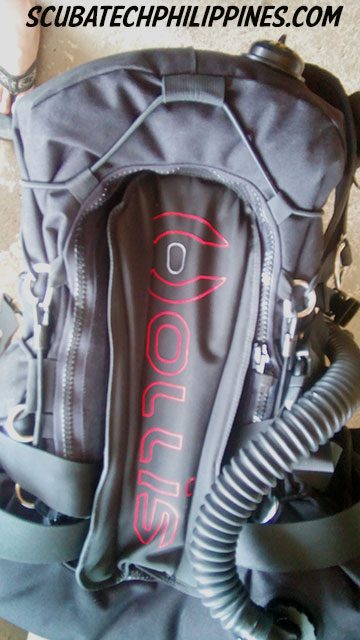
On the Hollis SMS100, the rig is supplied with the LPI top-mounted and an Over-Pressure Valve (OPV or pull-dump) on the left inner-hip area of the wing. It is a simple task to swap the positions of the LPI and OPV, as they have identical threads.
Detail of the OPV swapped to the top position on the wing
With the OPV at the top of the wing, the sidemount diver can easily dump air on descent and ascent. I route the pull-dump cord forwards, retained under the nylon loops on the shoulder harness.
No pull-dump on the SMS100 lower wing
Unfortunately, the SMS100 doesn’t have a secondary OPV on the lower wing. Thus, to to dump air in horizontal trim you either need to roll slightly to the right and dump from the LPI. Alternatively, come slightly head-up. It’d be nice if Hollis put a secondary OPV on the lower wing to rectify this.
The OPV pull-dump is retained under existing nylon loops. You can see shoulder trim-weights in the rear.
The Low Pressure Inflator (LPI) now routes upwards/across from the lower left kidney area.
This provides a clean pairing with the low pressure inflator hose that routes horizontally across the torso from the left regulator 1st stage.
Positioning the LPI on the lower-left kidney is a common feature on the vast majority of sidemount BCDs.
The Low Pressure Inflator (LPI) routes from the bottom left, so that it corresponds to the hose routing from the left-side regulator
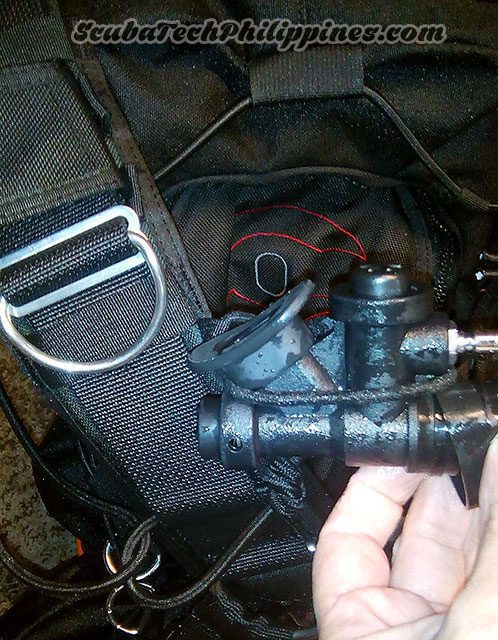
I route the LPI corrugated hose up and under the waist belt and secure it to the lower part of the shoulder strap using the velcro attachment that was previously on the left shoulder.
Detail of the LPI attachment and routing under the waist strap, secured using the velcro attachment off the shoulder.
The top of the LPI secures across the chest via a small loop of 3mm bungee tied through an existing small nylon loop on the right shoulder harness. The places the LPI in a convenient location for oral inflation, and also keeps the diver very streamlined. The LPI can easily be removed/replaced from the bungee loop.
The LPI is secured across the chest using a small loop of bungee
Sponsored Link
3. Weighting System
The next tweak is to provide a cheap and simple weighting system o the SMS100. I normally have students put a couple of small weights (1-2lbs) onto the upper shoulder straps for the sake of trim.
In warm-water/wetsuits/aluminum cylinders, very little extra weight is normally required – but the SMS100 doesn’t have any weight pockets or dedicated places for weighting.
The solution I use is to put a small webbing strap down the back of the SMS100, onto which conventional weights can be threaded. It will take up to three weights (>4lbs) for a total capacity of 12lbs, plus 4lbs as trim weights on the shoulders.
Detail of the Hollis SMS100 simple weighting solution
To make the simple weighting system, I just use the existing bolts supplied with the single-tank-adaptor (STA). I just take a 1-foot length of surplus 2-inch webbing and put some holes in it (drill or heated screwdriver). You can space several holes at the bottom to allow the webbing to accommodate different sizes of weights.
The webbing runs between the upper and lower STA bolts and should be tight with the weighs added. The surplus webbing can be from cutting down the existing waist belt to fit.
To add or remove weights, simply undo the lower bolt and slide weights onto the webbing. This also gives options to refine your trim, as you can slide the weights (even in-water, with the help of your buddy) upwards or downwards.
The simple weighting system modification on the Hollis SMS100
Buy my ‘Sidemount: Principles For Success’ ebook now!
My comprehensive guide to sidemount configuration and development as a diver.
For some reason, the Hollis SMS100 (and SMS50) don’t ship with front waist D-rings or sliding rings. This is an oversight, as divers using aluminum cylinders need to reposition their cylinders attachments during the dive to compensate for the negative-positive buoyancy shift in their tanks.
Luckily, the Hollis SMS100 does arrive with surplus/superfluous double D-rings on the shoulder straps. It’s a simple task to remove the lower set of D-Rings and place them in front of the hips on the waist belt.
You now have a location to reposition your tanks onto , so that you can retain proper cylinder trim.
All my students learn that the cylinders should be trimmed properly against the diver torso; with valves just inside the armpits and the cylinders in line with the center-line of the side of the torso.
Properly trimmed sidemount cylinders. They should stay in this position regardless of tank buoyancy changes during the dive.
The other minor adjustment at this time is also to make sure that the rails on the SMS100 buttplate are moved to the highest position.
This raises the rear attachment by an inch – bringing the level of the rail attachment and the front D-ring attachment closer together vertically.
This minimizes the lateral movement of the cylinder (bringing the cylinder forwards, valve beyond the armpit) when the diver shifts from rear to forwards attachment points.
Sponsored Link
5. Bungee System
To put it diplomatically, the bungees supplied with the Hollis SMS100 (and SMS50…) are truly horrific and I don’t understand Hollis’ logic in selecting that bungee material for their BCDs.
It is very high tension, thick (12-14mm?), which causes considerable exasperation (and sore fingers!) amongst users.
Very thick, high-tensile bungee might be necessary for extremely heavy, high-capacity, steel cylinders . But it is complete overkill for the vast majority of divers; and certainly for warm-water divers using the ubiquitous aluminum cylinders in most travel destinations.
The Hollis bungee is also pre-sized; with the bolt-snaps stapled in position and heat-wrap sealed. It’s pointless – because the first thing any of my students learn is that proper cylinder trim demands a custom-fitting, individually sized bungee system.
Hollis have to supply very long bungees with their sidemount rigs because the bungee itself is so inflexible… the average diver, without a background in powerlifting sports, struggles to stretch it around the cylinders.
This means the standard Hollis bungees always leave cylinder valves drooping 6 inches below the shoulders and cylinder trim becomes an impossibility.
Replace the stock Hollis SMS100 bungees
I always replace the bungee for my students. For tropical diving with AL80-AL100 cylinders a flexible 6mm bungee is more than sufficient. This is the same, proven, bungee supplied with sidemount rigs like the Razor 2.0, XDeep Stealth 2, Tec or Rec and the Apeks WSX-25.
I teach two bungee methods to my sidemount students; the bolt-snap bungee (split or continuous) and the sliding loop bungee.
Both methods have varied pros and cons. Other methods, like the ‘old school’ bungee and the ring bungee don’t work so well with aluminum cylinders in my experience. I’ve tried and tested all the methods extensively.
Bolt-Snap Bungee
Pros
Universal to any cylinder/valve
Commonplace method
Most instructors can teach this
Cons
Requires bolt-snaps
More effort to don tanks
Takes up shoulder D-ring ‘real estate’
Doesn’t snug the valve under the armpit
Sliding Loop Bungee
Pros
Cheaper – no bolt-snaps
Easy to don and remove tanks
Very effective for cylinder trim
Cons
Optimal with left/right-handed valves
Requires cylinder valves with stems
The Hollis SMS100 ships with a bolt-snap bungee, so if this method is chosen, the only modification is to replace the standard heavy bungee with a 6mm bungee.
To set-up a Sliding Loop bungee, you have to put a small loop of bungee through the nylon webbing of the shoulder harness. Then a larger loop of bungee is threaded through that loop and secured at the rear of the BCD.
I secure it by tying a simple knot around the uppermost small D-ring. The bungee should be sized so that it takes only moderate pressure to pull the bungee forwards to the nipples. It should take more effort to bring the bungees together at the front.
To don a cylinder using the Sliding Loop bungee, the diver needs only take the bungee under their thumb and bring it around the valve and stem. Then they can push the cylinders back under their armpits once they are horizontal in the water.
Currently residing in Subic Bay, Philippines; he has amassed more than 10,000 open-circuit and CCR dives over three decades of challenging diving across the globe.
Andy has published numerous diving magazine articles and designed advanced certification courses for several dive training agencies, He regularly tests and reviews new dive gear for scuba equipment manufacturers. Andy is currently writing a series of advanced diving books and creating a range of tech diving clothing and accessories.
Prior to becoming a professional technical diving educator in 2006, Andy was a commissioned officer in the Royal Air Force and has served in Iraq, Afghanistan, Belize, and Cyprus.
Custom Sidemount Hardware Upgrade With SUMP UK Sidemount Hardware Custom Upgrade With SUMP UK Andrew Goring, at Sump UK, has been busy designing and producing some clever custom hardware for sidemount…
Top 5 Sidemount Adapter Systems A reviewed list of the Top 5 Sidemount Adapter systems for converting backmount wing systems for sidemount diving.
Deco Sidemount BCD Review My dive-tested review of the Deco Sidemount BCD. It's my favourite travel system for warm-water recreational sidemount.
FinnSub 'Fly Side' sidemount BCD FinnSub 'Fly Side' Sidemount BCD Reviewed The FinnsSub Fly Side sidemount is a tear-drop shaped bladder based upon a DIR harness with metal backplate and…
Some Options for Homemade DIY Sidemount Rigs Some Options for Homemade / DIY Sidemount Rigs When I was a new sidemount diver there weren't many commercially sold rigs available. As a result,…
The Best Sidemount Diving Regulators Set Looking for sidemount regulators? This review features all the specifications for the best sidemount regulators sets on the market today!
Aquamundo Sidemount BCD Review The Aquamundo Sidemount BCD I was pleased to be asked to conduct pre-release trials on the Aquamundo Sidemount BCD in Sept 2013 and this is…


Any suggestions here ?????