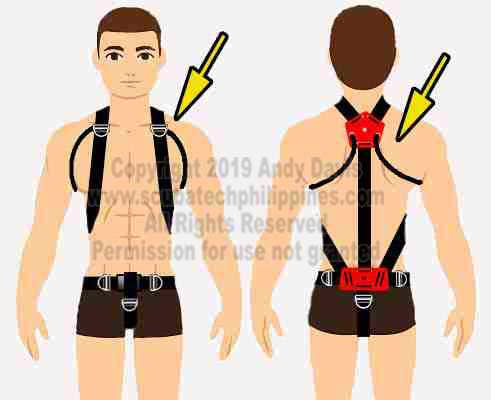
A lot of divers find setting up a sidemount harness to be confusing, even those with experience configuring a backmount harness. As a technical sidemount instructor with nearly two decades of experience, I thought I could help. So, here is my ultimate guide to setting up, sizing, and configuring your sidemount harness.
This article deals with Mexican-style sidemount harness designs; as these are the ones that require the most knowledge and procedure to get right. These types of harnesses can be seen on many of the most popular sidemount systems, like the Razor 2.0, XDeep Stealth, Apeks-WSX, Diamond, Deco Sidemount, and many more. You can even build your own harness quite cheaply and easily using my instructions below:
I’ve tried to keep this article quite ‘generic’, as there are specific details and differences on most ‘off-the-shelf’ sidemount harness systems. Think of it primarily in terms of key guiding principles for configuration.
I’ve also made all of my illustrations without showing the sidemount wing attached as it aids clarity. When putting together your sidemount system, obviously you’d need to attach the sidemount wing at an appropriate stage in the process.
If you are assembling a harness for the Deco Sidemount wing, read these specific instructions:
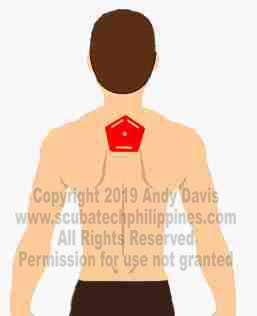
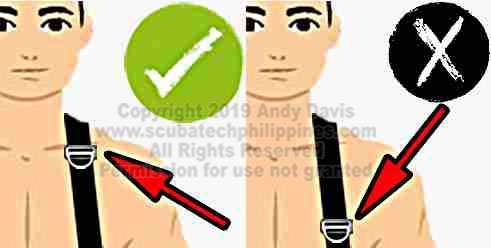
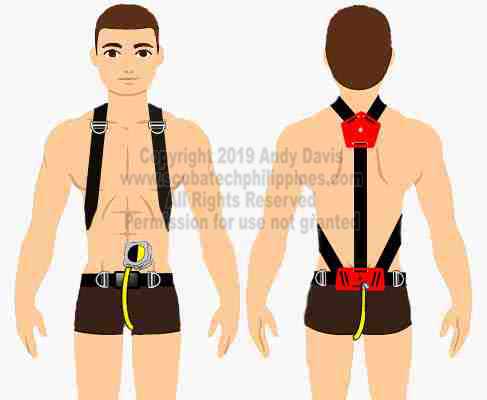
This is always the first step in putting together any new sidemount harness. The top of the sidemount shoulder plate should be just below the C7 cervical vertebrae (aka ‘the prominent bone’ at the base of your neck).
If it’s any higher, it will press into your neck when you’re in good trim. Any lower and you’ll be slackening off your shoulder straps and losing some fit with the harness.
Step 2 – The Sidemount Lumbar Plate
The sidemount lumbar plate should be positioned down, very low over the lumbar region of your spine. That’s the ‘flat’ area just immediately above the crease of your buttocks. If you have a knowledge of anatomy, then the bottom of the plate should be over the S2 vertebrae. A common error is locating the sidemount lumbar plate far too high on the spine. That mistake probably arises from sidemount divers who are more accustomed to diving with solid metal backplates of a set length.
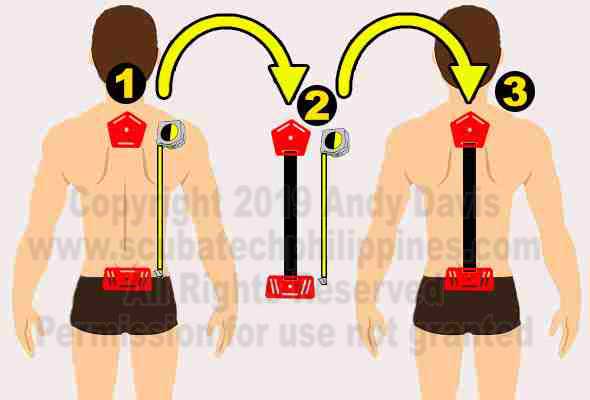
Once you’ve positioned both sidemount plates, get a friend to take the measurement between the two plates.
Using that measured distance, thread and secure the spine webbing between the sidemount plates. Thread the webbing through the slot in the plates and then secure it using weight belt retainers/ tri-glides (top and bottom) back along the main webbing.
With the webbing threaded, secured, and adjusted; you can now hold the plates against your back to ensure you got the distance right.
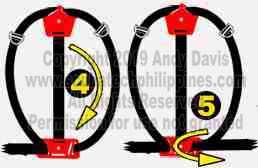
You’d now also attach any spine weighting systems if you were using them. Also, if you are using a loop bungee tri-glides on the spine webbing, thread those onto the webbing also.
The Razor sidemount system comes with a one-piece spine and crotch strap. That makes the setup a lot more problematic. You’d have to size and fit the crotch strap at this time (see directions in Step 7, below). Personally, I don’t like having one-piece spine/crotch webbing; I dive a Razor very often, but I replaced it with a dedicated crotch strap and it’s set up as per this article.
Step 3 – The Sidemount Harness Shoulder Webbing
Once the sidemount harness shoulder and lumbar plates are configured, you can progress to setting up the shoulder webbing. Some sidemount harness systems come with one-piece webbing (i.e. the Razor) and some come with individual shoulder and waist webbing components. Nonetheless, the order and approach remain the same.
There’s definitely a knack for threading the sidemount harness webbing through the plates. It is easy to get confused between front and back and get the webbing twisted. So take it slowly and work methodically with everything laid out flat.
Lay the sidemount harness webbing flat, with the inside facing you.
The harness webbing enters from the inside on the left (as viewed) slot in the sidemount lumbar plate and comes back through the second slot. Now is the time to add a shoulder D-ring.
Route the webbing up to the sidemount shoulder plate and thread it through the slot on that side. Keep track of which side is the ‘inside’ of the webbing.
The sidemount webbing passes through the slot and then doubles back on itself. Then route it back through the opposite slot. The diagram below shows the outside of the sidemount shoulder plate for clarification.
Now route the webbing back down to the sidemount lumbar plate and thread it through the first slot on the plate from the inside. Again, remember to keep track of which side of the webbing is ‘inwards’. Also, don’t forget to add your other shoulder D-ring at this time.
Finish off by threading the sidemount harness webbing back through the remaining slot; from outside to inside.
It’s really easy to make a mistake and get the webbing twisted when doing this. Once threaded through, it then routes off to the right (as viewed).
You should have threaded enough sidemount harness webbing through to the right side (left as worn) for it to reach (just below) your belly button, with maybe 6″ to spare to thread the belt buckle with. The remainder of the webbing should stay on the left side (right as worn).
Before you go any further, make absolutely sure that you didn’t forget to add the shoulder D-rings and that they’re threaded onto the proper side of the sidemount webbing. This seems to be a common oversight that happens quite frequently.
Obviously, the D-rings themselves should be on the outside. The exact positioning will be done later.
This also applies if you use sidemount loop bungees with tri-glides or rubber o-ring on the shoulder strap. They would be fitted at the same time as the chest D-rings.
Once you’re sure that everything is where it should be, then it’s time to fit and adjust the sidemount shoulder webbing. Needless to say, it shouldn’t be too loose, or too tight. Remember to account for the exposure protection you’d be using on your dives when setting up your sidemount harness (or wear your drysuit/wetsuit when actually doing the fitting).
One common mistake is to adjust the sidemount harness shoulder straps too tight, which pulls up the sidemount lumbar plate (see illustration above). The sidemount harness shoulder straps should be sized so that the spine webbing isn’t forced slack; and that the sidemount lumbar plate can hang naturally where you first positioned it.
The sidemount harness chest and waist straps should now be approximately sized, but you’ll probably still need to fine-tune them later with some in-water adjustments.
Want a PDF copy of these instructions? It’s in my eBook…
Sponsored Link
Buy my ‘Sidemount: Principles For Success’ ebook now!
My comprehensive guide to sidemount configuration and development as a diver.
Step 4 – Adding the Sidemount Harness Waist Hardware
Now is the time to add your sidemount harness waist hardware. That’ll either be four D-rings, or a pair of sliding D-rings.
As an aside, I don’t recommend sidemount sliding D-rings in most circumstances. Add them later if the specialist needs demands it. They should never be used as an equipment fix to a skills problem: the skill typically being bolt-snap manipulation.
Sidemount Harness Square D-rings
If you are fitting square D-rings to attach a sidemount pouch, fit them first; right next to your lumbar plate on each side. If not, add the D-rings first on each side.
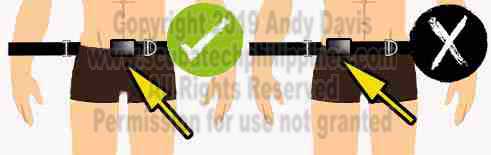
Sidemount Harness Waist Buckle
Then finally add the belt buckle on the left side. I much prefer sliding-type waist buckles. People also call them ‘roll pin’ buckles. They’re lightweight and much easier to cinch and tighten. Unlike a jacket BCD or backmount wing, you won’t need a quick-release buckle with a sidemount harness. Sliding belt buckles are a great upgrade for any sidemount rig.
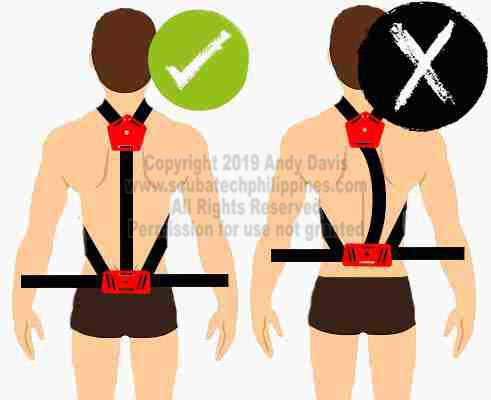
Be observant to ensure that your waist buckle is configured to be in the centreline of your stomach. If your sidemount harness is well configured so far, it should be sitting much lower than your belly button. Most people need it on, or just above, the pubic region of the abdomen.
Trim the sidemount harness to fit
Once you’re sure that your waist buckle is correctly located for when you’re wearing your exposure protection, you can trim off any excess sidemount harness webbing from the side. Leave maybe 4-6″ and secure that back along the inside of the waist strap using rubber loops. Many sidemount BCDs come with these loops provided; but if not, you can cut 1″ loops out of an old bicycle inner tube.
Again, ensuring that you’ve got a good fit, you can now cut away surplus sidemount harness webbing from the right side of the waist strap. There should be enough length to run through the buckle with maybe 6″ protruding.
If you will be switching between drysuit and wetsuit, or are worried about future weight gain, you can leave a longer surplus of waistbelt webbing. That extra should be on the buckle side; folded back inside the waistbelt and secured together with rubber loops.
Don’t forget to burn and melt the ends of the sidemount webbing once you’ve cut it – otherwise it’ll fray annoyingly. Just run a lighter over it until it begins to melt and bubble, then press the end flat with something metal (not your fingers!).
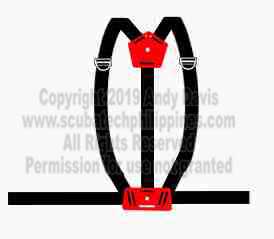
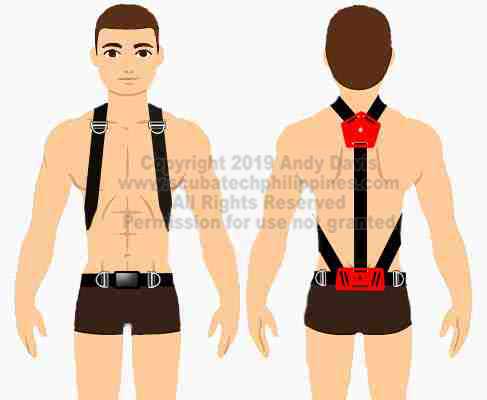
The main elements of your sidemount harness are now mostly all configured. It should look like the illustration above.
Step 6 – Adjusting the Sidemount Harness Chest Hardware
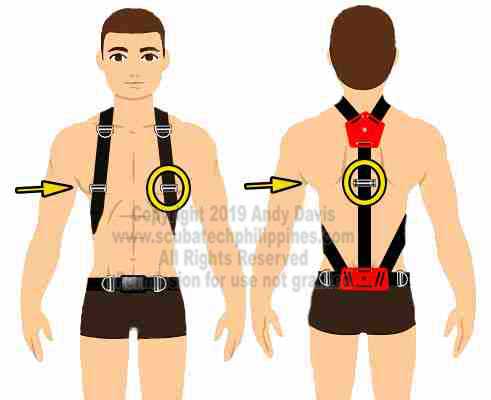
At this time, you can adjust and properly locate the hardware on your sidemount harness. Start with the sidemount shoulder D-rings:
The optimum location for the sidemount shoulder D-rings is just immediately below your collarbones. These D-rings are primarily for attaching stage or deco tanks, but also the long hose will clip to your left shoulder D-ring when not in use.
Trust me, you want these connections up and above any other clutter near your armpits and chest. It pays dividends by reducing task loading and also helps keep stage/deco cylinders better in trim. Properly locating the shoulder D-rings also keeps your long hose second stage out of your armpit and nearer to your chin.
If you need lower attachment points for sidemount bungee systems then fit separate ones at the optimum height on your shoulder webbing. You can use simple fixed tri-glide retainers to secure some 550 cord loops; or even semi-movable rubber o-rings.
I like using the o-ring style, especially with loop bungees. These are the same thick o-rings that come with XDeep Stealth sidemount BCDs for use as sliding D-rings. If you don’t have an XDeep, you can purchase these o-rings from most good plumbing suppliers – the size is 50 x 8 mm (diameter x thickness). For Americans, that’s approximately 2″ x 0.3″. You can find these easily on a Google search; they’re sold on Amazon, eBay, etc.
If using Loop Bungees, you’ll want your bungee attachment points at the level of the armpit. The rear bungee attachment goes at the same height.
The rear attachment can be a simple tri-glide, or you can make a worthwhile investment in some custom hardware, such as Andrew Goring at SUMPUK makes. These are special tri-glides that are extended in length and have two holes on each side, specifically for loop bungee attachment
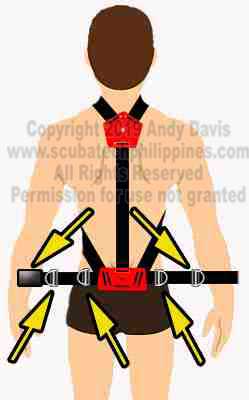
Step 7 – Adjusting the Sidemount Harness Waist Hardware
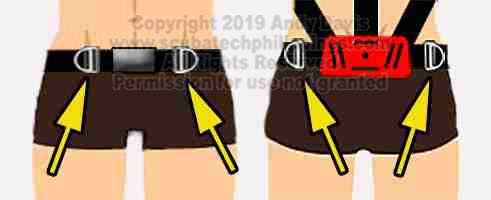
Now is a good time to get all sidemount hardware on the waist belt webbing properly located.
The optimum location of the front and rear waist sidemount D-rings is dictated by two factors:
Your waistline size.
The length of the bolt-snap and leash used for the lower cylinder attachment.
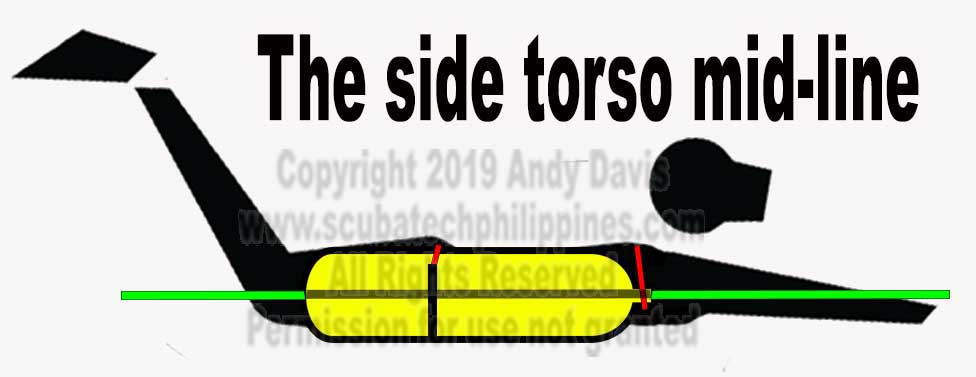
You want your sidemount cylinders to trim out corresponding to your side torso mid-line. That’s the line that runs from your armpit, through your hip, and to your knee… when you are in good trim. Simplistically, it’s where the stitching runs down the sides of a t-shirt.
To get the sidemount D-ring location approximately correct (pending minor in-water adjustments), clip your sidemount cylinder bolt-snap to each D-ring in turn, and adjust the D-ring location on the waist belt.
Move the sidemount D-ring until the bolt-snap leash touches the side torso mid-line. That’s where to locate your D-ring. Do this for each D-ring. You’ll notice that the D-rings should end up symmetrical on each side and also front-to-back. This is one aspect that sliding D-rings makes easier. But they can have some drawbacks later on.
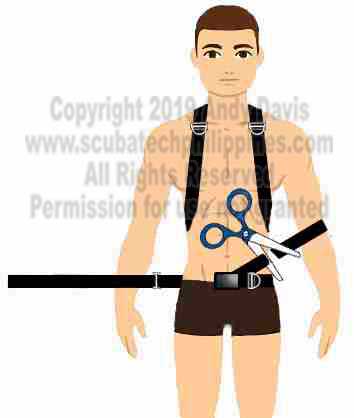
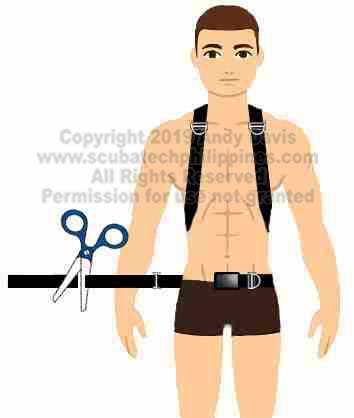
Step 8 – The Sidemount Harness Crotch Strap
Unless you’re configuring an unmodified Razor system with a one-piece spine and crotch strap, you’ll now need to set up your sidemount crotch strap. It usually makes sense to leave this until nearer the end, as the sidemount crotch strap doesn’t affect any other fitting of the harness.
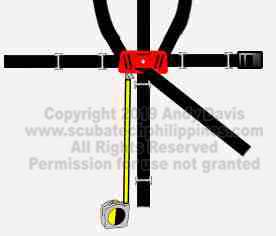
The easiest method is to measure from the base of the sidemount lumbar plate, between the legs, and up to the top of the waist buckle. If you don’t have a tape measure, just use some string and knot it at the correct distance.
Now you can fit the length of your sidemount crotch strap accurately, without having to fumble between your legs. Measure out the correct distance and thread this through the outside of the lower slot on the sidemount lumbar plate. Then secure the surplus sidemount webbing back through the rear crotch strap D-ring tri-glide.
The sidemount crotch strap should be adjusted to fit very snugly, but it shouldn’t be painful. Bear in mind that when diving you’ll be in (I hope!) a proper “trim position” and the resulting slight arch in your spine will reduce the distance between the sidemount shoulder and lumbar plates. This will relax the fit of your sidemount harness; especially the crotch strap. What seems tight when standing, should feel comfortable when diving.
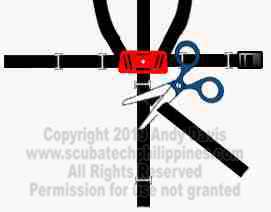
Once you’re happy with the length of the sidemount crotch strap, you can trim off the excess webbing material. Most soft crotch straps come with an excessive length of webbing. Leave maybe 6″ to be sure. Thread the remainder through some rubber loops that you’ve put on the crotch strap.
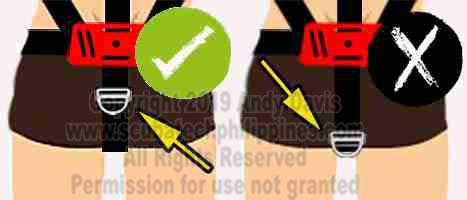
Lastly, you need to properly locate the rear crotch D-ring. That should sit just above the crease of your buttocks, NOT between your buttock cheeks. It’s a common error and an uncomfortable one.
The rear crotch D-ring is where you’ll stow items like reels, spools, and DSMBs. You want to avoid these lumpy objects falling between your legs when diving.
Sponsored Link
Setting up sidemount bungees
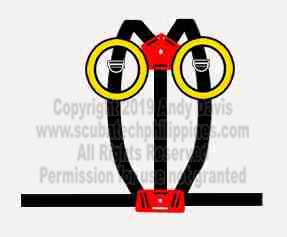
Step 9a – Set up Sidemount Loop Bungees
If you’re using sidemount loop bungees (recommended for most people), then now is the time to fit them. Thread one end of the sidemount bungee through the top of your rear tri-glide, bring it forward under the armpit and thread it down through whatever you’re using as a front retainer (tri-glides or rubber o-rings). Then route it back under the armpit and back through the tri-glide at the rear. Secure it using simple overhand knots at each end.
Test your sidemount bungee length by inserting your thumbs through one strand of the bungee on each side. Bring the bungees together at the front of your chest. As a rule of thumb, the correct length for sidemount loop bungees is when you can stretch them comfortably to the nipples; and at full stretch (high tension) they should meet together at the sternum.
Once sized appropriately cut off the surplus bungee. Leave maybe 4-6″ extra initially; pending in-water testing and adjustment.
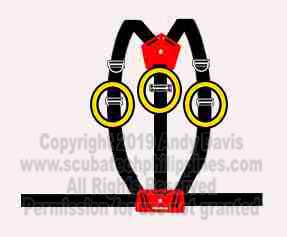
Step 9b – Fitting Continuous or Independent Sidemount Bungees
If using continuous sidemount bungees, they run through the spine strap at the rear – the gap between the main strap and the surplus that you folded back down and secured through the tri-glide. If you like a little more security with continuous sidemount bungees, you can run them through the holes in the lumbar plate.
With independent sidemount bungees, you can run each length from holes in the sidemount shoulder plate at the rear.
For either method, the sidemount bungee runs under the armpit and up to the front harness shoulder D-rings. Most divers connect continuous or independent sidemount bungees to the D-rings via medium-sized boltsnaps. The drawback to that is more clutter on the D-rings; which is especially poignant to technical divers who’ll be adding lots more boltsnaps to those D-rings when they attach multiple deco/stage tanks.
The alternative, which keeps the D-rings less cluttered, is to thread the bungee through/under the webbing where it runs through the D-ring tri-glide. Just thread the bungee between the harness webbing and the tri-glide; then tie an overhand knot on the other side.
With continuous or independent sidemount bungees, the proper sizing is to run it snugly up underneath the armpit. They shouldn’t dangle down below the armpit, but neither should it be painfully tight. Once sized correctly, tie knots in the sidemount bungee to secure it in the tri-glide and cut off the surplus. Leave maybe 4-6″ extra initially; pending in-water testing and adjustment.
I hope that helps some people. If you’re having problems with your own sidemount harness configuration, please do drop me a line! I’m happy to help. Video or photos do help with a diagnosis.
Currently residing in Subic Bay, Philippines; he has amassed more than 10,000 open-circuit and CCR dives over three decades of challenging diving across the globe.
Andy has published numerous diving magazine articles and designed advanced certification courses for several dive training agencies, He regularly tests and reviews new dive gear for scuba equipment manufacturers. Andy is currently writing a series of advanced diving books and creating a range of tech diving clothing and accessories.
Prior to becoming a professional technical diving educator in 2006, Andy was a commissioned officer in the Royal Air Force and has served in Iraq, Afghanistan, Belize, and Cyprus.
Ultimate Guide to Sidemount Cylinder Trim Sidemount cylinder trim is a headache for many sidemount divers. This illustrated guide will help you diagnose the problem & find the solution
Top-5 Best Sidemount Fins 2024 Choosing the right set of sidemount fins is an important decision. They have a profound effect on diver trim and control. With that recommendation in…
How To Set Up Sidemount Loop Bungee How to set up sidemount loop bungee : an illustrated step-by-step guide by Andy Davis. Take the guesswork & frustration out of kit setup.
What are the benefits of sidemount diving? An honest explanation of the benefits of sidemount diving. The pros and cons of sidemount versus backmount gear for recreational, technical and cave divers
The History of Sidemount Diving A complete guide to the history of sidemount diving: how it evolved and the principles that were shaped from differing environmental needs.
DIY Sidemount Helmet Instructions How to make a DIY sidemount helmet for wreck and cave diving. An illustrated and comprehensive guide.