As an experienced instructor who has taught all levels of diving for several decades, including technical trimix and advanced wreck diving, I understand the importance of mastering diving buoyancy control for safe and enjoyable dives. In this very comprehensive article, I will cover topics such as optimal weighting, horizontal trim, breath control, and gear configuration; sharing proven effective techniques to help you accelerate your buoyancy skill development and become a comfortable, confident, and proficient diver.
As a highly experienced dive instructor, I cannot stress enough the importance of mastering scuba diving buoyancy control. Buoyancy control is not only essential for the safety of the diver and improved enjoyment of dives, but also for the protection of the marine environment. It has too many benefits to be neglected. Sadly, far too many scuba diving courses do neglect developing real proficiency with buoyancy control.
The eight benefits of diving buoyancy control proficiency are:
Good buoyancy control is crucial for minimizing the impact of diving on the marine environment. When a diver can reliably maintain neutral buoyancy, they avoid touching and damaging delicate marine life. It also prevents silt and sediment from being stirred up and choking the coral reefs. With good buoyancy control, divers can move through the underwater environment without disturbing the natural ecosystem.
2. Equipment damage and injury prevention
Maintaining neutral buoyancy also helps protect the diver and their equipment from damage. Poor buoyancy control can lead to accidental collisions with delicate or hazardous marine life, corals, and other underwater features. Increased proficiency with diving buoyancy helps to prevent the risk of injuries, such as abrasions, contusions, lacerations and stings. It also helps avoid damaging your expensive dive gear and other costly equipment like cameras or GoPros.
3. Efficiency, relaxation, and enjoyment
Mastering diving buoyancy control can improve the diver’s experience underwater by making dives less physically demanding and more relaxing. With good buoyancy control, divers can fin more efficiently, whilst reducing the amount of energy they need to exert. This can lead to a more relaxed and enjoyable dive experience, allowing divers to fully appreciate the underwater world around them.
4. Reduced gas consumption
Mastering buoyancy control not only benefits the diver’s safety and enjoyment but also their gas consumption. Divers who have good buoyancy control consume less gas, which increases the duration of their dive. This is because the diver is not using propulsion to maintain depth. This results in less muscular exertion; reducing respiratory demand and decreasing gas consumption. Lowering gas consumption allows for longer dives where the diver would otherwise have to surface because they were low on air.
5. Safe controlled ascents
Maintaining proper diving buoyancy control is essential for a safe and controlled ascent. Improved buoyancy skill allows the diver to maintain an optimal ascent rate and hold their safety stop at an accurate depth, reducing the risk of decompression sickness and causing less fatigue after their dive. Many beginner divers have been scared by uncontrolled ascents, and rightly so because they are dangerous. Improving proficiency with buoyancy control means that won’t happen.
6. Increased situational awareness
When a diver has good buoyancy control, they will enjoy reduced task loading throughout their dives. Lowering task loading has the direct effect of freeing up their brain to absorb and process more of the details around them. This can mean that you notice far more marine life during your dives. It also means you are more likely to observe problems with your dive buddy; increasing your ability to proactively avoid emergencies from arising.
7. Wreck diving buoyancy control benefits
Wreck diving is an enormously popular activity for scuba divers. However, wreck diving requires very reliable buoyancy control skills to avoid disturbing silt and not cause injuries or equipment damage from collisions with the wreck structure. With good buoyancy control, divers can safely maneuver around the wreck without risking silt outs or damaging themselves.
8. Better buddy skills
Buoyancy control is essential for safe and effective diving with a buddy or team. Good buoyancy control allows divers to remain closer to their buddy or team, enabling more ability to quickly provide support when it is needed. It can also help prevent buddy separations, which are most likely during descents and ascents. Being proficient in buoyancy control makes emergency skills, such as air-sharing ascents, far easier to achieve.
Sponsored Link
The 4 factors reducing diving buoyancy control
Diving buoyancy control is a critical skill that is fundamental to safe and efficient diving. It involves achieving neutral buoyancy at any given depth, which allows divers to effortlessly move through the water and conserve their air supply. Several factors can impact a diver’s buoyancy control, and this article will explore the most significant ones.
The four factors reducing diving buoyancy control are:
Overweighting
BCD familiarity
Wetsuit compression
Gas consumption
Overweighting
Overweighting is a common issue among novice divers. Superfluous weight increases the amount of gas the diver puts into their BCD. More gas volume in the BCD causes more expansion as they ascend. This makes buoyancy hard to control and is the reason why beginner divers suffer uncontrolled ascents when they reach shallower water.
1kg (2.2 lbs) of weight displaces approximately 1 liter (.22 gal) of water. To compensate for every 1kg of surplus weight, the scuba diver needs to add 1 liter of air to their BCD. Each liter expands constantly as the diver gets shallower: from 10m (33ft) to the surface that volume doubles. This makes neutral buoyancy near-impossible in shallow water if there are even small fluctuations in depth.
Eliminating unnecessary weight means that you’ll have less gas in your BCD. That, in turn, makes your buoyancy far easier to control.
BCD familiarity
Equipment familiarity is developed through effective deliberate practice and the acquisition of experience. Struggling to add or release the correct amount of gas from the BCD is a major factor in why divers struggle with accurate buoyancy control.
Divers should make a point of practicing locating and operating the BCD Low-Pressure Inflator (LPI). Securing the LPI properly against the BCD shoulder strap keeps it in a consistent position; which makes locating it faster. Speed of dumping gas is particularly important when ascending because gas expansion in the BCD is occurring. Fumbling for an LPI can lead to uncontrolled ascent.
It is a common novice mistake to not fully elevate the LPI when trying to dump gas from the BCD. This consequently allows some air to remain in the BCD (even though the LPI deflate button is depressed).
Similarly, make sure to practice operating the BCD’s lower pull dump valve. This enables the diver to release gas from the BCD without having to get into a vertical position. It’s quicker and it promotes more consistent horizontal trim; which is a huge benefit that I’ll describe later.
Invest some time mindfully practicing the operation of your BCD’s LPI and lower pull-dump valve. The aim is to make finding and using those BCD dump valves an unconscious and reliable habit.
Wetsuit compression
Wetsuits compress at depth as they are exposed to increasing pressure, and this reduces the buoyancy they provide. They also decompress on the ascent, increasing the diver’s positive buoyancy as they get shallower.
Neoprene material contains a volume of trapped air, which creates an amount of buoyancy relative to a wetsuit’s size and thickness:
An average 3mm 1-piece wetsuit has less than 1kg buoyancy uncompressed.
A 5mm 1-piece wetsuit has 2-3kg buoyancy.
A 7mm 1-piece wetsuit has around 6.5kg buoyancy.
Adding a hood, vest, and gloves to a 7mm wetsuit results in approximately 8.5kg uncompressed buoyancy.
You can confirm the uncompressed buoyancy of your own wetsuit by simply putting it in a mesh bag and seeing how much weight needs to be added to sink it.
That positive buoyancy has to be balanced with sufficient weighting to allow descent. As we descend, the reduction in the suit’s buoyancy has to be compensated for by the addition of air to our BCDs: this should be the only reason why we add any air to the BCD. On the ascent, a wetsuit decompresses and regains positive buoyancy. This also needs to be compensated for by removing gas from the BCD.
Understanding the buoyancy properties of your wetsuit helps you determine accurate weighting. This, in turn, enables easier diving buoyancy control.
Gas consumption
Air has a weight of 1.2 grams per liter. As the diver consumes gas from their cylinder throughout a dive, it reduces their buoyancy. When a diver breathes half of the gas (100 bar/1500psi) from an 11L AL80 cylinder, they will have lost 1.32kg (2.205lbs) of weight.
Consequently, divers need to carry weight to compensate for the lost weight of the gas that we use from our cylinders during the progress of the dive.
If you have your own cylinders or know what cylinders you’ll use on a dive, you can check the manufacturer’s cylinder specifications to know exactly what the buoyancy characteristics of the tank are. This helps with making your weighting more accurate.
The three methods to calculate optimal dive weighting
Proper weighting is crucial to scuba diving safety and enjoyment. Insufficient weight can cause an inability to descend, while excess weight can lead to uncomfortable and dangerous buoyancy issues.
Overweighting is regrettably common in scuba courses. It just makes the instructor’s job easier; especially when they are teaching skills with students kneeling on the bottom (which isn’t recommended!). To ensure optimal buoyancy control, scuba divers need to confirm their accurate weight requirements.
There are 3 methods for checking scuba diving weighting:
Basic weighting guidelines
Pre-dive weight check
End of dive weight check
Basic weighting guidelines
Basic weighting guidelines for scuba diving serve as a simplistic ‘rule-of-thumb’ starting point when first setting up a weight belt. These guidelines only provide a vague estimate of the required weight, taking into account the buoyancy of exposure suits and body size. However, in practice, these calculations tend to cause divers to be substantially overweighted.
The basic scuba weighting guidelines are as follows:
Swimsuit or dive skin: +0.5–2 kg (1–4 lb)
3 mm wetsuits: +5% body weight
5 mm wetsuits: +10% body weight
7 mm wetsuits w/hood: +10% body weight + 1.5-3 kg (3–5 lb)
Neoprene drysuits: +10% body weight + 3–5 kg (7–10 lb)
Trilaminate drysuits: +10% body weight +1.5–3 kg (3–5 lb)
It’s essential to keep in mind that weight requirements may vary according to individual factors such as gender, body composition, lung capacity, and water salinity. Women should add 4-5 lb of weight (~2 kg) if diving in saltwater or subtract the same amount for freshwater. Men should add 6-7 pounds (~3 kg) if diving in saltwater or subtract the same amount for freshwater.
Quick pre-dive weight check
The quick pre-dive check is a critical step that confirms whether the initial weight estimation is correct. This check only ensures that the diver has sufficient weight to descend, but does not confirm they will have enough weight for the end of the dive when they have consumed weight of gas from their cylinders and will be more positively buoyant.
To carry out a pre-dive weight check, follow these steps:
Take a deep breath and hold it at the surface.
Cross your ankles to prevent any instinctive fin movement.
Keep your arms against your body to prevent any instinctive sculling.
Hold your Low-Pressure Inflator (LPI) vertically upward and release all the air from your buoyancy control device (BCD).
You should now float at approximately eye-level in the water.
Exhale the breath that you were holding.
You should now begin to slowly sink.
If you do not sink, add further weight until you float at eye-level while holding a normal breath and can sink when you release that breath.
Add weight to account for air used during the dive (if you know the specifications of your cylinder you can be exact, otherwise you’ll have to guestimate 2-3kg (4-6lbs).
If you subsequently struggle to hold your safety stop at the end of the dive, with an empty BCD and not making the mistake of being vertical and finning, then you’ll know you need a small amount of additional weight.
Accurate end-of-dive weight check
An end-of-dive weight check confirms the exact minimum weight required to maintain neutral buoyancy under these circumstances. You should consider this as the ‘gold standard’ of weight checks.
To conduct an end-of-dive weight check, follow these steps:
Hover horizontally at 3-5m depth while breathing normally and without sculling.
Deplete the air in your cylinder to 35 bar/500psi.
Empty your BCD completely.
Incrementally add or remove weight until you are neutrally buoyant (small weights are best for fine-tuning).
Experiment with changing your lung volume to fine-control your buoyancy.
Once minimum scuba weighting requirements are confirmed, divers can be confident that they have enough weight for the initial descent and to hold a safety stop with minimum air remaining in the cylinder. This establishes a strong foundation for effective buoyancy control, making diving considerably easier.
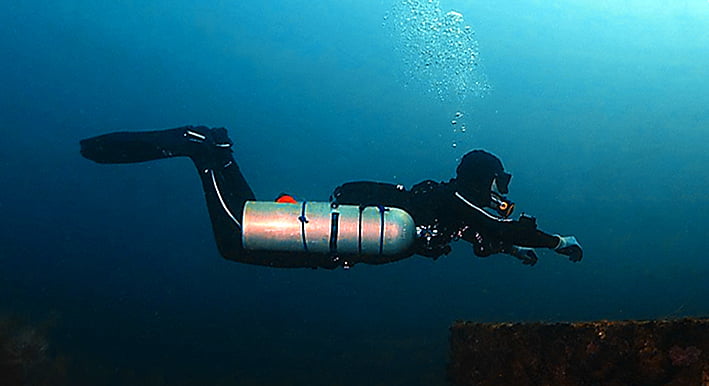
Master horizontal trim to improve diving buoyancy control
Horizontal diver trim is crucial for speeding up the development of diving buoyancy control. When you are horizontal in the water, especially when using a frog kick or when static, it becomes near-impossible to use propulsion as a means to compensate for maintaining depth. When deprived of that ability to compensate, or ‘cheat’, you are forced to maintain depth by becoming neutrally buoyant; accurately adding or removing gas from the BCD, and consciously varying your lung volume when breathing.
If you are in a feet-downwards orientation when finning, a proportion of your thrust is holding you at depth. This is why many divers notice that they start sinking whenever they stop finning. True neutral buoyancy is rarely achieved when diving; so it’s not improved as a skill.
The only true measure of neutral buoyancy, which eliminates the risk of masking, is to practice hovers in horizontal trim. Remaining static doesn’t allow fin propulsion to conceal being negatively buoyant.
Diving out of trim masks deficiencies in your ability at diving buoyancy control. This is, unfortunately, why some unscrupulous instructors don’t attempt to correct students with bad trim or even teach divers to hover in horizontal trim at all.
When out of trim, you are not neutrally buoyant. Some of your propulsion is keeping you at depth.
Staying in horizontal trim is temporarily harder, for sure, and it will initially make you feel less in control of your buoyancy. That’s exposing reality and it can be disheartening. However, embracing that reality and making the extra effort is what triggers meaningful skill development. The divers who avoid horizontal trim, and make excuses for not using it, tend to be the ones who won’t develop proficiency in the long term.
Addressing the following steps will help you develop reliable and consistent horizontal trim; helping you to accelerate the process of mastering buoyancy control.
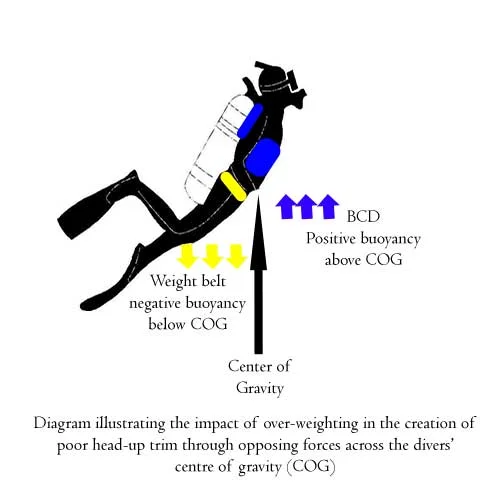
Step 1: Optimize your weighting
The first step towards achieving a flat horizontal trim is to ensure that the diver is not over-weighted. Overweighting creates a push-pull effect across the diver’s center of gravity (CoG). The weight belt is below their fulcrum and the gas in their BCD is above it. This misbalance causes the torso to rise and the legs to lower. Minimizing the weight carried, and the air in the BCD to compensate for it, reduces the severity of that effect.
Step 2: Use the correct posture
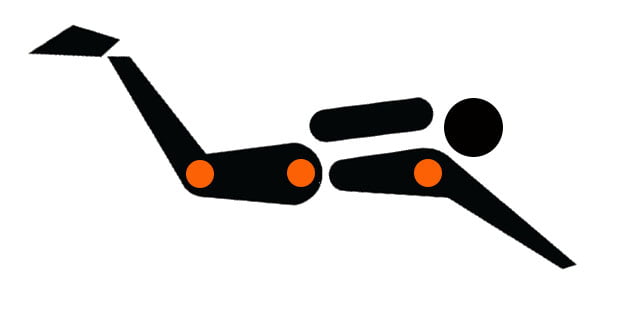
The correct posture to facilitate horizontal trim is to keep your body flat; the shoulders, hips, and knees should be in a straight line. The chin should be raised and the arms can be adjusted into, or away, from the body to tweak your balance. Usually, the knees are bent at 90 degrees with the fins parallel to, but above, the level of the body.
Correct posture for horizontal trim
The key to maintaining correct diving posture is to keep the hips ‘locked’. This is best achieved by slightly clenching the buttocks to drive the hips forward. Some divers make the mistake of believing that correct posture is achieved through arching the back; avoid doing this because it causes strain and injuries. The spine should be aligned straight and level at all times.
Common mistakes with diving posture that ruin trim:
Dropping the knees: dropping the knees causes the diver to pivot feet downwards out of trim. They will rotate into a vertical position.
Extending the feet: straightening the legs can cause the diver to pivot the feet downwards. The lower legs are heavy and extending them further from the torso maximizes the leverage effect of that weight.
Lowering the chin: if the head drops, the body will pivot the head downwards.
Step 3: Balancing weight distribution
The final step to creating innate horizontal trim is to balance the distribution of weight along your body. This includes lead weights and also the calculated choice of other equipment, such as fins, that enable you to be naturally trim underwater.
Divers can remove some of the weight from their belts and replace them with trim weights to resolve major problems in their hover. Trim weights are small weights that can be attached to the cylinder cam bands, BCD, or ankles.
Fine-tuning can be achieved by experimenting with the location of the diving cylinder on the BCD and the specific items of diving equipment. The choice of positive or neutrally buoyant fins can also play a role in trimming, as can arm positioning during the dive.
Step 4: Deliberate practice of horizontal trim
To improve horizontal diver trim, divers should invest some time to deliberately practice their trim. Simply going diving is not enough to achieve meaningful and efficient skill development; you have to spend time exclusively focused on improving a specific skill.
Deliberate practice is most effective with immediate corrective feedback. Work with a mentor or competent buddy who can observe you, ensure that your technique is correct, and guide you where improvement is needed. If you don’t have a skilled partner to practice with you can record your practice sessions on a GoPro video camera and watch the footage afterward for critical self-analysis.
Use breathing for precision diving buoyancy control
As a scuba diver, understanding the connection between breathing and buoyancy control is paramount for a safe and enjoyable dive. Every breath we take affects our buoyancy, and mastering lung volume control can make all the difference when navigating underwater environments.
Breathing and buoyancy control are closely related when scuba diving. The lungs, being air spaces, affect buoyancy by displacing the weight of water. In this article, we explore the relationship between breathing and buoyancy control.
The lungs and diving buoyancy control
The lungs have a relatively large capacity of 4-6 liters, of which there is a ‘tidal volume’ that varies as we inhale and exhale normally (0.5 liters on average). A set volume of about 1 liter (called residual volume) always remains, as our lungs cannot completely collapse on exhalation. A full, forced exhalation and inhalation can vary the volume by as much as 5 liters, which affects buoyancy as air volume equates to buoyancy.
Breathing patterns and buoyancy changes
For each liter of water displaced, buoyancy increases (1 liter = 1kg freshwater / 1.03kg saltwater approx). Therefore, a 3-4kg buoyancy shift can occur from full exhalation to full inhalation. Divers can effectively add or subtract about 2 kg (4 lbs) of buoyancy to compensate for minor variances during their dive.
Lung Volume Control
When considering buoyancy control, it is easy to identify the positive applications of manipulating our lung volume. By breathing deeper and slower, our increased lung volume will increase buoyancy and raise us in the water. Conversely, breathing slower and shallower will reduce our buoyancy.
This is especially useful to enable a diver to temporarily gain or lose buoyancy without having to re-adjust the air volume inside their BCD. The primary uses for this would be to navigate above or below a small obstacle or compensate for deviations from ideal neutral buoyancy; for example, when trying to hold an accurate depth during a safety stop.
Lung volume control is intended for fine-tuned buoyancy control; the BCD should be used primarily, and the effectiveness of controlling buoyancy with breathing is dependent on the diver’s weighting being correct.
The limitations of breathing for buoyancy control
Breath control and lung volume variability should not be used as a persistent aid to maintaining a given depth. The diver should always aim to breathe naturally, only using shallower or deeper breathing for brief corrections in buoyancy. At no point should a diver ever hold their breath.
Diving buoyancy control during ascents
Accurate diving buoyancy control is critical when returning to the surface as it minimizes the risk of decompression sickness from rapid ascents and/or missed safety stops.
Diving buoyancy control allows an accurate ascent rate
It is essential to maintain an optimal ascent rate during diving ascents. Recreational divers should not exceed a rate of 9-10m (30-32 ft) per minute until reaching their safety stop. Going much slower can lead to an inefficient off-gassing of dissolved nitrogen from the body; actually increasing the risk of decompression sickness.
From the safety stop (5m) to the surface, divers should take an absolute minimum of 1 minute (3m/10ft per min ascent rate) to account for the largest pressure differential in shallower water. Some very experienced divers prefer to allow 3 minutes to ascend the final 3m/10ft (1m/3ft per min ascent rate).
Mutual buddy is crucial during the ascent, as this is the most hazardous stage of the dive; the divers are most positively buoyant, air supplies are low and the divers are saturated with nitrogen.
Dive buddies should closely match and maintain their depth and ascent rate to ensure timely assistance in case of problems arising during the ascent; they must remain especially vigilant and focused because there is little reaction time available if someone starts an uncontrolled ascent.
Regularly making short ‘mini-stops’ throughout the ascent helps gauge ascent speed and confirm near-neutral buoyancy. Divers should never let themselves become so positively buoyant that a deep exhalation would not arrest the ascent.
Diving buoyancy control on safety stops
Sloppy depth control on safety stops can have a negative physiological effect on divers. Even relatively small fluctuations in depth, when the diver is very shallow, subject the body to substantial pressure variations. Repeated variations in pressure promote the formation of bubbles inside the body. In worst-case scenarios, those bubbles may grow large enough to be diagnosable as DCS. In less severe cases, they can cause observable post-dive fatigue, malaise, and sleepiness.
As a technical diving instructor, I aim to hold stops accurately within 25cm (10″) of my intended target depth. That would be a huge challenge for a beginner diver, but it is not a bad target to aim for. Doing so will help develop your buoyancy control skill. With a little practice and focus, it is not unrealistic to develop buoyancy accuracy within 50cm (20″).
While safety stops may not be mandatory according to dive tables or dive computers, it is advisable to complete a 3-minute or longer stop to mitigate decompression sickness. Divers should only abort a safety stop in scenarios like low-on-air, strong currents, or medical emergencies.
If diving repeatedly or deeply, divers should consider extending their safety stop beyond the advised 3-minute duration to maximize the off-gassing of nitrogen from the body. Use this time to practice buoyancy and core skills like mask clearing or air-sharing drills with the buddy.
About The Author
Andy Davis is a RAID, PADI TecRec, ANDI, BSAC, and SSI-qualified independent technical diving instructor who specializes in teaching sidemount, trimix, and advanced wreck diving courses.
Currently residing in Subic Bay, Philippines; he has amassed more than 10,000 open-circuit and CCR dives over three decades of challenging diving across the globe.
Andy has published numerous diving magazine articles and designed advanced certification courses for several dive training agencies, He regularly tests and reviews new dive gear for scuba equipment manufacturers. Andy is currently writing a series of advanced diving books and creating a range of tech diving clothing and accessories.
Prior to becoming a professional technical diving educator in 2006, Andy was a commissioned officer in the Royal Air Force and has served in Iraq, Afghanistan, Belize, and Cyprus.
The Balanced Rig Principle For Diving The balanced rig principle for diving describes a calculated approach to the amount of weight which can be jettisoned in an emergency
10 Tips To Horizontal Hover When Scuba Diving The ability to horizontal hover when scuba diving is the benchmark of fundamental skills proficiency. These tips will help you master hovering
Using Your Hands Whilst Scuba Diving Using your hands when scuba diving is inefficient for maneuvering. Learn how to break this habit and become a better scuba diver.
7 Diving Buoyancy Tips That You Need To Know Divers often struggle with their buoyancy. These essential tips are game-changing to set you on the right path for consistent improvement.
Learning Scuba Diving Skills On Your Knees Scuba diving skills taught in a kneeling position cause a plethora of problems for divers. Training in neutral buoyancy is very important!